Jan 20 2014
Welcome to the second page 🙂 But don’t forget the read page 1 first
After the first coat of paint on the tub I thought it would be a good place to start a second page in the restore.. scrolling down to the bottom was getting to be too much.
While I wait for paint to dry.. 🙁 I thought I’d see about the dash board design.
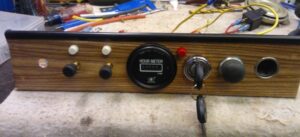
I lined them up the way I would like them to be on the dash.. From the right.. 12 volt outlet, Horn button , Key switch / with a power light above, Hour meter, Running lights, Head lights, And the choke will be next to that.. In the back is the relay that will kill the motor when the key is off.. All of this will be on an aluminum panel mounted at a slight angle in front of the control sticks. The only other thing on the rest of the dash will be the original HOLY- SHIT handle in front of the poor passenger. Not considered and not forgotten is a winch control.. later. Got the switches and stuff. mounted to the aluminum ( old deactivated road sign). Just need to cut out the shape and make the bends. The fuse panel will be up inside. Ya… wood grain .. but it’s a bit more to my liking than naked aluminum. The choke is still missing .. and so are the labels. But we have indicator lights for , power on , running lights and head lamps.

This is a far cry from what there originally was on the Bazoo. There was just a key switch , hour meter 12 volt outlet and choke control. The dash panel will easily remove with just four screws for access to the wiring. It took me a whole day to build this.. but I like this kind of stuff. I left the painting of the second coat on the tub till the evening, so I would not be working around wet paint all day.
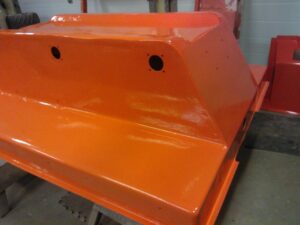
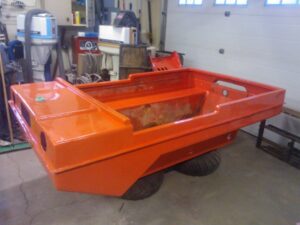
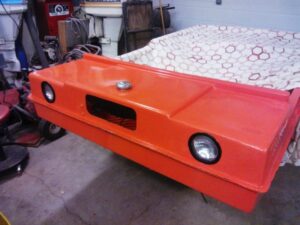
Nice and shiny.. the way we like it.. After a days curing the tub will go right side up on some stands. Tub’s over… and I was trying the interior covers on for size..
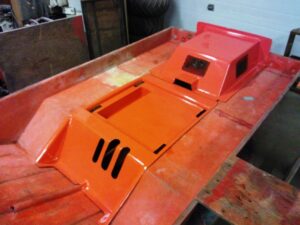
They are now in great shape. I still need to paint the screens satin black. And to figure a way to anchor them down. The seat holds the front one down.. but the motor cover needs a way that makes it easy to lift up. And hopefully no holes in the tub. Got lots of time to figure it out.
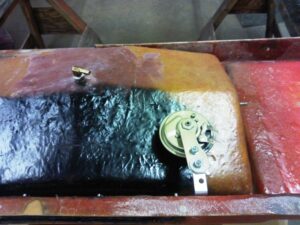
After trying several different ways .. I settled on this. hope it’s not to loud for the operator 🙂 Also in the photo is the new gas tank fitting.. threaded in there tight .. should not leak. I will test before I mount the top on the bottom..
I had to work fast before the resin set up.. just got the two together in time.. I used a slim strip of fiber mat and resin as glue. Tomorrow I’ll lift the body up a bit higher for painting.
Sunday February 16 th 2014
Well another Sunday …and more work on the Bazoo to be done. Last night I got the first coat of paint on the top side of the Bazoo. And because I only have just enough paint to finish.. I only painted the interior parts that will show. The plywood that was bolted to the insides of the sides will be replaced with new plywood. That is why I left those holes along the sides unfilled. I plan on staining & varnishing the wood, not painting it. I feel that the plywood helps give strength to the body. As for the second coat.. I will wait till the evening so I’m not working around wet paint all day .. and I’ll do some other stuff..like cleaning and painting the motor..
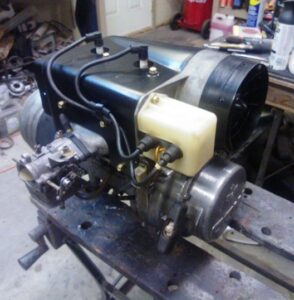
Motor Time !
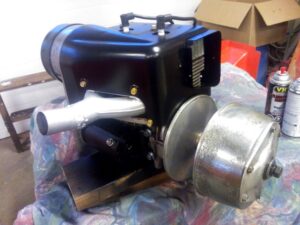
So yes I did take the motor apart clean and paint the parts.. It took all day.. but the result is worth it.. High heat paint on the exhaust header, Satin black on the starter , cowl and air intake. Will it run better ? don’t know. It ran fine so now it will look good running fine.
Transmission Time :
It was the transmission’s turn.. So I removed the secondary drive (in background) & the output gear. I slit the case apart and had a good look inside.. nothing wrong..no metal pieces.. So I cleaned the halves and resealed them.. Should be good to go..
I’m also trying something brave.. I painted the rubber headlamp mounts with the flexcoat bumper paint.. They are / were white from the factory.. very grubby and would not clean up.. If the paint won’t stand up to the flexing then I’ll have to think of another way. I’m not doing the white trim thing like from the factory.. I want black.
They are just 35 watt tractor lights.. but I could not find LED’s that are the same size.. These work ok so they stay for now. And I’ll be keeping at least some nostalgic stuff.
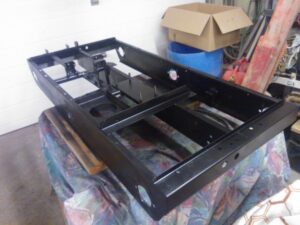
The frame got it’s satin black paint job tonight.. and looks good.. Next I’ll be cleaning and painting the bits that go on the frame..
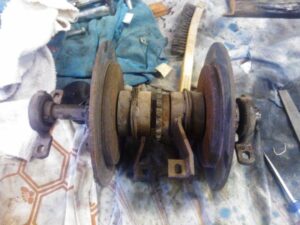
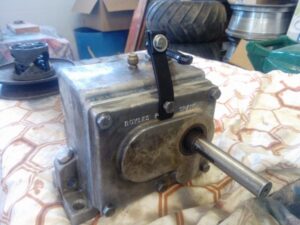
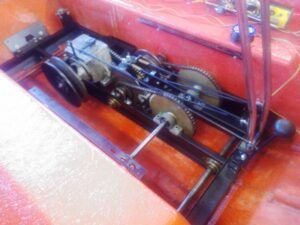
This is a critical part in the 6×6 drive system. It takes the power from the transmission and splits it to the two sides.. and the brakes for steering as well.
This is in very good condition. Not worn down at all. Lots of pad left on the clutches.. and the discs are good. Seen also in the photo is the control handles, they are chrome and I’ll leave them that way. Here’s the Two Clutches & both brakes are put back nice & clean.. Lots of adjustments on this system..
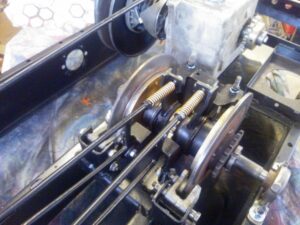
I don’t know what else to call the two split drives that are after the clutches.. so I’ll call them the secondary drives.. The final drives being the chains that join all the wheel axles together. Any Who.. the brunt of the abuse seamed to be here.. A lot of torque is on those small sprockets. And the key way in the axles show it.. ( upper right hand in photo) I bought new keyed 3/4 axle, and new bearings , key stock.. collars too. I took a break for a few days till I could get to Kelowna to get these supplies.. now its time to have at it again..
This post is also getting too long.
Also time to start a third Bazoo Page…
Page 3