March 2013..
This is the new post for the restoration of the Performer.. And this is page 1 dedicated to the work done in 2013. Page 4 is for work in 2014 I decided to start this new post and the pages cause I thought the old post would grow too big.. A fresh start..and..so I had been determined to complete the boat by the summer of 2013.. but that did not happen.. But look at what I did get done..
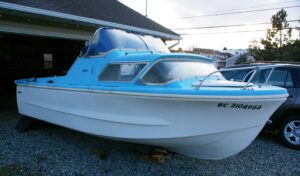
She’s a good looking boat ! And I’m naming her after our much loved and sadly departed Kitty “Bessy” We had Bess in the family for a long time… Boats should have names and this seems fitting.
Today I made some support blocks up and dropped the boat onto them.. It’s easier to work on the boat when it’s low and not tipsy. This weekend I’ll set up the garage over her.. and put some lighting in there.
Look I can just step over the stern to access the boat..cool. When I went to Kelowna to get the garage I also picked up some fiberglass supplies ..including white Gel-coat for the hull. I’m getting a price on solid teak hardwood flooring too. And I decided to completely strip the boat’s inside down to the fiberglass. Yes that means new cabin walls and rebuilding the berths too. There’s just too many holes in stuff.. And the rear bulkhead for the motor well will be raised higher and moved back a bit for more room.
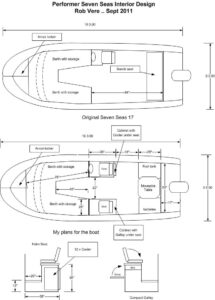
Just once more I thought I’d show the plans for the boat.. I haven’t changed anything except give myself a bit more room at the stern..
This photo is my inspiration for the color scheme I like.. it’s a 50’s car color and the boat is also 50’s so it just works for me. It’s going to look great with the teak interior too. We’ll see if this all comes together.
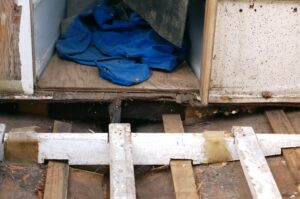
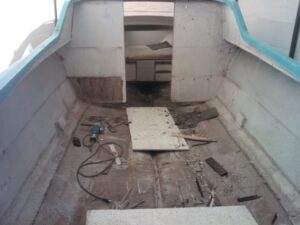
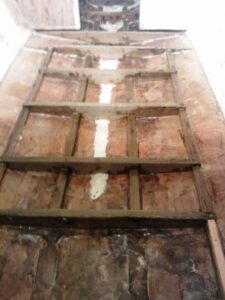
You can see in this photo that the floor under the cabin is in bad shape.. at least the part you can see.. The 1/2″ ply bulkhead walls are in good condition.. But they need to be firmly attached to the floor.. so maybe instead of removing them I’ll cut them up an inch or so and then add a piece back on the bottom after the floor is in.
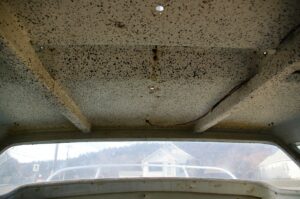
The roof of the cabin will get some Finnish as well. To make it look nice and to hide some wires. The wood beams are in perfect condition so I will probably just paint them..
Day 1
Got the garage up today.. so the boat is safe & dry. Dave & I removed all the windows ,fittings… and stuff from the boat.
I Bought my own oscillating multi tool today and gave it a try.. going to make short work out of removing all the wood. It flush cuts very nice.
The plan is to clean out most of the interior of it’s wood parts. Then rebuild the stringers , ribs and the floor. Also replace the rear bulkhead and some of the transom. Everything will be glued and fiber glassed into place. This puts the strength back into the boat. Then I plan to roll the boat 45 degrees to one side and re-gel-coat that side of the bottom.. Then do the other side. After that the top of the boat will get its fresh blue paint. And then it’s time to start putting things back together.. and finishing the interior.. Wow all before July.

I Had Help for the day… it takes two to undo the bolts holding things on. Now it’s stripped down.
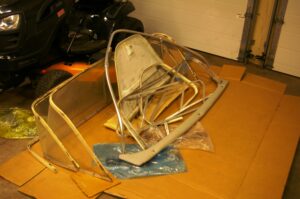
Here’s the pile of parts. They will need cleaning up..
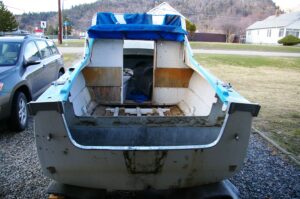
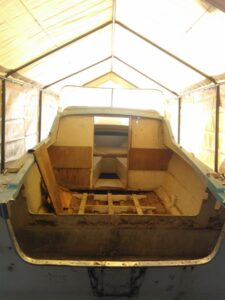
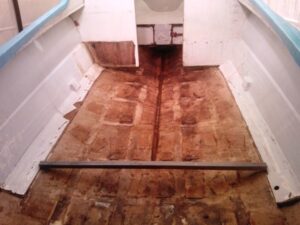
In two days I’ve got a lot done.. All the floor right to the front is gone.. I’m not touching that chamber in the bow.. there’s no floor there, there’s no ribs or stringers .. The bow doesn’t need support. You can see I cut the cabin walls about a half an inch above the floor. There’s no rot on them.. but there was lots under the floor in the cabin.. bad ! All that’s left is to grind it all flat. And I need to remove the inside layer of the transom..
Today I scrubbed in inside of the boat.. You can see a stick I’ll use to locate the floor level. I also cut out a new transom piece from 3/4 ply.
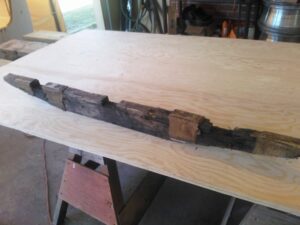
Here you can see one of the many ribs I removed .. not much left.. and just bands of fiberglass holding them down.. I’ll do better..
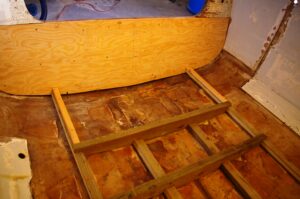
Here’s the new 3/4 inch inner transom.. Glued..screwed.. and clamped. This has hopefully taken the bow out of the transom too. I don’t want to remove the clamps for 24 hrs. I’m using Polyester construction sub floor adhesive.. Waterproof and strong.. I’m gluing the four stringers into place with it as well.. using big concrete blocks for weight.
So far so good.. The glue is holding good. The resin and mat with be the real strength in the end. The bottom of the boat takes a real beating with the water & waves. So the only thing that is strong enough will be multiple layers of fiberglass. Here it’s all in.. ready for the mat & resin.. Using foam to fill gaps. Today I got the resin & mat out and was determined to get that part done.. 4 Litres of resin and a lot of mat. Got it done.. after it’s all cured I’ll put a 1×4 down the middle for the floor to join on.. I’ll need to get the 1/2 ” ply for the floor..
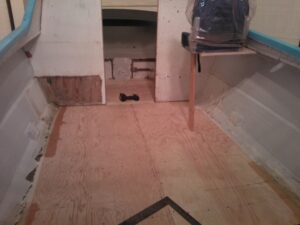
The floor is now in and very solid. It turned out good.. I used lots of PL Premium glue and coated deck screws. Today I glassed in the outer edges to the hull. I’m also taking the time to plan the cabinets and seats.. and so I’ve made a few adjustments to some measurements on the plans. Nothing to much just a tweak here and there..
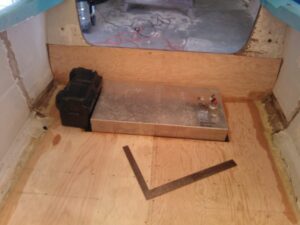
Nice place for the tank & battery box. The aluminum tank is 18 gallons.. lots for a long day. We tested the fuel gauge too. Works great. Next is the inner wall for the motor well.
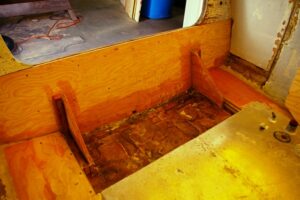
My Friend Dave had a great Idea ! Two braces are better than one .. So I made these up and fit them so the fuel tank fits nicely in there.. Glassed them in and now a much stronger transom.. I like. And before I install the motor well wall I’m going to rebuild the berths & lockers in the cabin. Much easier when you can just step over the stern.
But Summer is coming and other stuff to do … so the Boat got put back on it’s trailer and moved to the franknport.. I’ll bring it back out in the spring and continue then. In the mean time I’ve added goodies from older campers to my pile of parts.. I have more stoves and sinks and pumps …. etc to choose from.