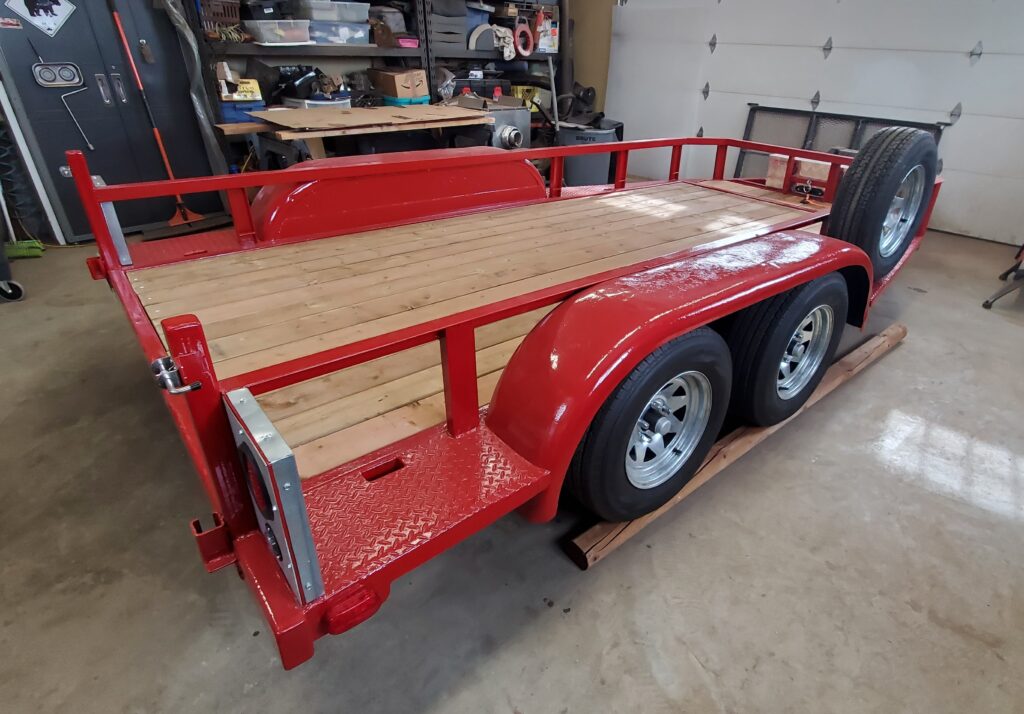
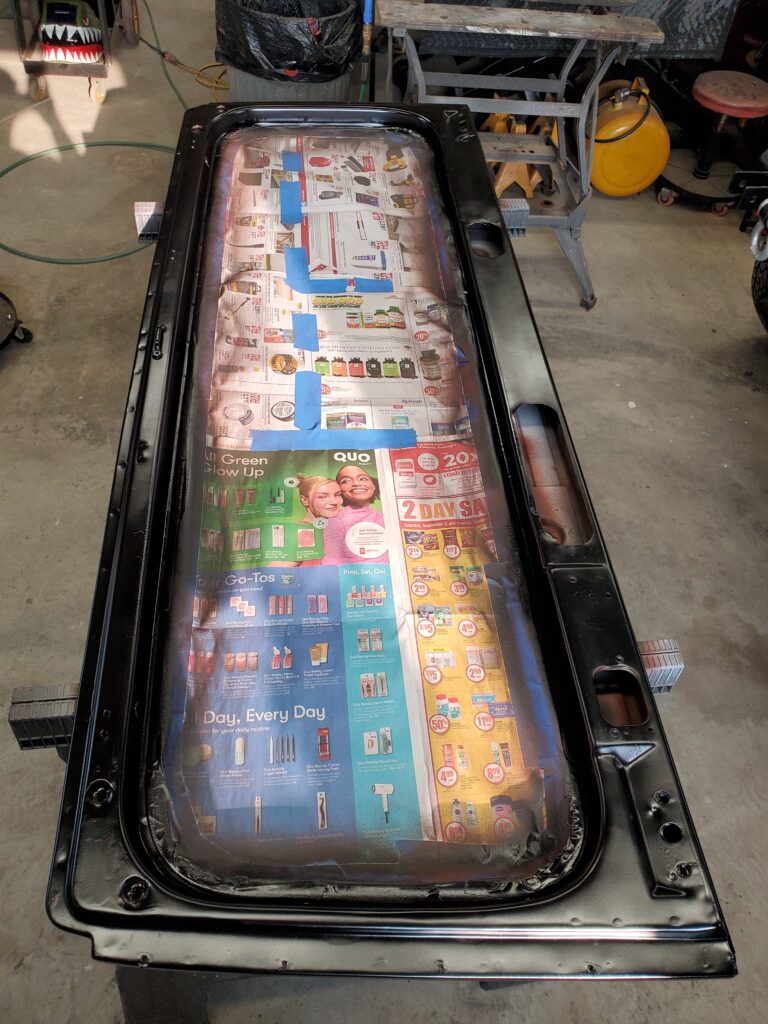
Yup home stretch.. finish the deck just need to paint the tailgate. Here’s what we have so far..
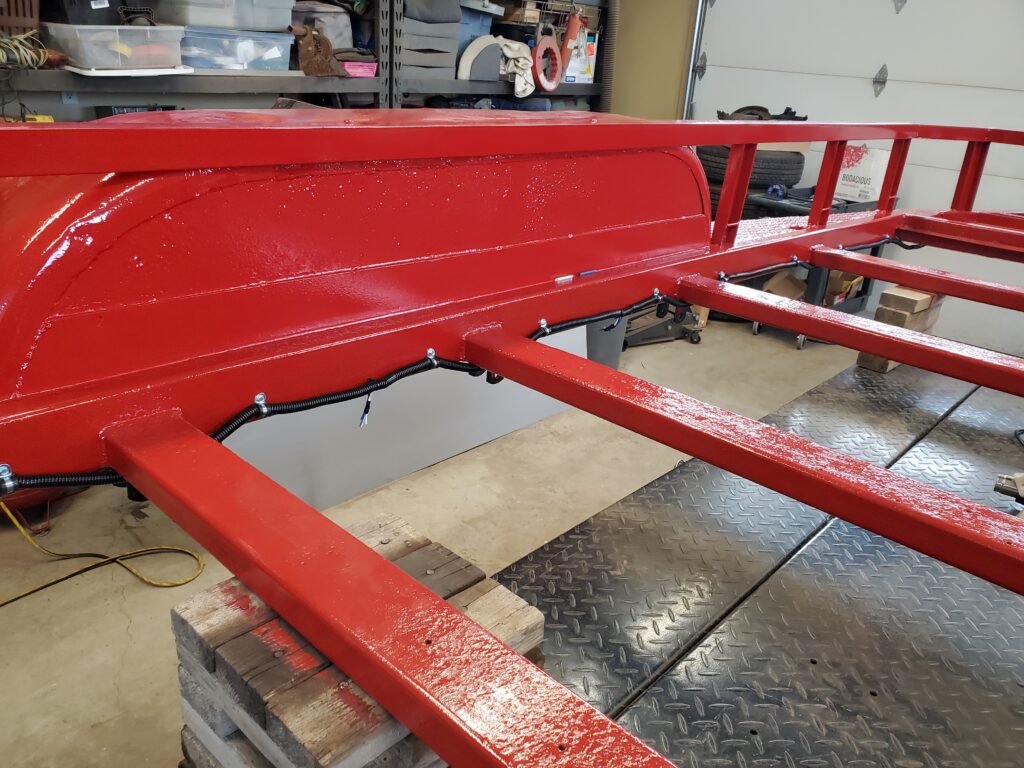
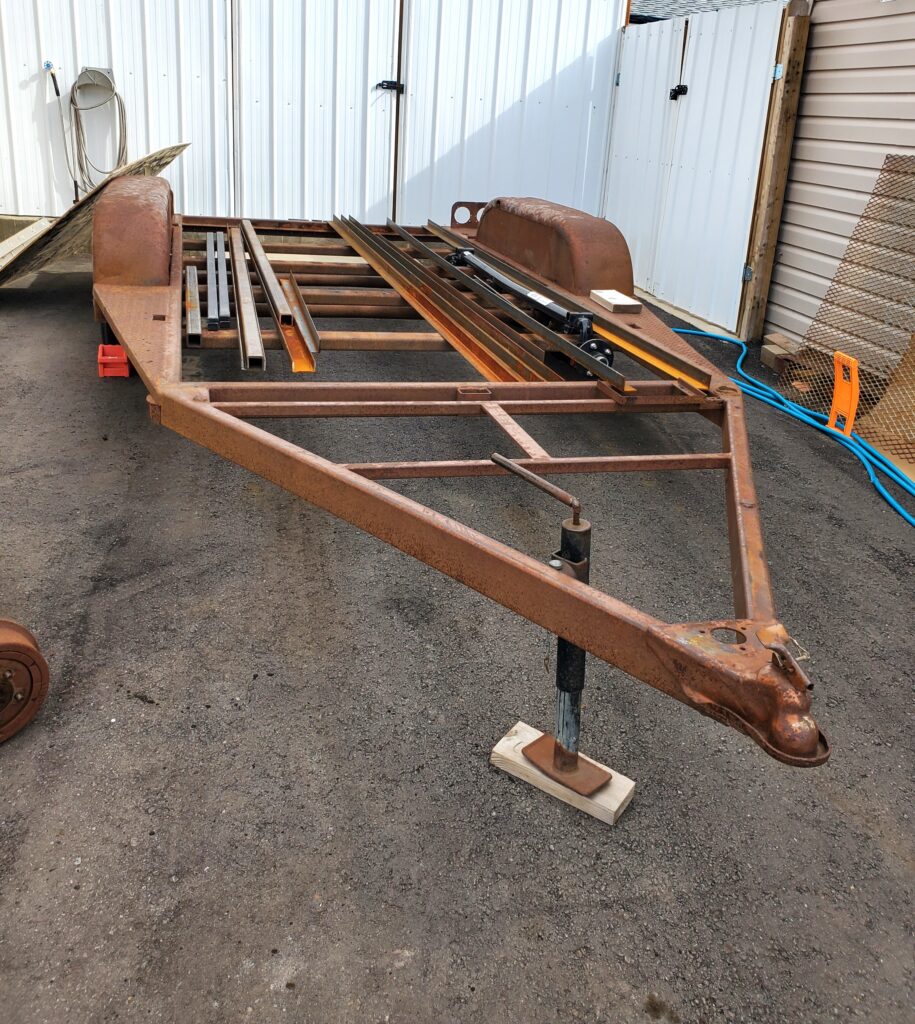
What’s with the landscape ties you ask? The 3 ” of extra lift means the axles clear the lift table.. Yes it’s hiding under there.
Pardon the wide angle shots. That’s how I can get the trailer in the photo. One more…
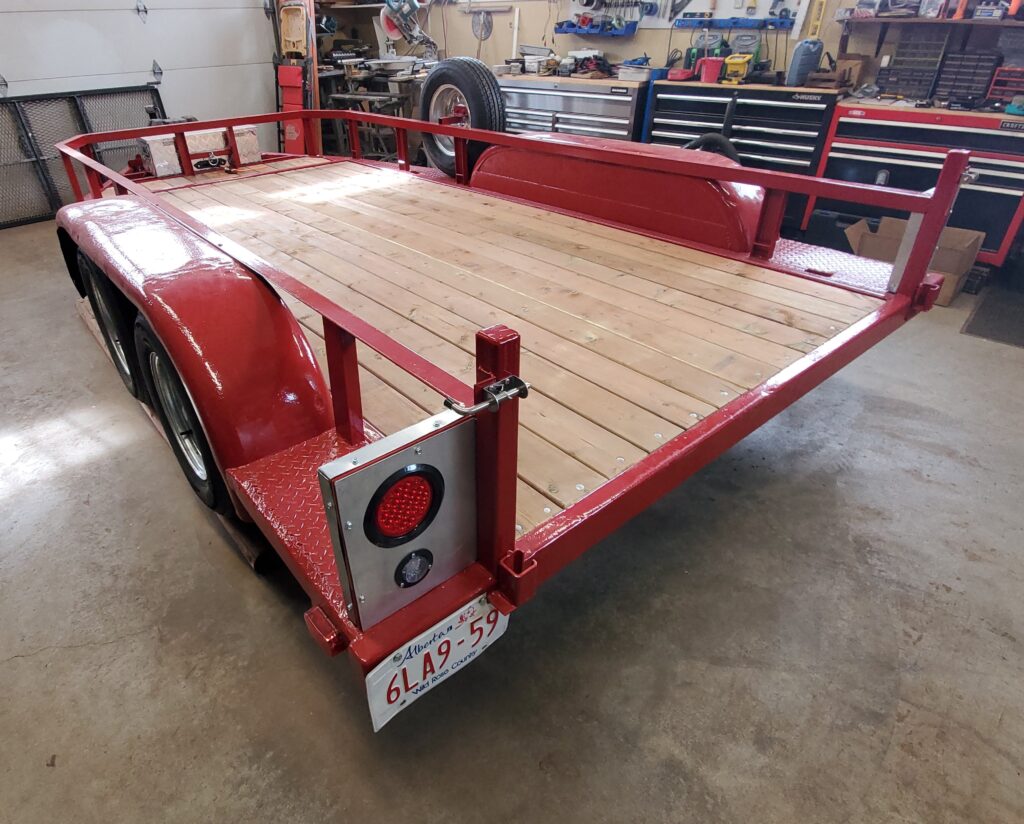
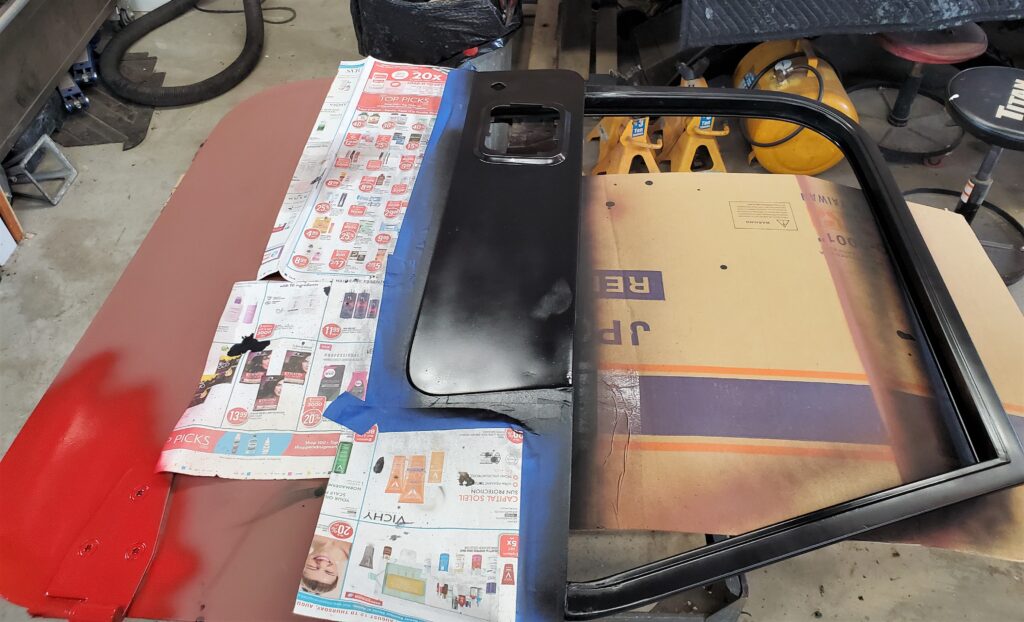
Impressive ! Too bad I’m selling it soon. but I have no need for this size of trailer, nor the space to park it. On to the tailgate… It’s all painted now AND the trailer is listed for sale. May take awhile for the right buyer.. Meanwhile I’ve remounted the tailgate.
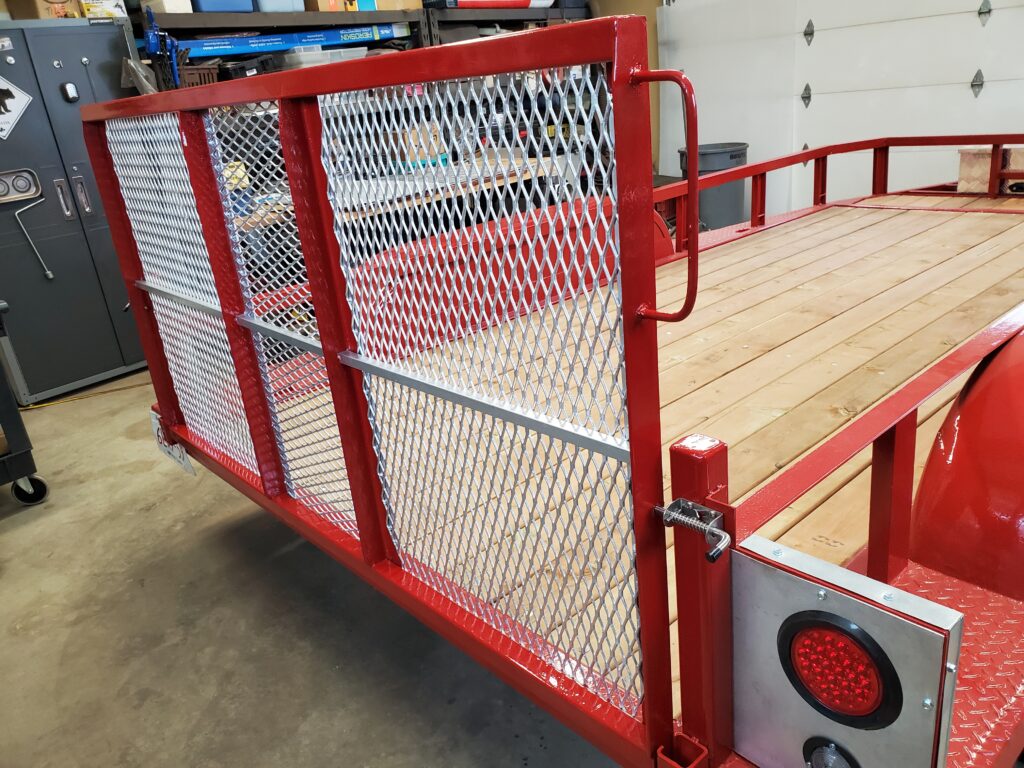
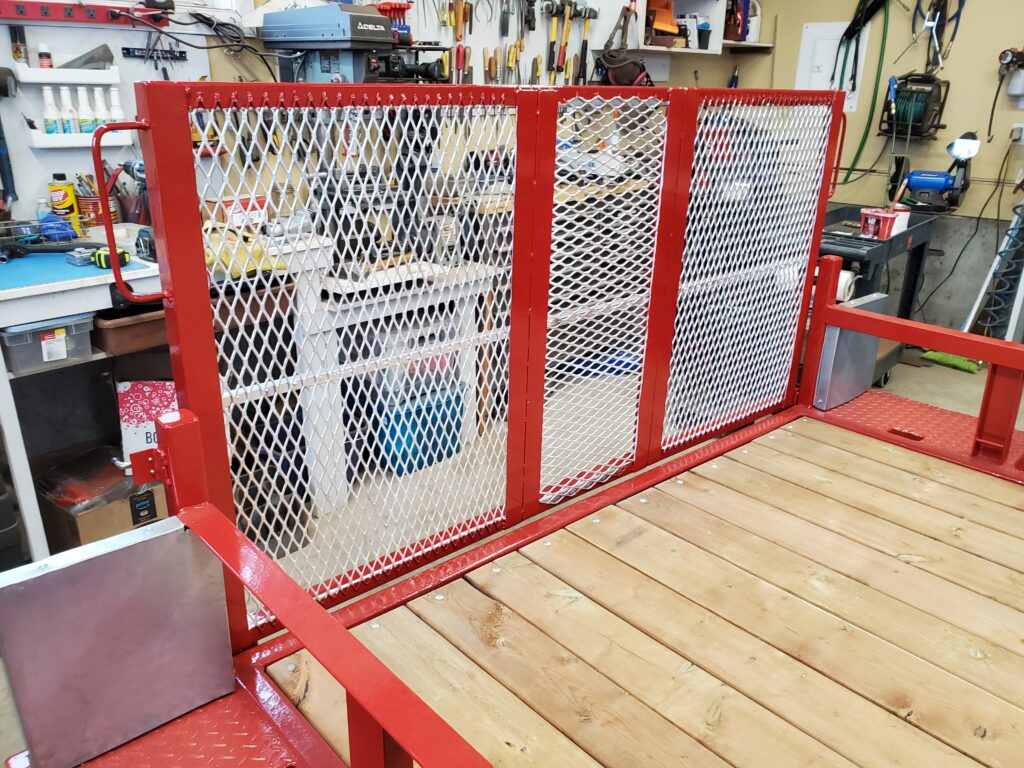
Just a bit fancy, but following the theme for the trailer. It’s easier the spray paint the mesh, and I had a can of aluminum.
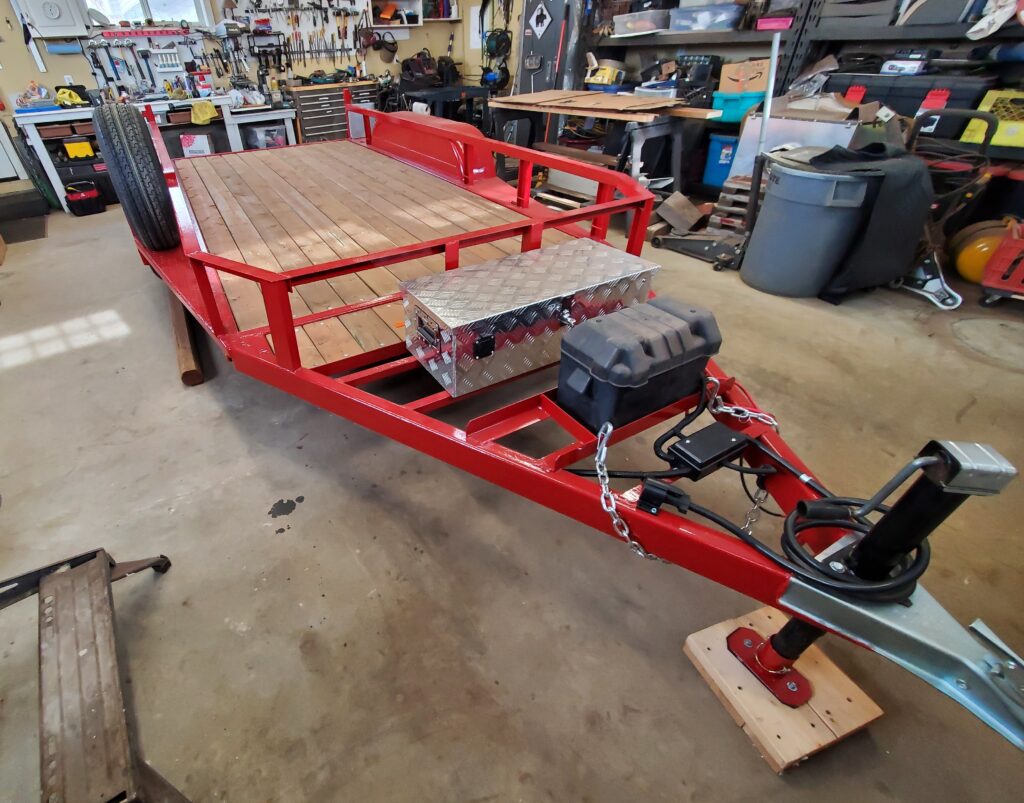
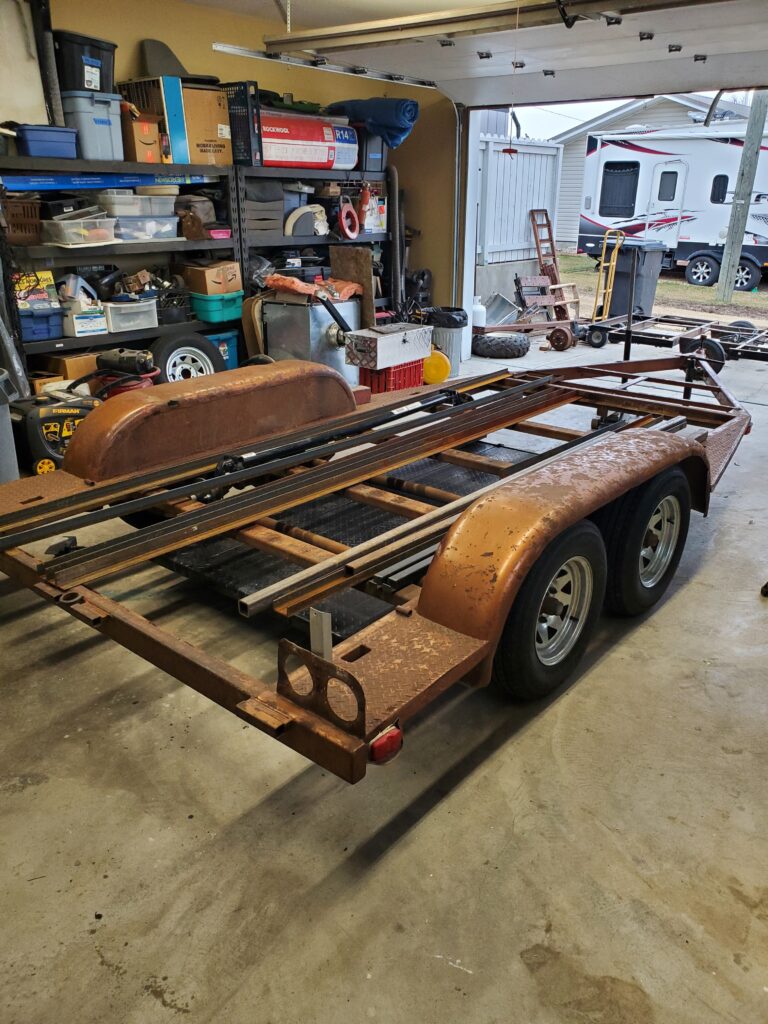
Nice big grab handles. The trailer is still 3 ” off the ground because of the lift table. It will be interesting to see how a 36″ ramp works for angle once the trailer is sitting properly on the ground.
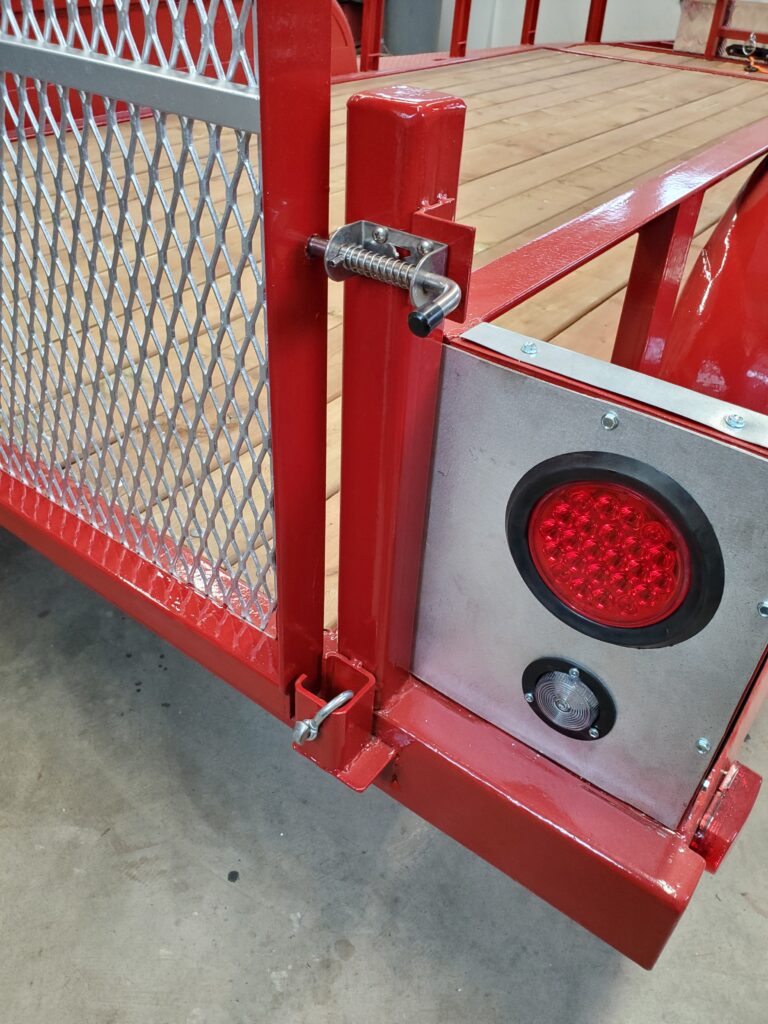
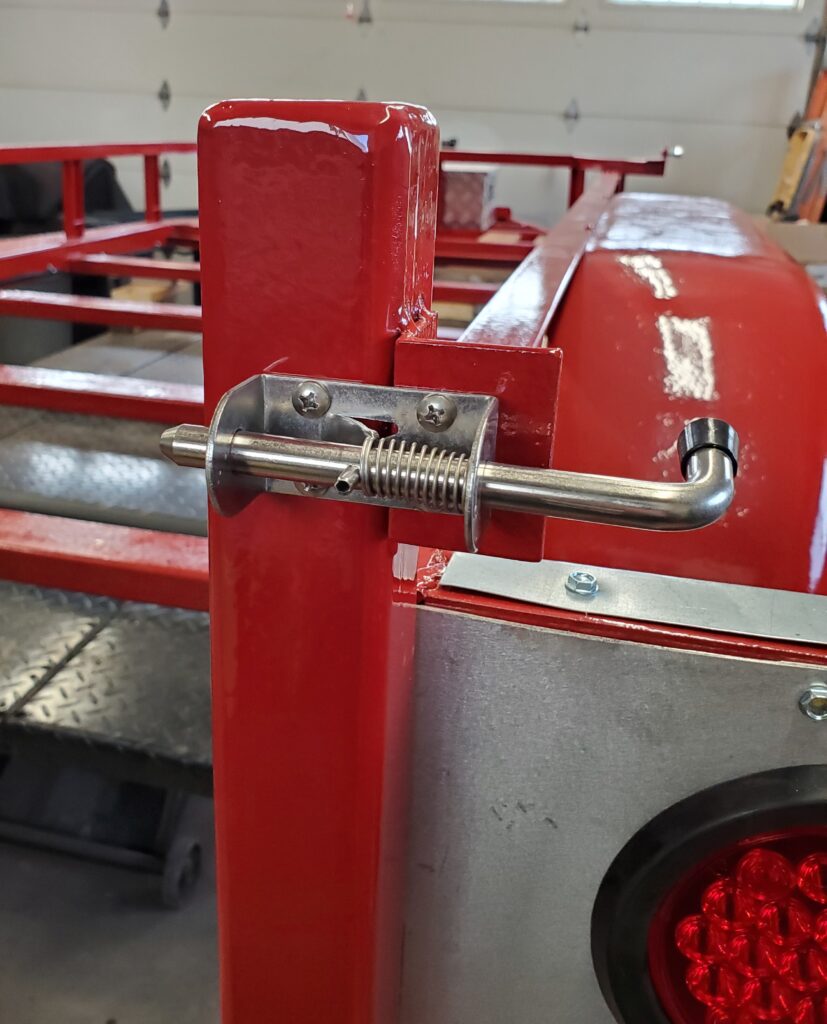
And lastly a look at my latches and the shackles to keep the hinge pin from popping out when you use just a handle on one side. And of coarse you would do that. now we can say DONE ! Here’s a final video:
It’s staying inside for now because winter is once again happening. Plus we are waiting for a buyer.
But first proof I know what I’m doing when wiring a trailer!
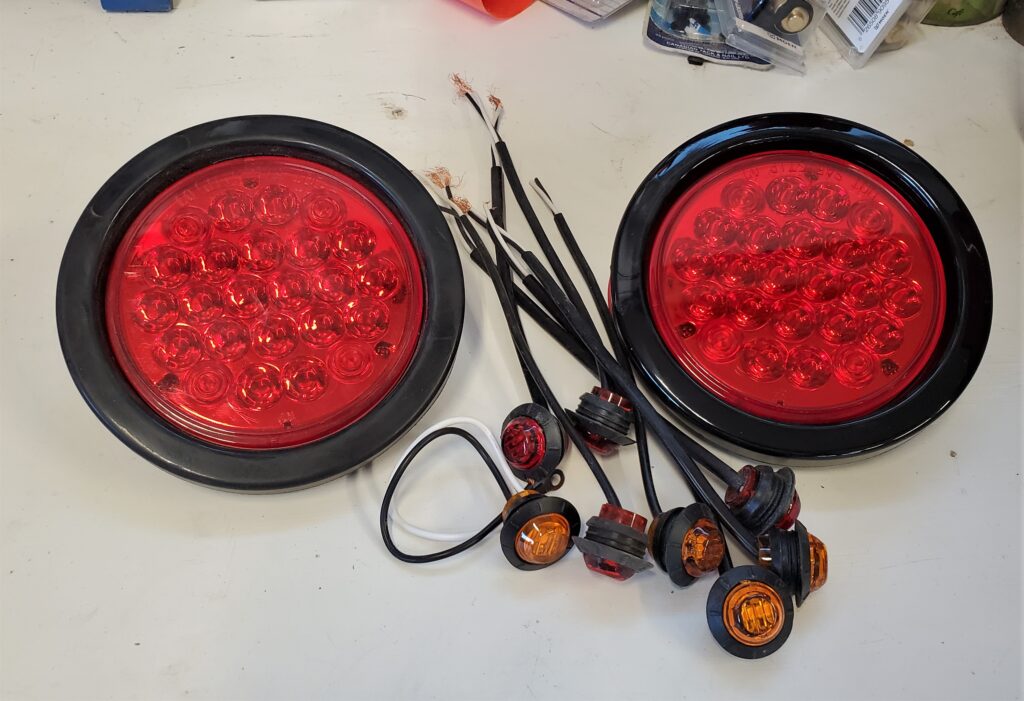
I’m also taking the time to make covers for the front side of the tail lights. That’s what the old galvanized chimney cap is for. Those are now done and I’ll take a photo when they are finished. The big thing done today ( with the help of my Son) was getting the axles under the trailer.
I made some brass shims for the eyes of the springs, and got them bolted up. All new parts! good for another 30 years. Putting the brakes back on is the next step. But first these covers finish the tail lights nicely and keep the wiring out of sight and protected.
There is likely different ways I could have done the lights but here it is and screws can be removed to fix any wiring issues. Onward to the brakes…
Them’s the BRAKES !
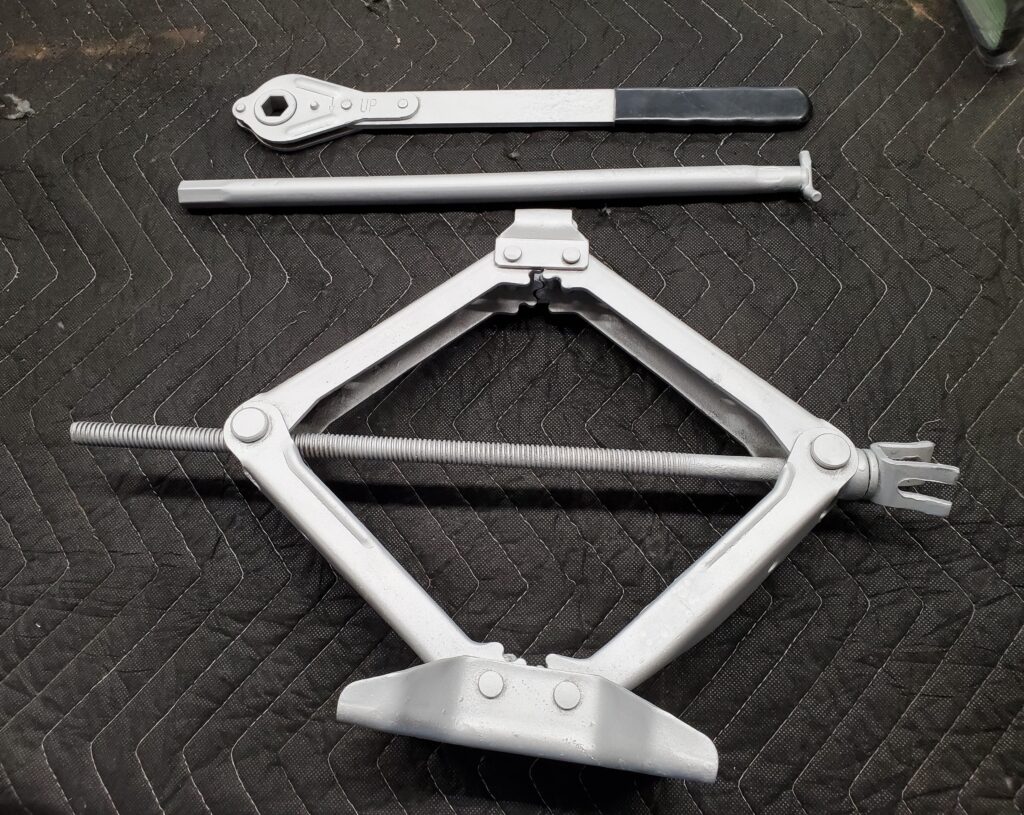
Remember I spent a lot of time cleaning and painting the parts for the bakes. And I have the special tools for brakes too. And just like that we are done.
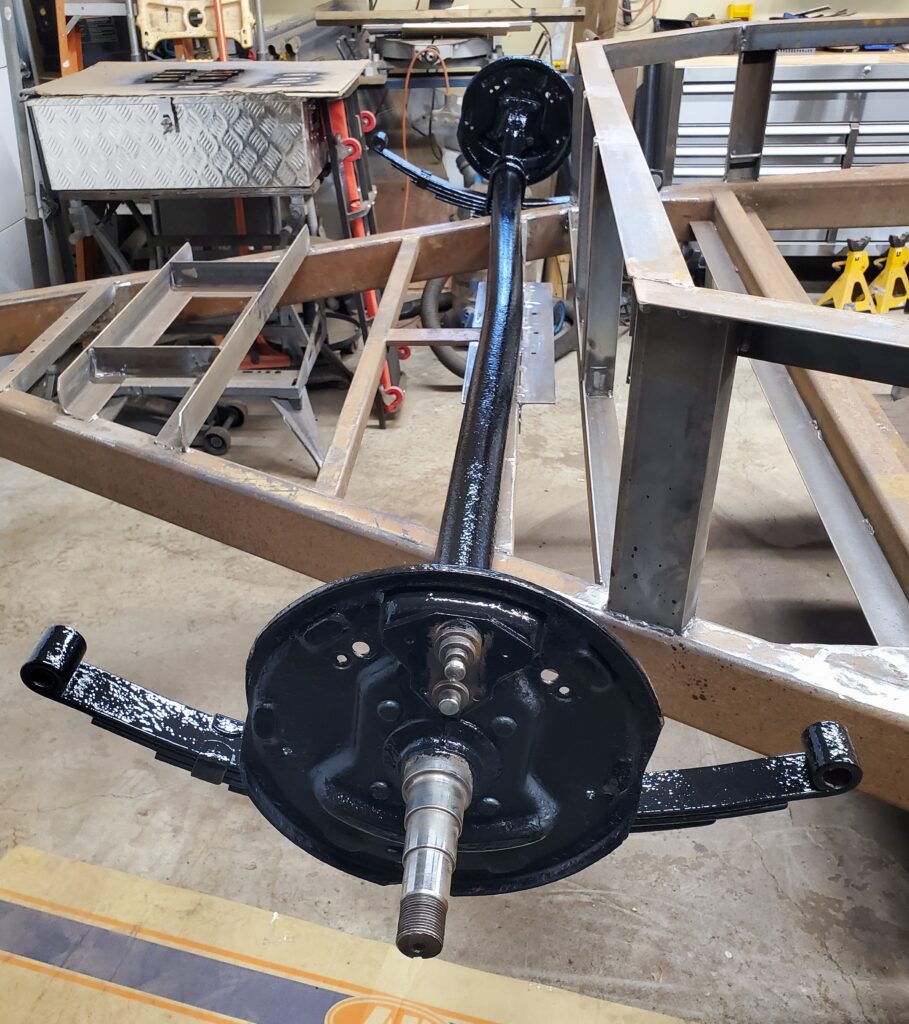
Well I should not forget a bit of cursing and groaning getting the springs on. Now to hook up the wires and the drums go back on. And it’s all done.. Brakes checked and working good. Hubs rolling nice with the correct amount of tightness.
Wow.. looks better than new, the way I hoped it would. Just a few little details to do before the deck.
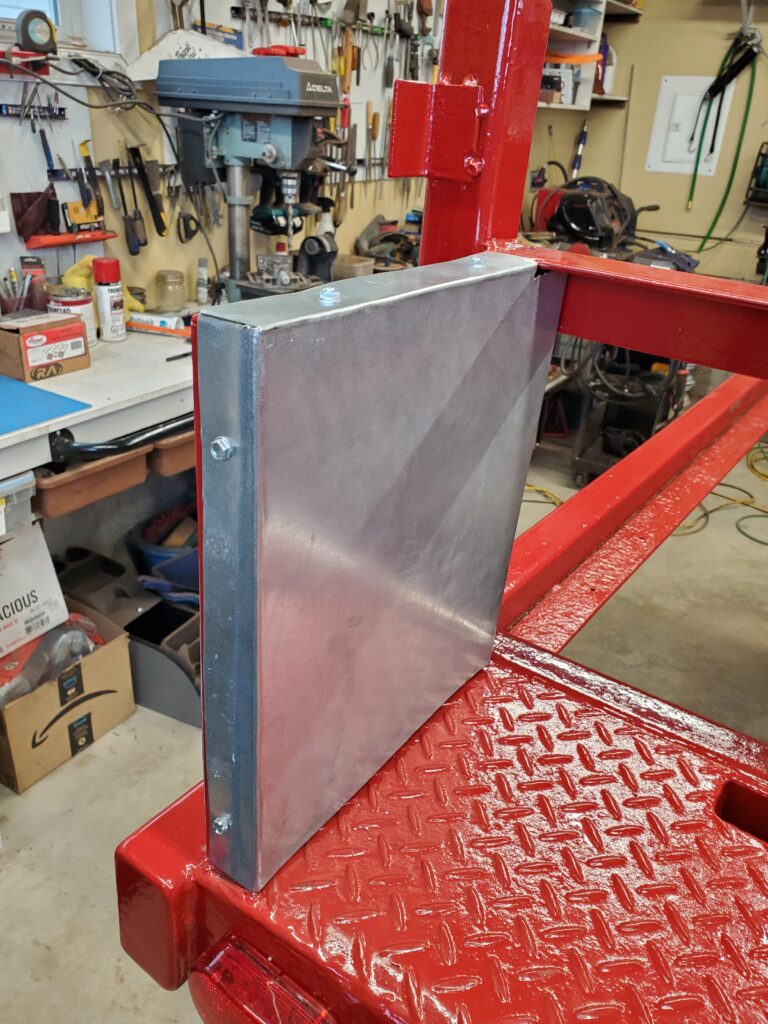
Like the nice slide latches for the tailgate. I drilled and tapped for the stainless steel screws.
And this nifty holder for the 7 pin plug. Keeps the end clean. Jack is on, new chains too.. Ready for decking… I’m starting at the front on the 12″ extension. I can stand in the space there to install them..
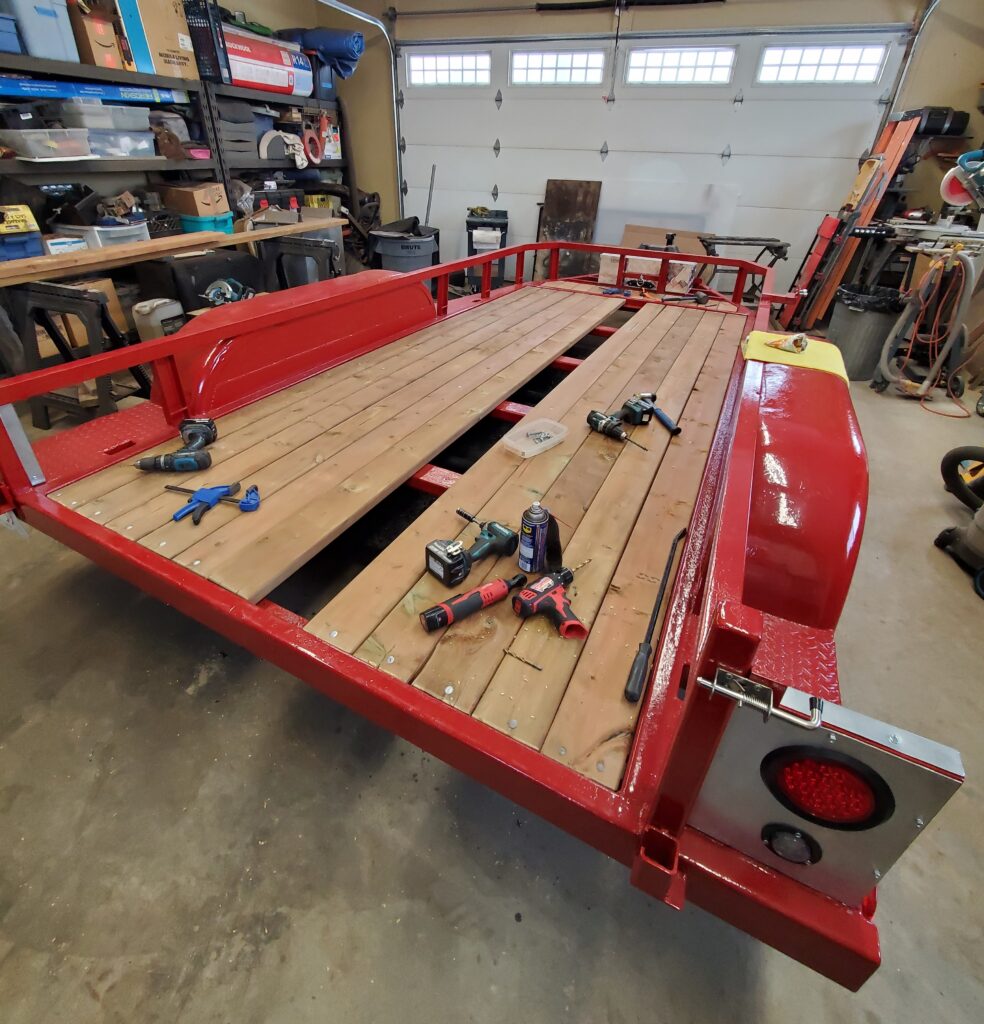
Looking good ! Buying 50 carriage bolts with washers and nuts is costly, but I’m not using self tapping screws. It’s a pain drilling through the 4×2 hollow frame, but after braking a few drill bits I figured it out.
Here we are almost finished. There’s 48 holes and 48 bolts.
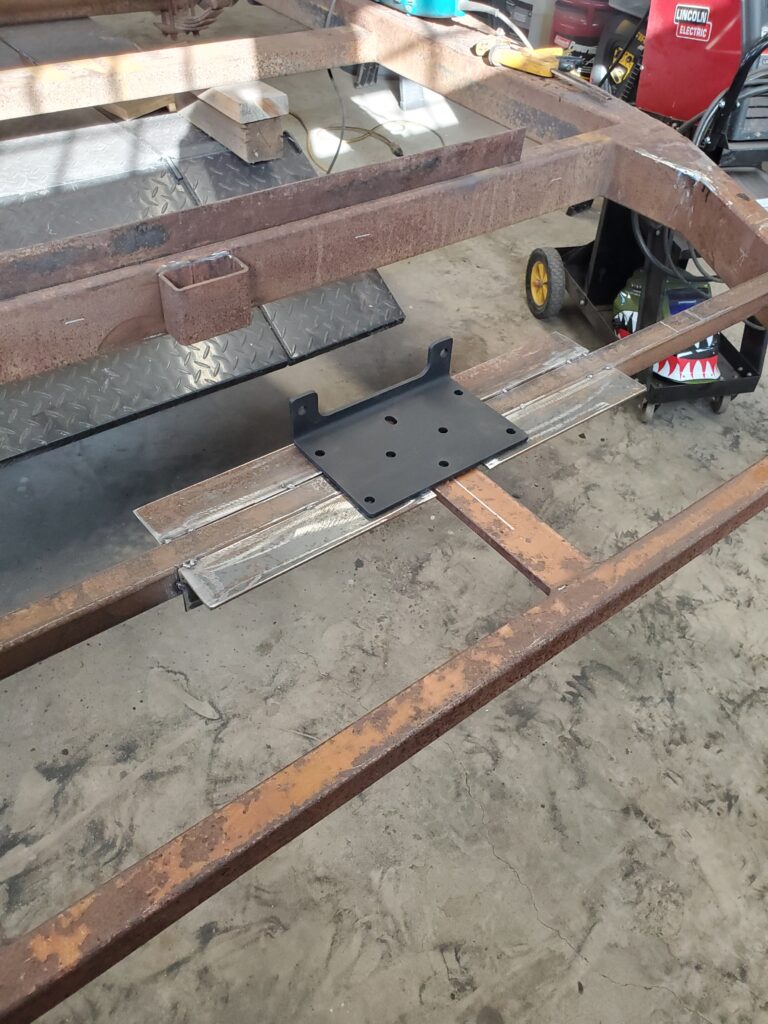
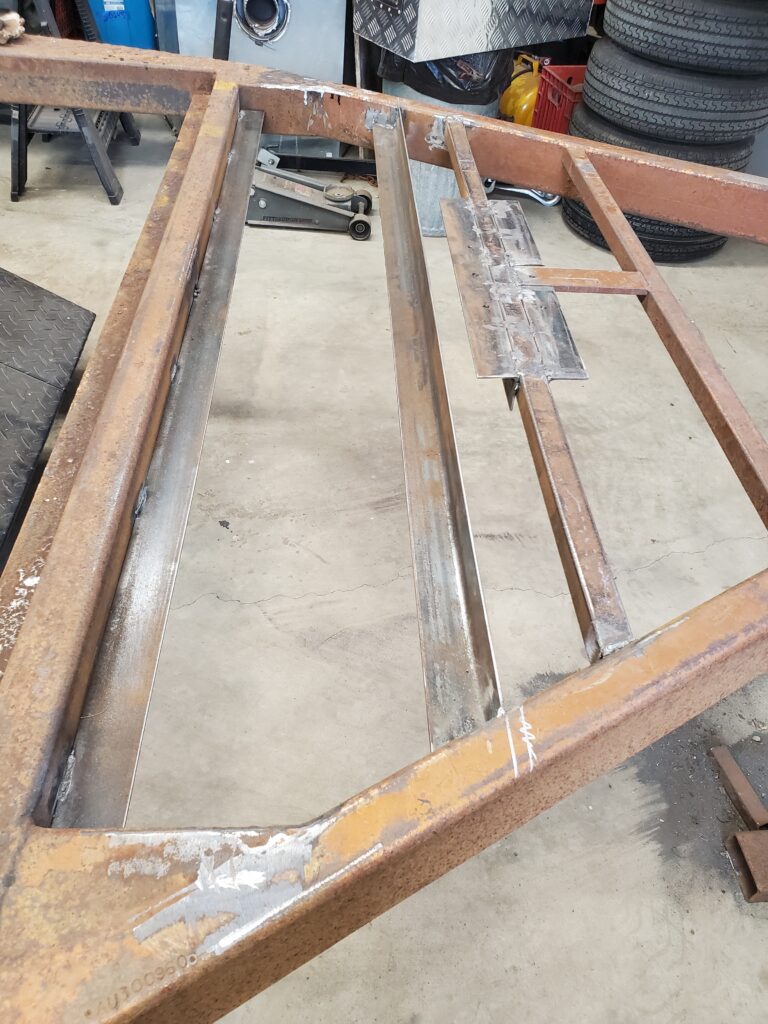
Ok.. I’ve had lots of time to think of the order of things needing to be done. Of coarse the last of the welding needs to be done before any paint happens. Today I made the mount for holding the spare tire.
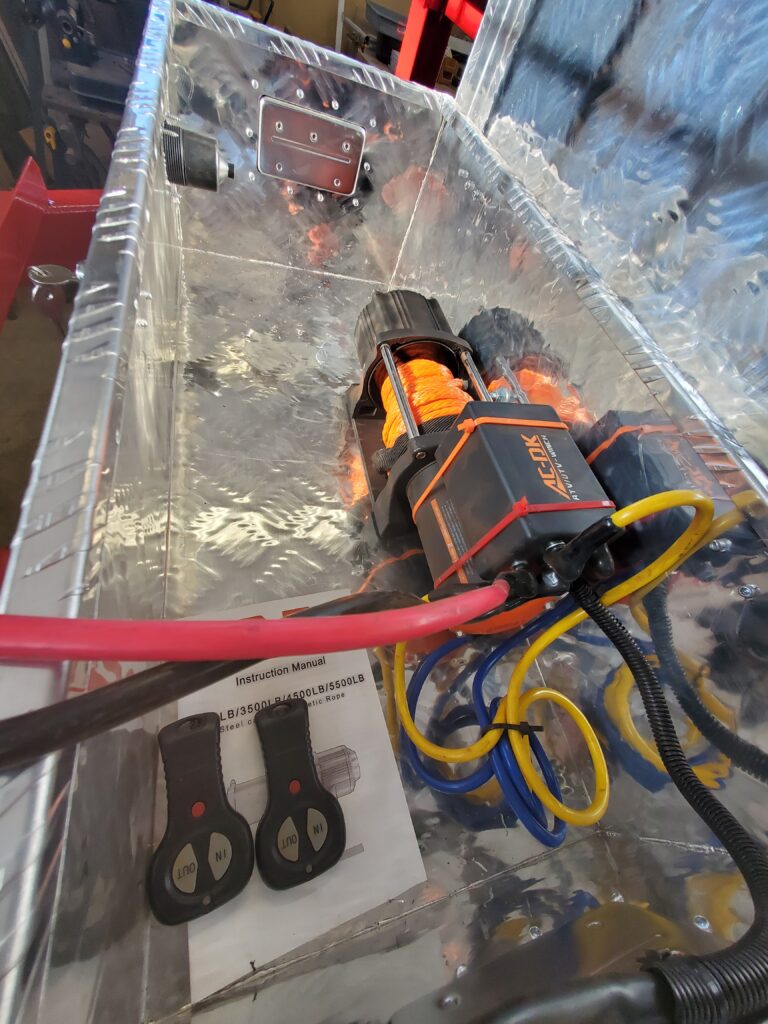
The spare rests on the checker plate and against the front of the right side fender. Oh and I believe the spare should always go on the passenger side to avoid unnecessary road rash. Then I made a bit of an improvement to the winch and box at the front of the trailer… Explained in this new video…
I mistakenly said the battery will be in the aluminum box.. Nope it has it’s own place in front of the box. And with that done ,and the underside of the fenders coated with under coating it’s on to some painting. I’m starting on the front of the trailer, and working my way back. There is more complicated things to paint at the front.
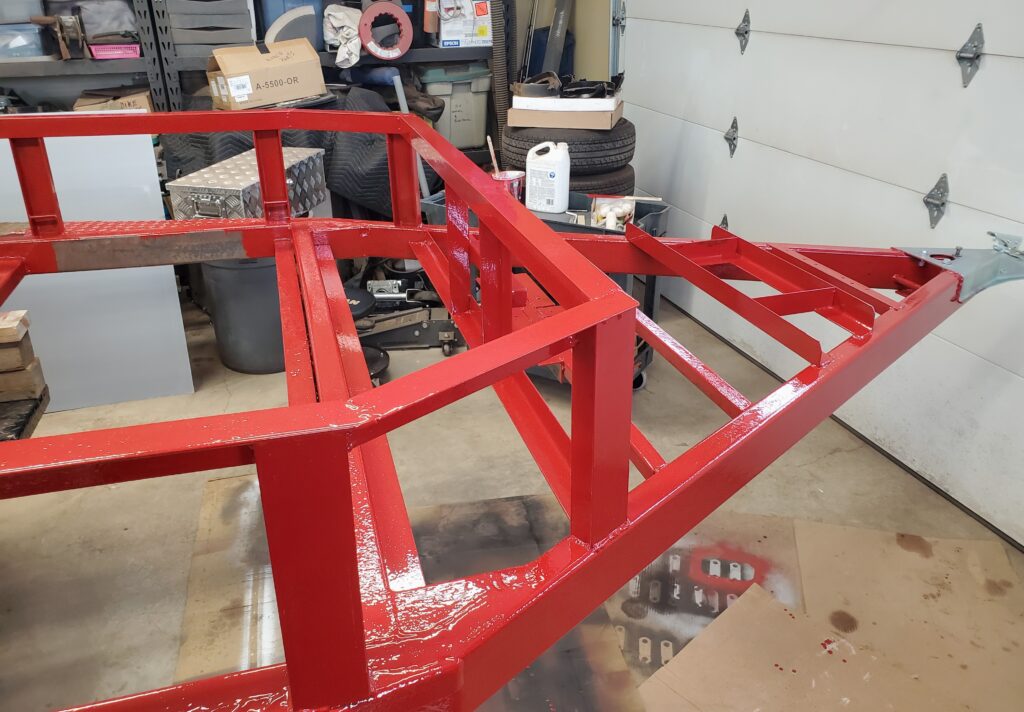
And there we have some done. It’s not as dark red as I had hoped.. But I’m okay with it. All righty… I have the whole trailer painted now. And it looks great ! And RED !
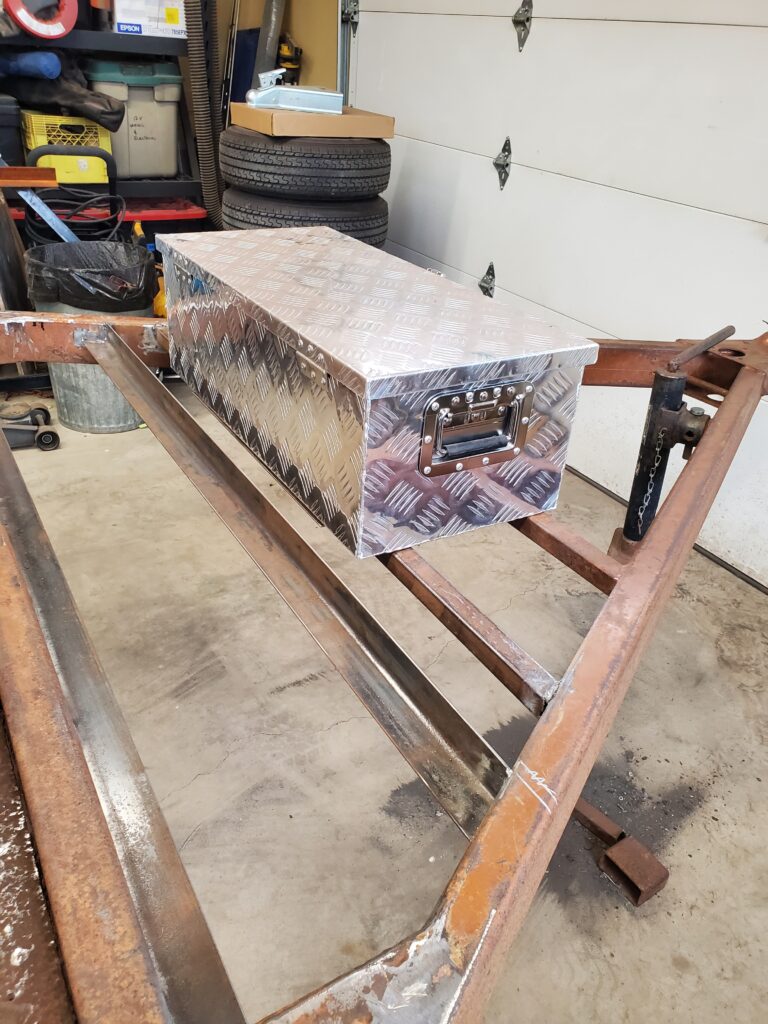
There’s so much still to do.. wiring, axles and decking. But It’s fun putting things back together. You know you try things and fit things… but now I get to permanently attach things. Like the box with the winch. Which is where I started first.
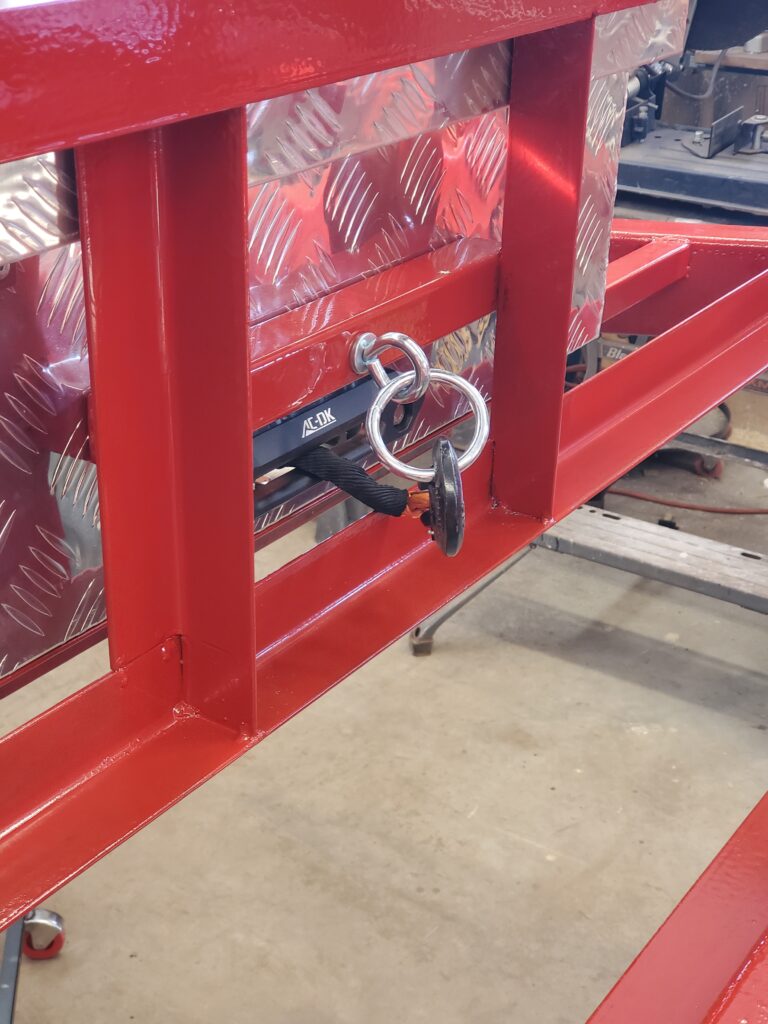
All bolted in place ! Worked out as planed, with the winch line centered between the two uprights. I’m satisfied with the sturdiness of the mount now.
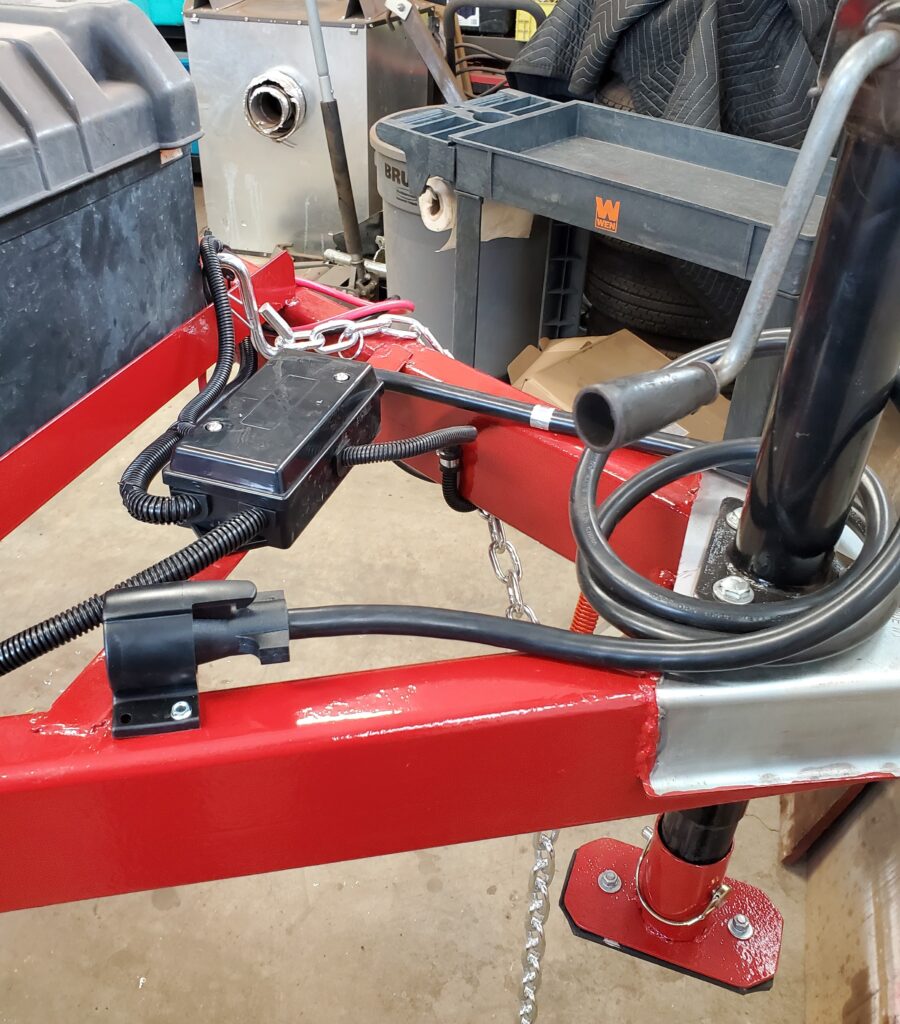
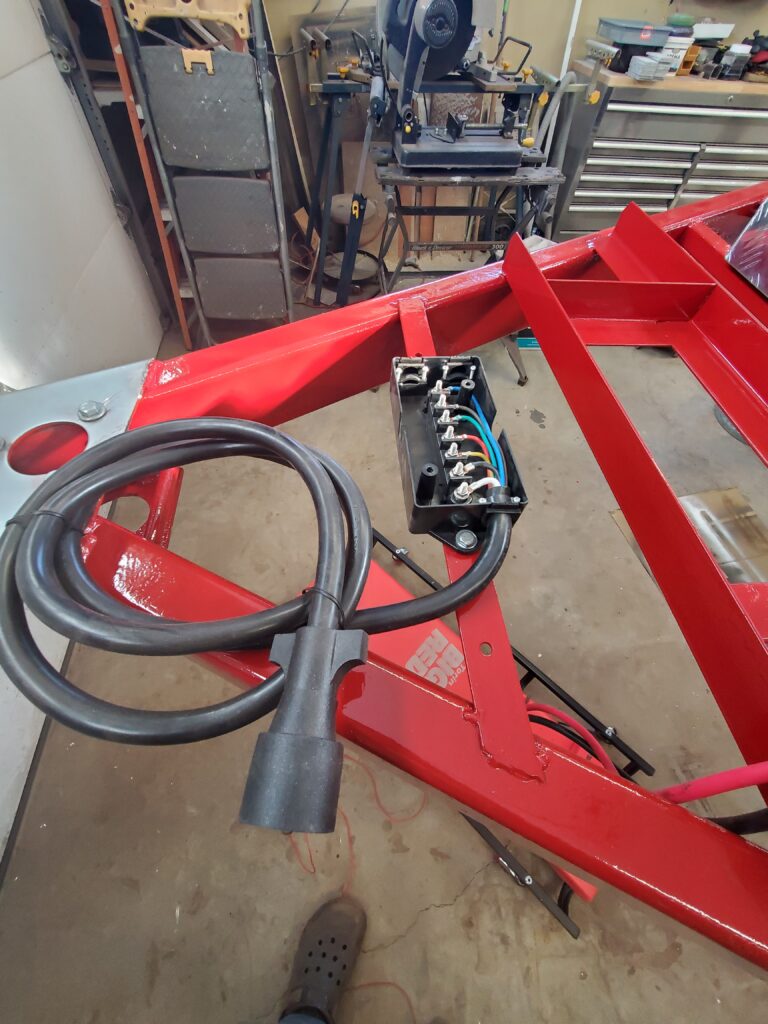
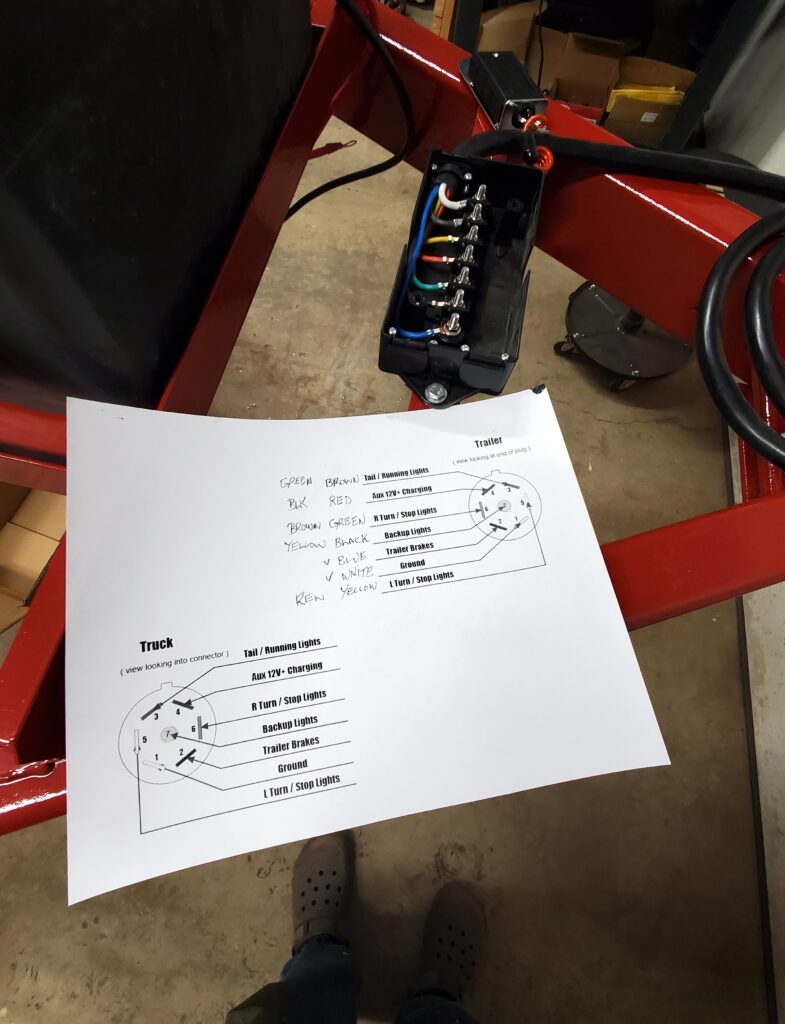
Ad to that a strong place to hook up to if you use the snatch block. A battery charger was added inside the box with a 110 plug on the outside. This idea can from my Southland dump trailer that I loved so much. I now turn my attention to the wiring. The first thing is to have a look at the seven pin junction box that I use on my trailers that have brakes. The ones I like come from amazon and are made in China. That’s ok but the color coding is weird.
However you can test the plug to see which is which. You can’t change the wires at the plug end so you just need to use the correct terminal in the box. Easy to do . I made a diagram to remind me.
I will be testing everything from the plug when I’m done. Today a new action camera arrived to replace my Gopro that’s getting old. So I made a video to test that out..
That turned out good.. And so is the wiring ! All in loom and tucked away from danger.
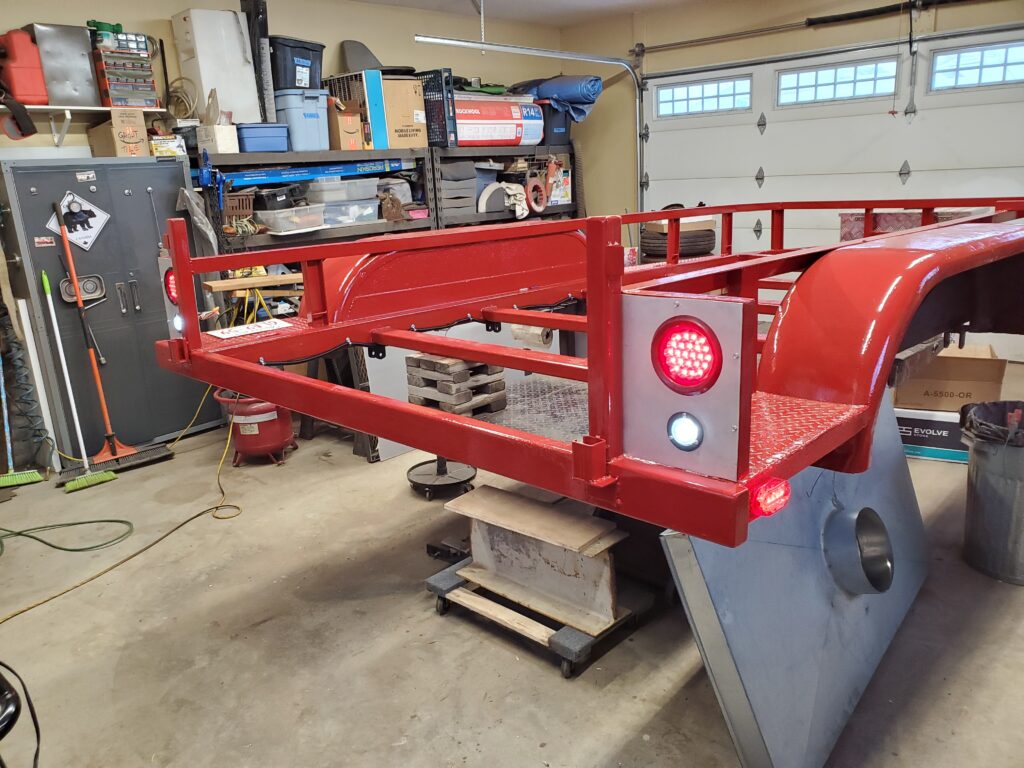
All done except for the trailer brakes. Cant hook those up till the axles are back under the trailer. Soon ! Below photo shows my tail light set up.
That’s aluminum sheet from a road sign sanded to a satin finish. The wiring is tested and passes of coarse.. Time for a new page for the axles..
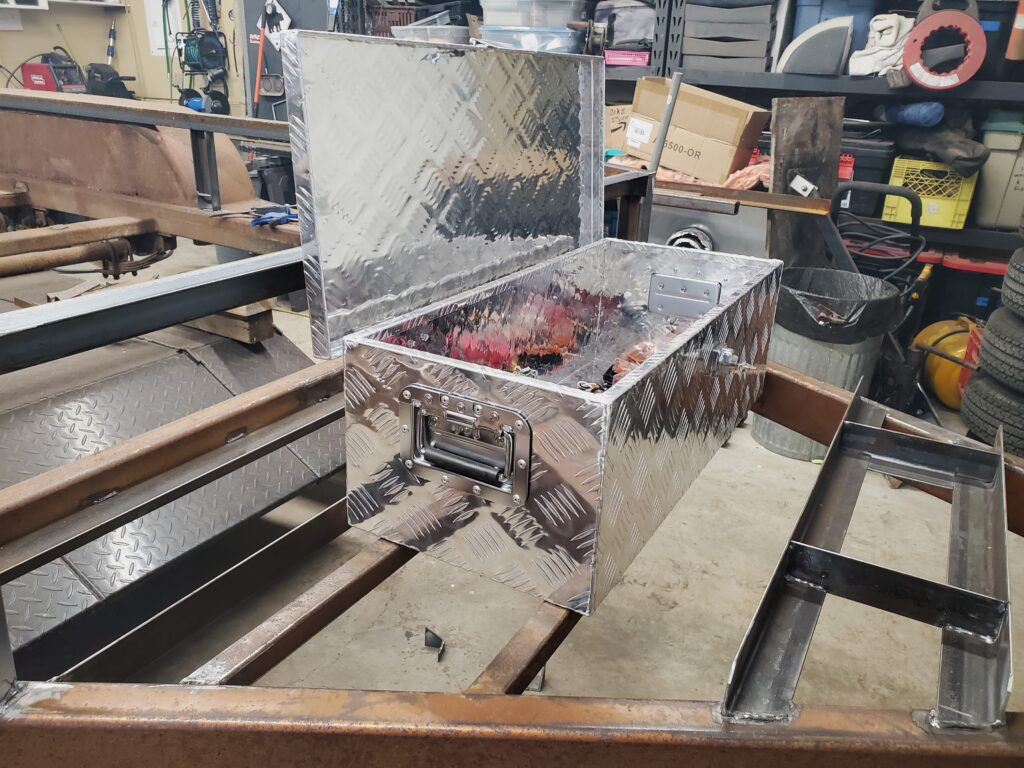
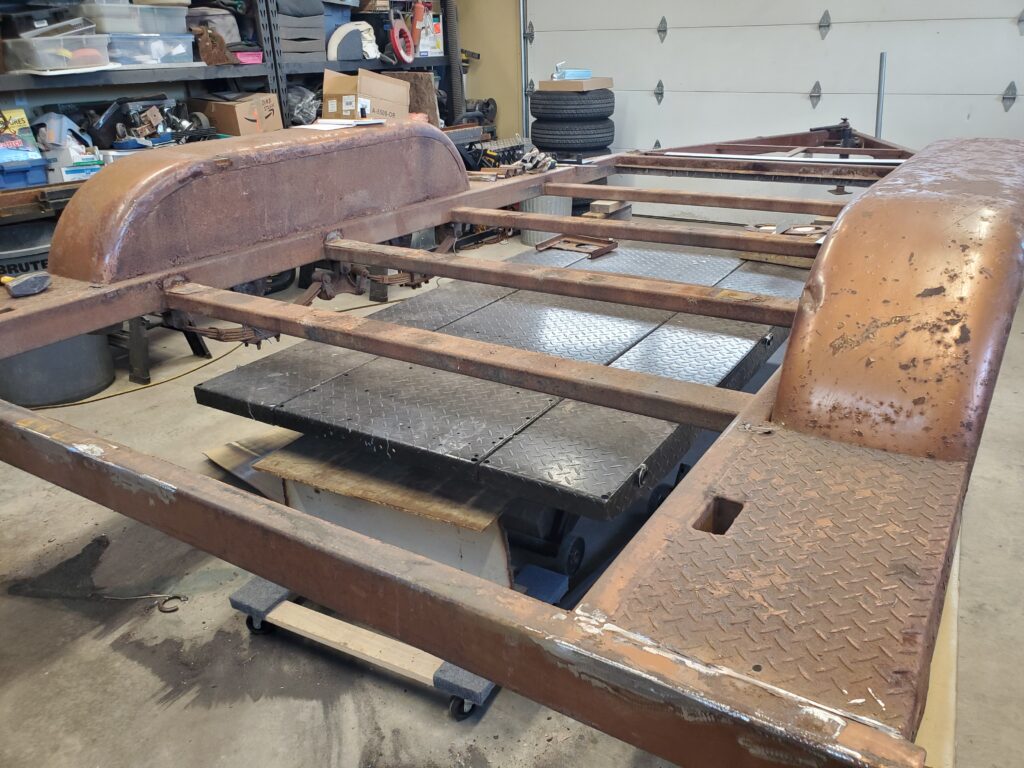
Got to love it when a plan works out. I now have 13 ft- 4″ of deck space. Also the box sits there nicely and the lid has room to open.
Now to figure out the tail lights… I made the decision to go simple. No fancy angles, just a good size square with room for the lights.
The two lights are designed to flush mount so I’m using a piece of 1/8 ” aluminum sheet. Seen on top of the fender. It’s now time to clean up the top side of rust and loose stuff before I flip the trailer.
OK The whole gantry thing was a bust.. Therefore the part of this post that deals with that I edited out. However the axles are a go..
Removing the Axles :
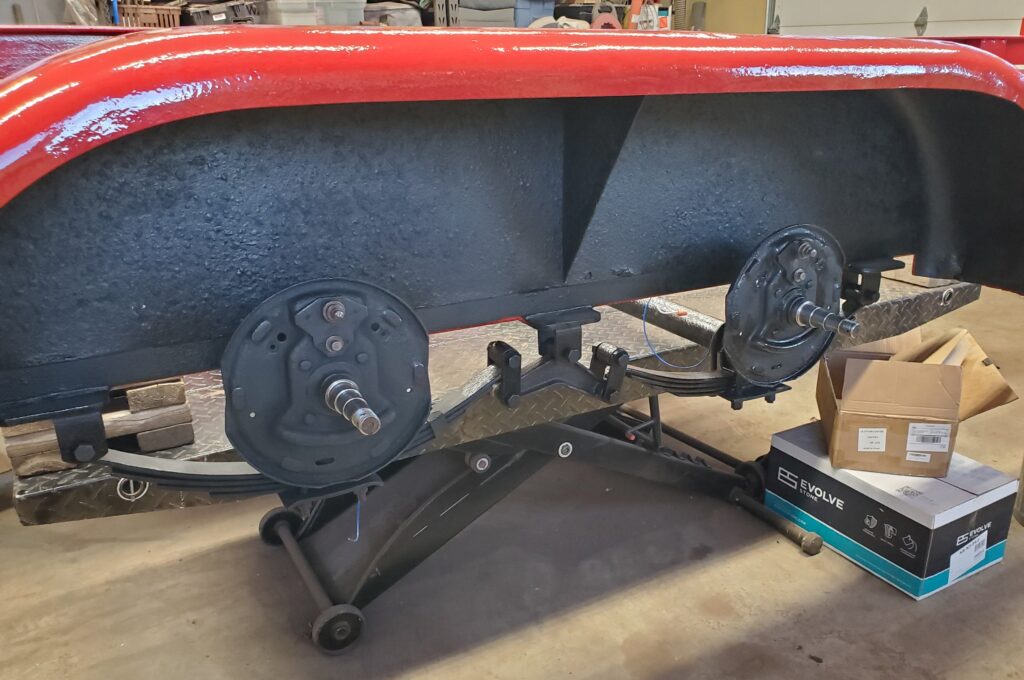
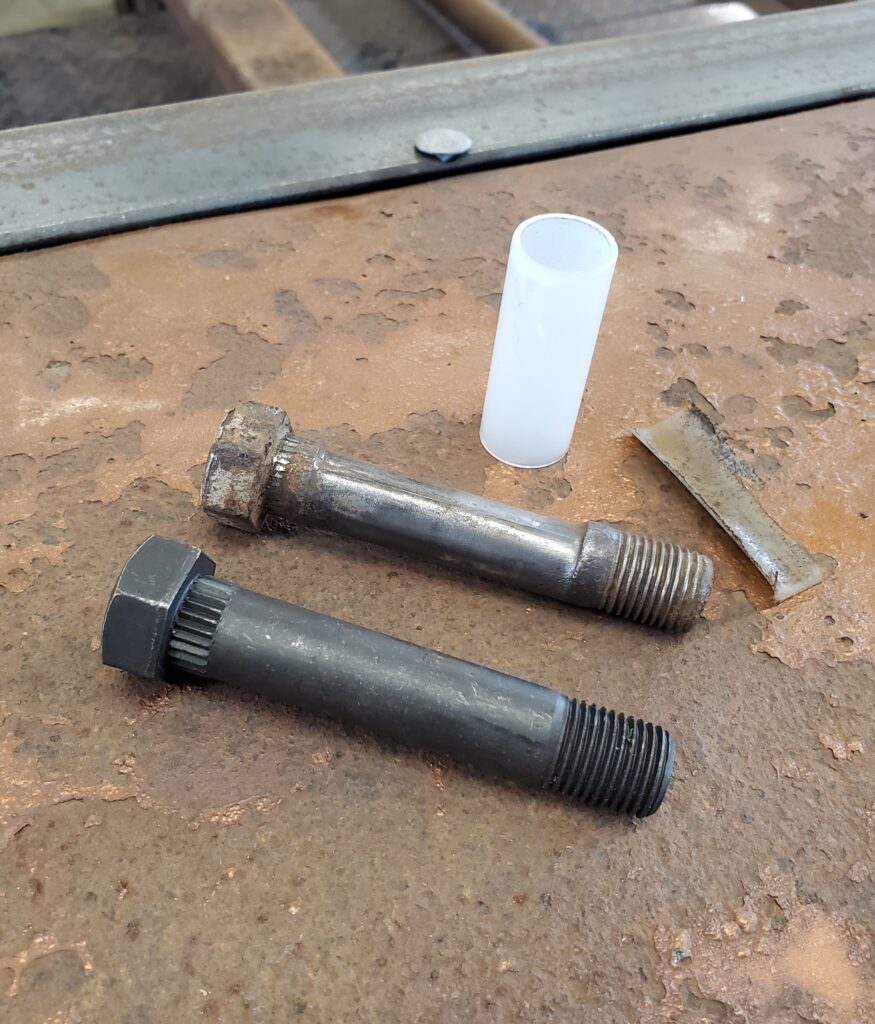
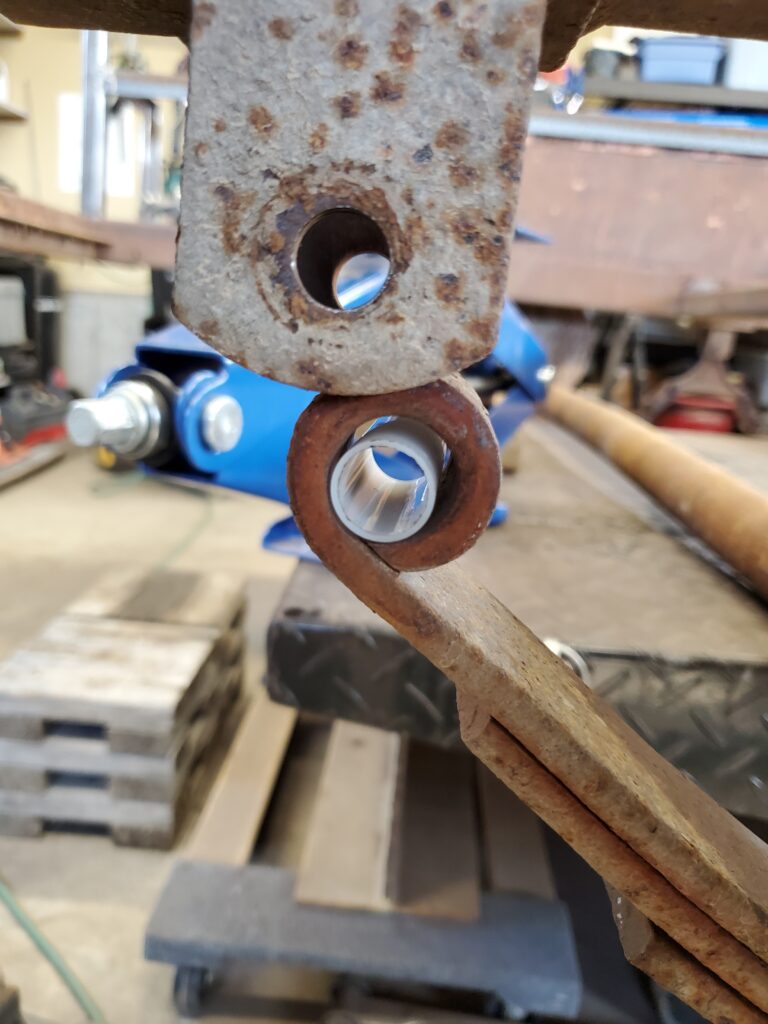
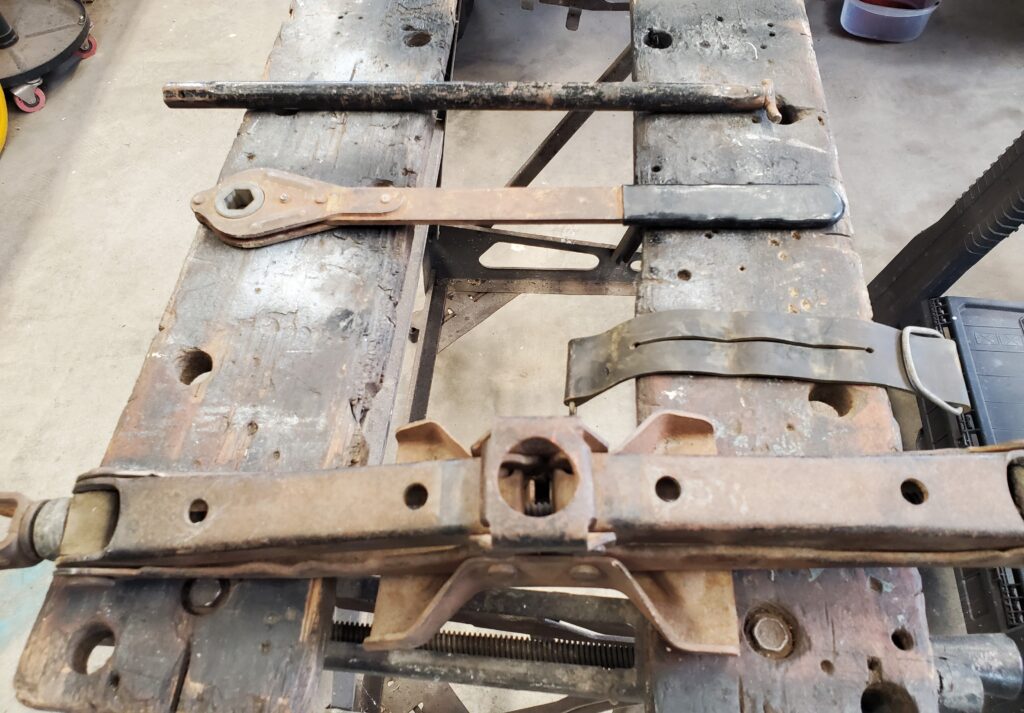
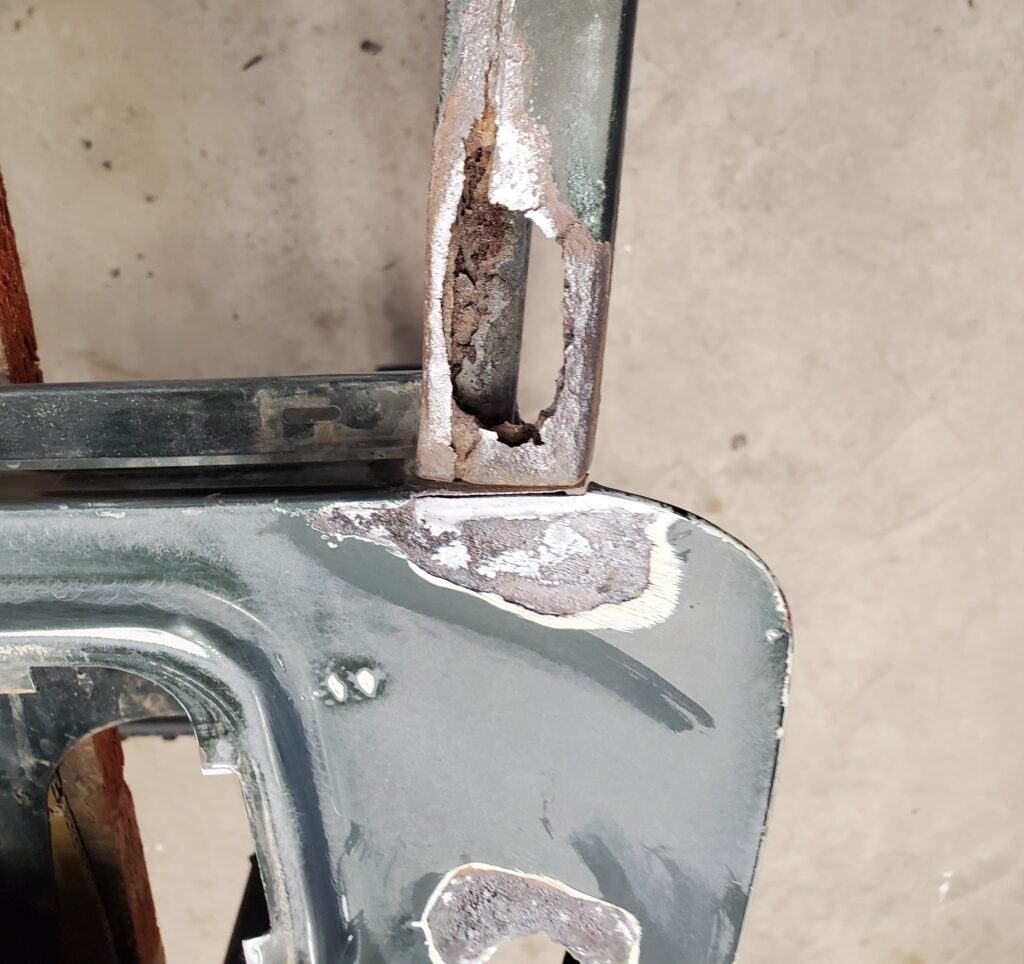
Compare old and new ! Ya ! not much left of the old bushing.. And the bolt has seen better times too. It gets worse.. New bushings won’t help.
All that play just hammered the eye of the spring. Going to get interesting ! I’ll have to get some brass shim material to fix this. I’ve ordered a new bolts, bushings, shackles and two equalizers because everything is toast .
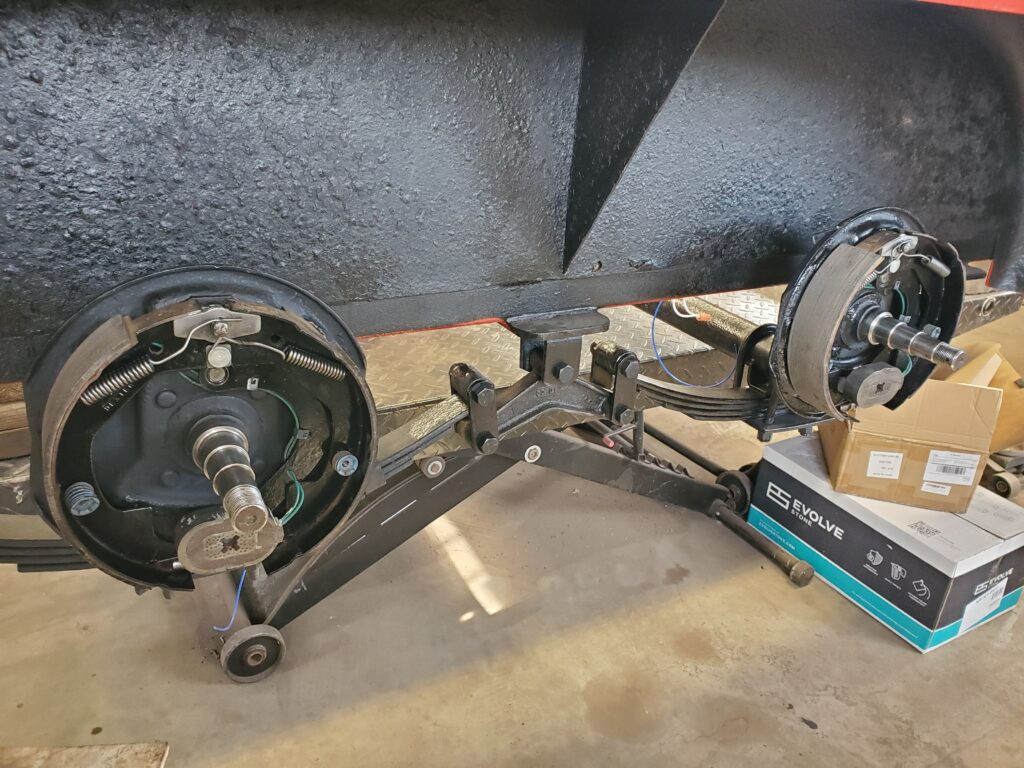
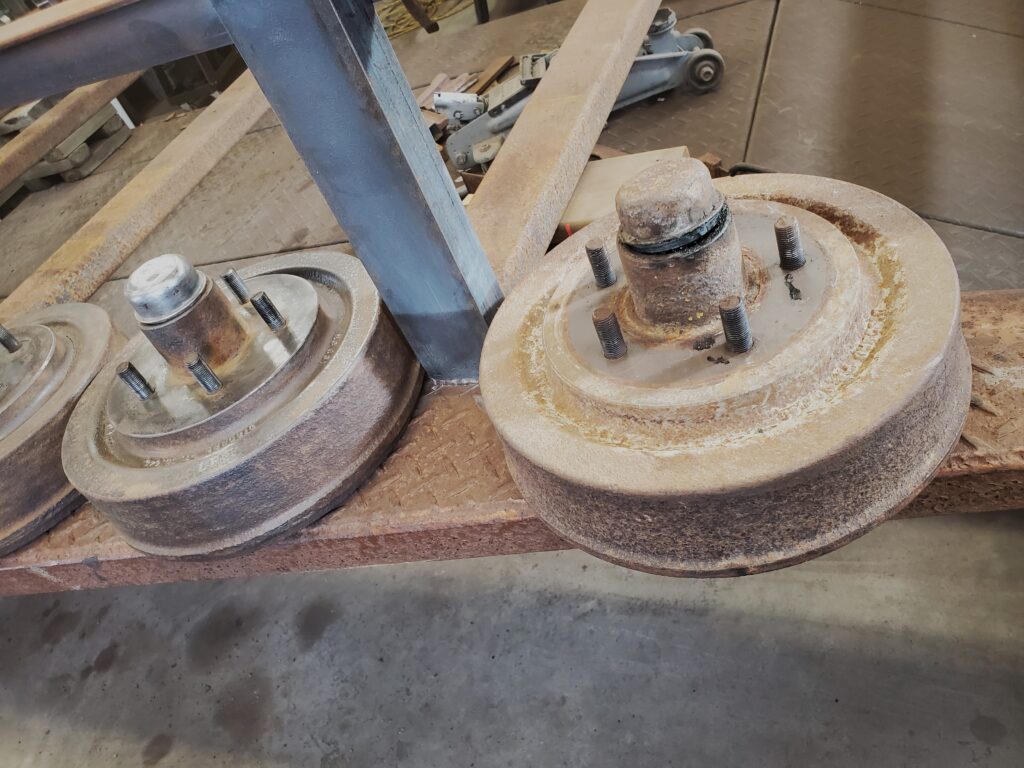
I discovered that years ago I bought an air hammer ! And never used it …till now. Made short work out of the frozen bolts. So now the axles are free and I have set them aside for cleaning and painting. Just don’t know where to start? The frame needs cleaning and the brake parts too. I’ll do the brakes next. So many little rusty parts !
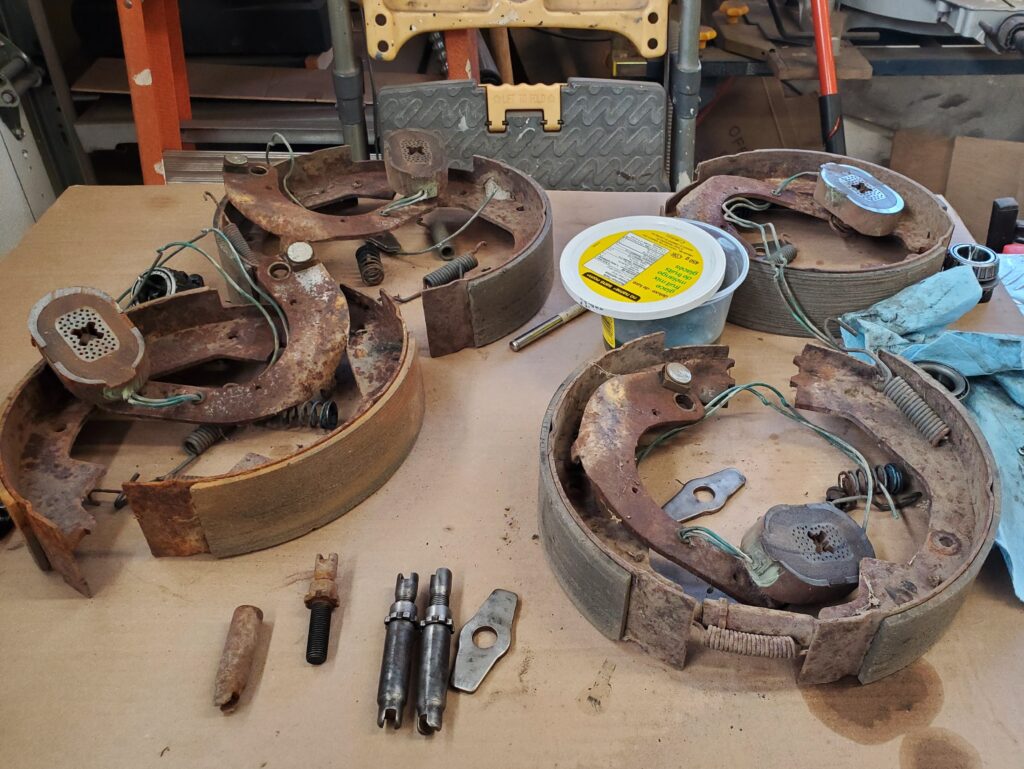
One thing for sure ..these brakes were not in working order. It looks like they had the left and right front brakes reversed. And not only were they backed off , but the adjusters were also rusted stuck. In this photo you can see two clean ones and a rusty one. Got the brake parts cleaned up . Made a new update video…
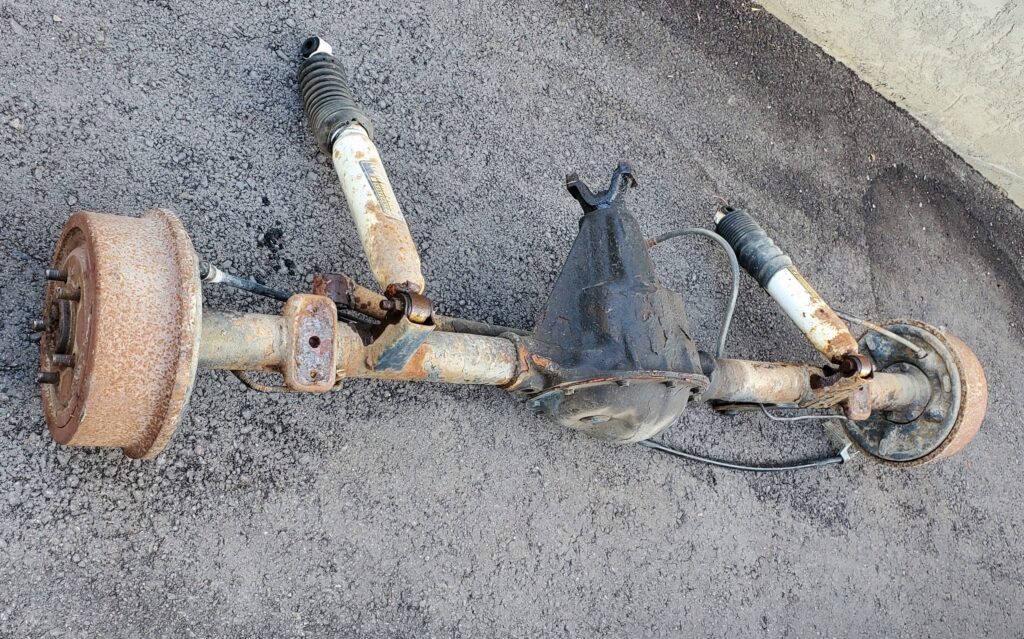
Rather than leave my axle and brake parts all over.. I decided to complete the cleaning. Gather all the parts in a box and clean and paint the drums.
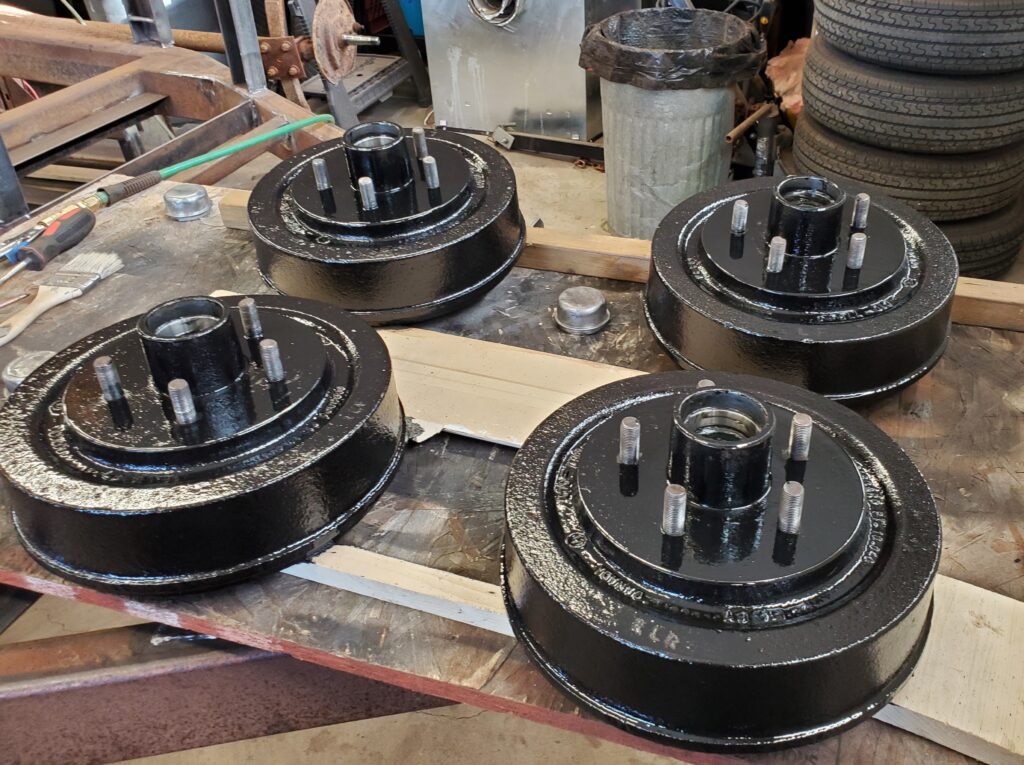
Here’s a clean drum next to a not cleaned one. It’s important to polish the inner surfaces of these drums. Both the surface for the magnet and the brake shoes.
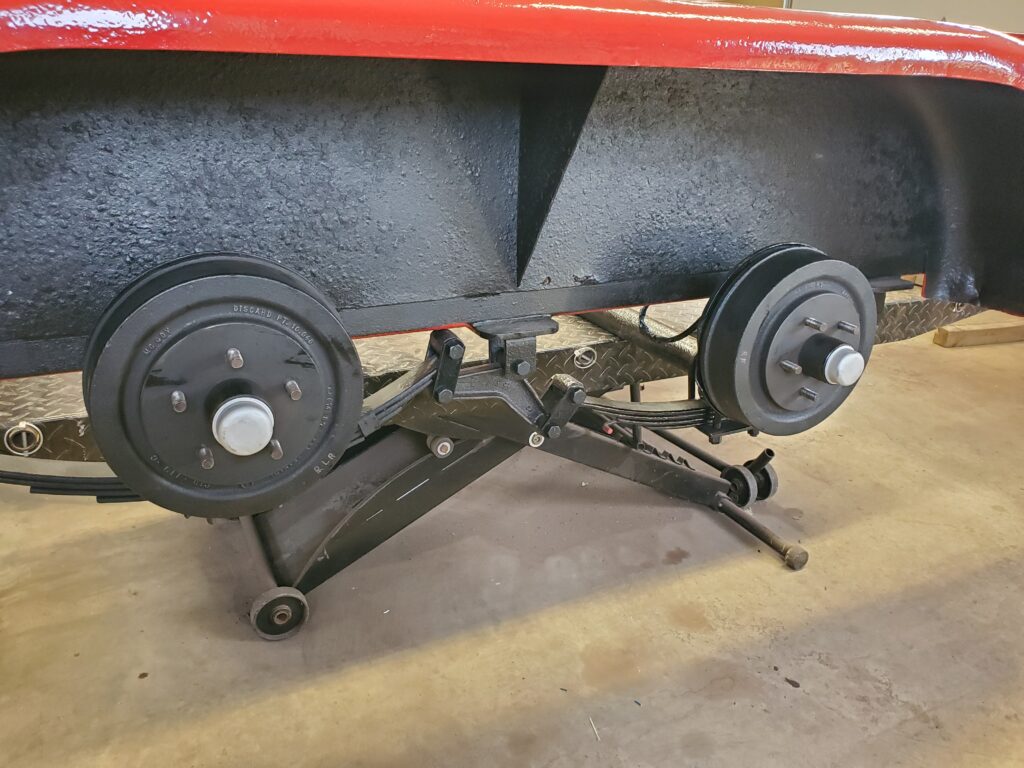
And this is the finished drums. Painted with Por15 rust paint. I’ve used this product many times and it’s tough. These will not rust again ! Same goes for the axles. They get a good cleaning and a Por15 paint job too.
This paint may be tough but it does not like the sun.. Which makes it perfect for axles and springs.. you know stuff that hides underneath the trailer. It takes a good 24 hrs to cure, and I don’t want to make dust. So one at a time… When the axles are done then I can put them aside and concentrate on the frame. Let’s start a new page…
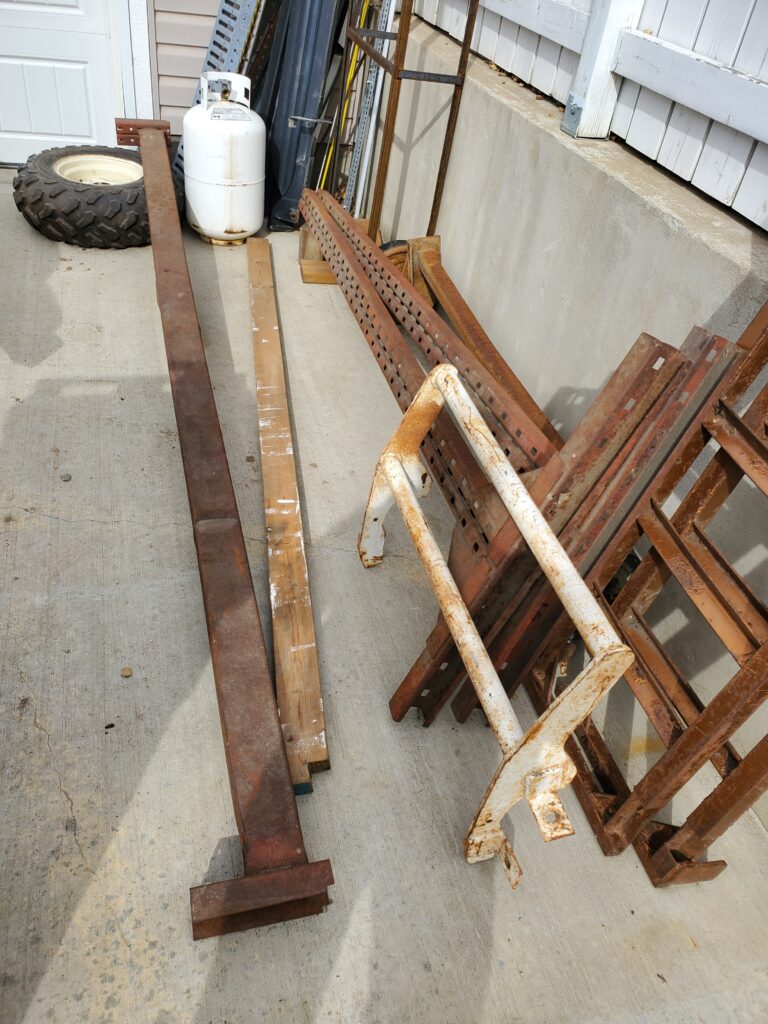
I put the trailer aside until I picked up the gantry from my friend. I will need that to flip the heavy frame without help.
Here’s the gantry pieces in among some of my stuff. The jeeps are in the way for a bit, then I will set this up.
Meanwhile the trailer has been enjoying this space, and providing a place to store the new metal.
Update: Now the jeeps are out of the way I was able to put the trailer in the shop.
Notice that I parked it in the middle over top of the lift table. Hoping the lift will lift it after I remove the ton of metal.. and maybe the wheels ?
Let the transformation begin !
Step number one is to remove unwanted things like the the four side lights. Also the wheels, jack and extra bits of steel. I did have marks where the extended front would go … but mother nature didn’t like them. That’s ok I remember the measurements, and they may change.
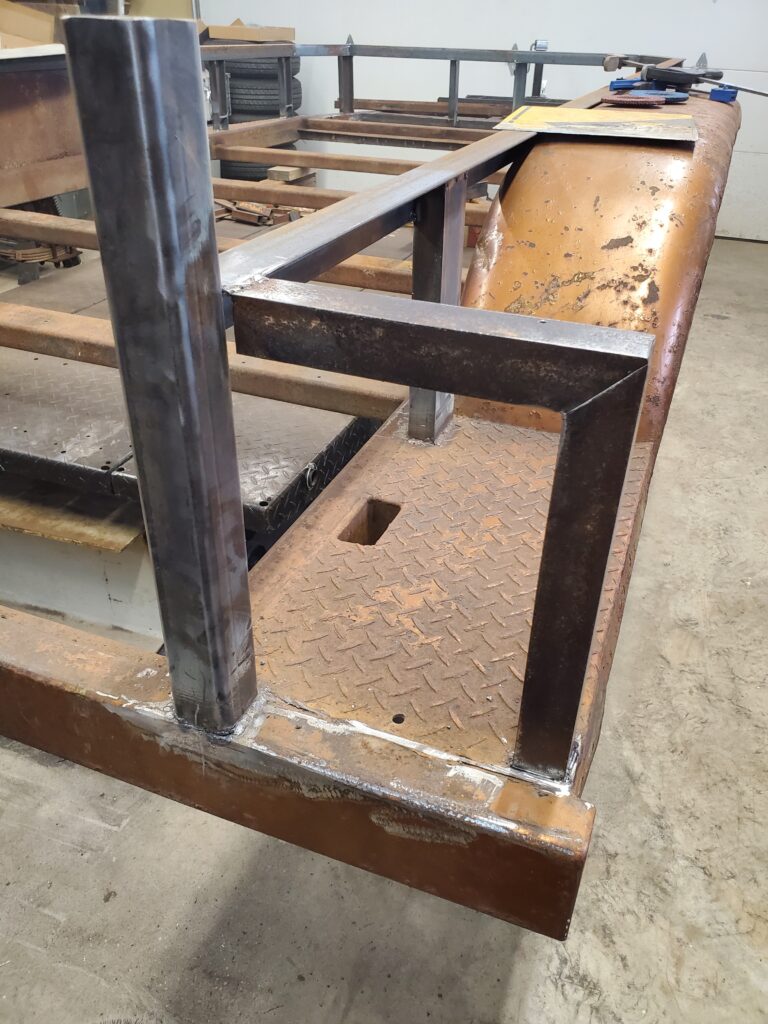
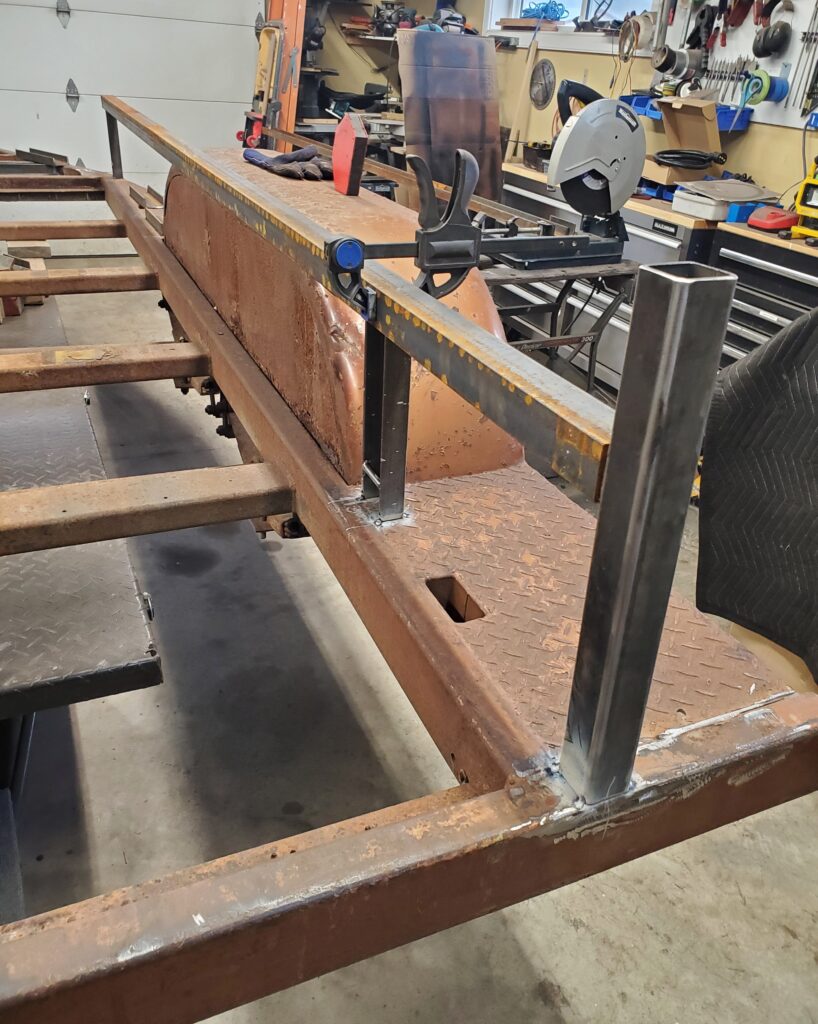
How about that lift table .. brought the trailer up to a comfortable height for working. Then I started cutting off the extra bits of metal. Next I moved some of the hitch pieces to extend the deck and mount the aluminum box with the winch inside.
That’s the winch plate that will be inside the box. I had to re- think my locations for things, and that will shorten the length of the deck extension by a few inches. Seems most of the work I do to trailers is to the hitch area. But if you don’t use that triangle wisely ..it’s a waste of space. You will see how I do it . I was waiting for an extension cord for my new welder so it can reach the front of the trailer. While waiting I tackled the dents in the fenders. They are not prefect but much better.
Here’s two new pieces of angle to hold the extra deck boards. Because of the location of the box and the need for a separate battery box the deck extension is less that the hoped for 20 inches. This afternoon I got the extension cord and was able to use the new welder. WOW does soooo much better with the 240 volts.
That’s where the box goes with room to open the lid. And the front area is getting less and less.
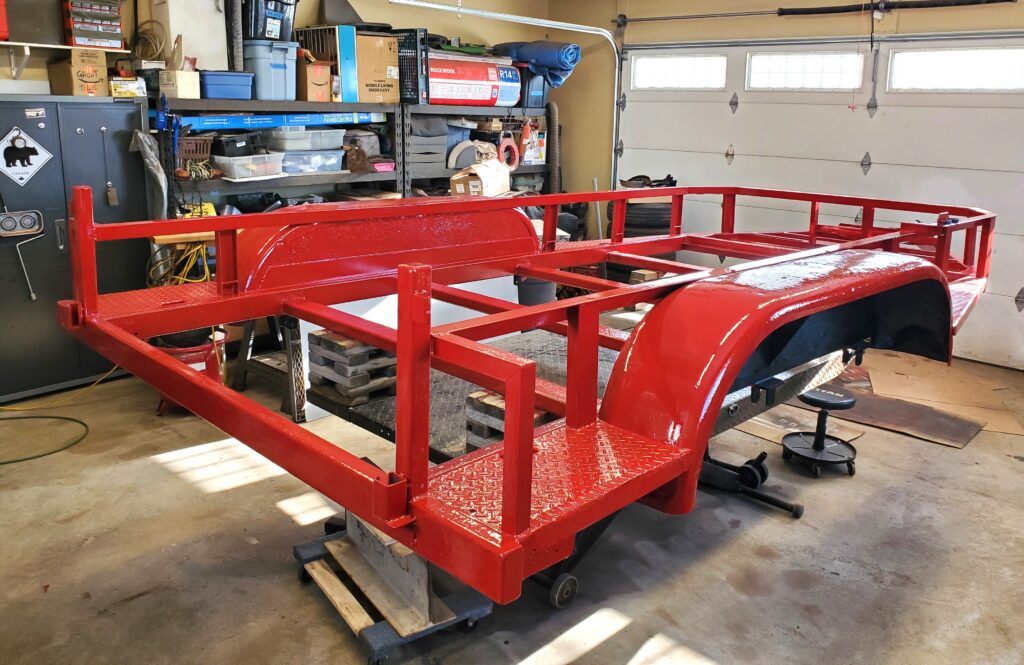
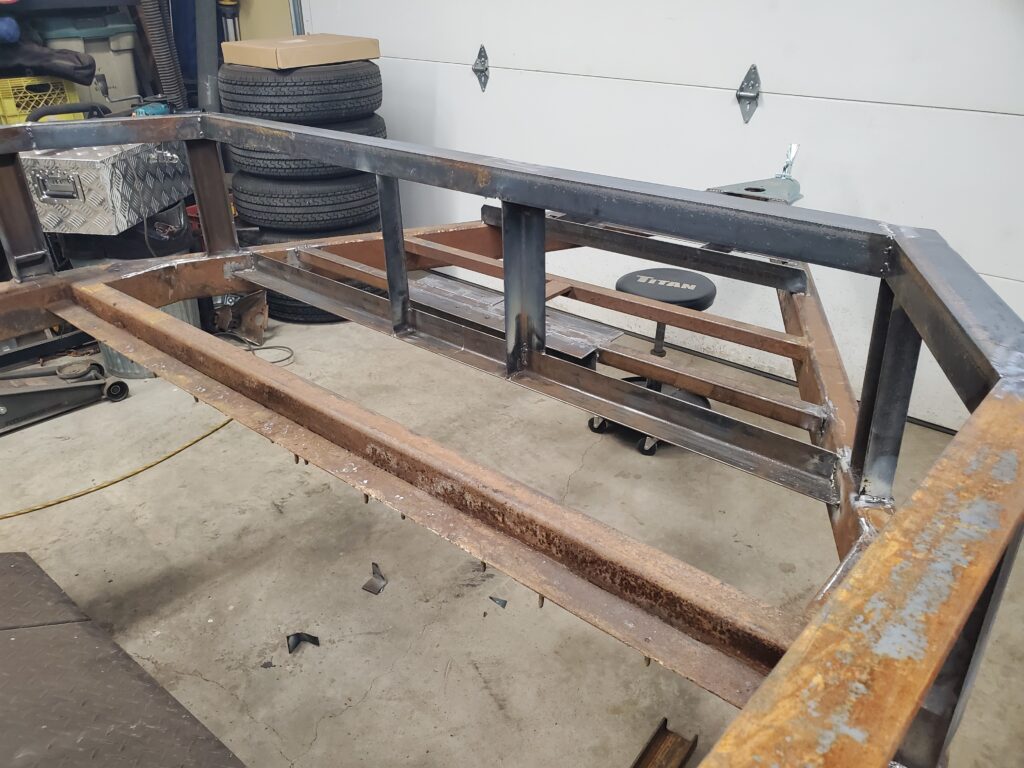
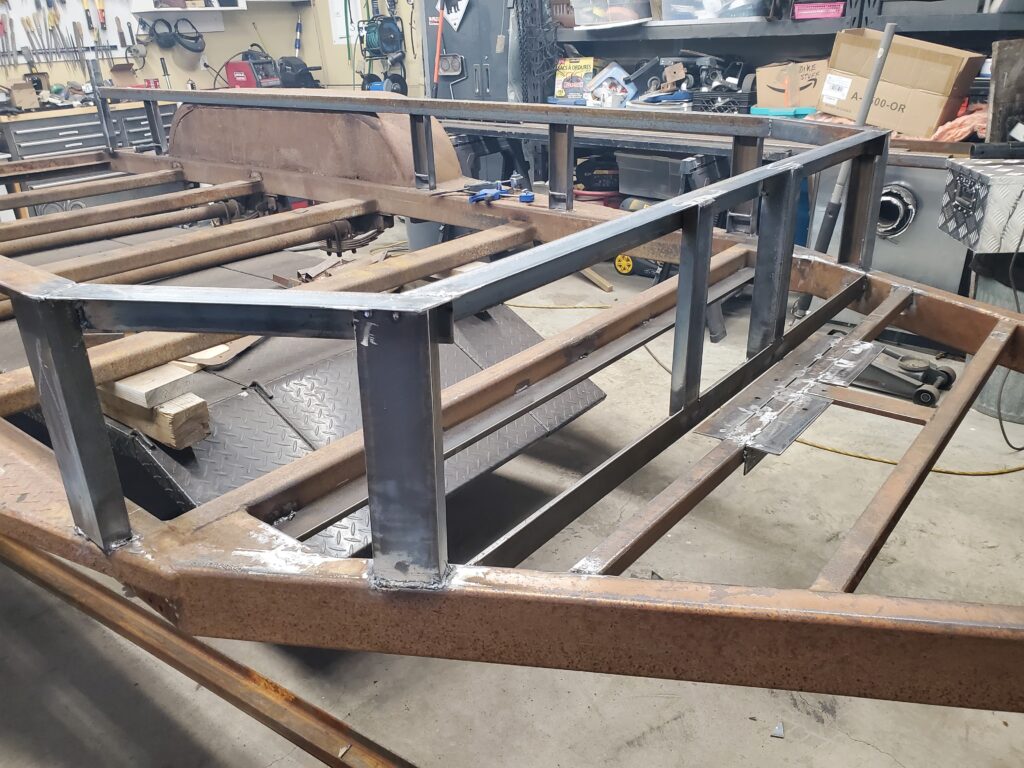
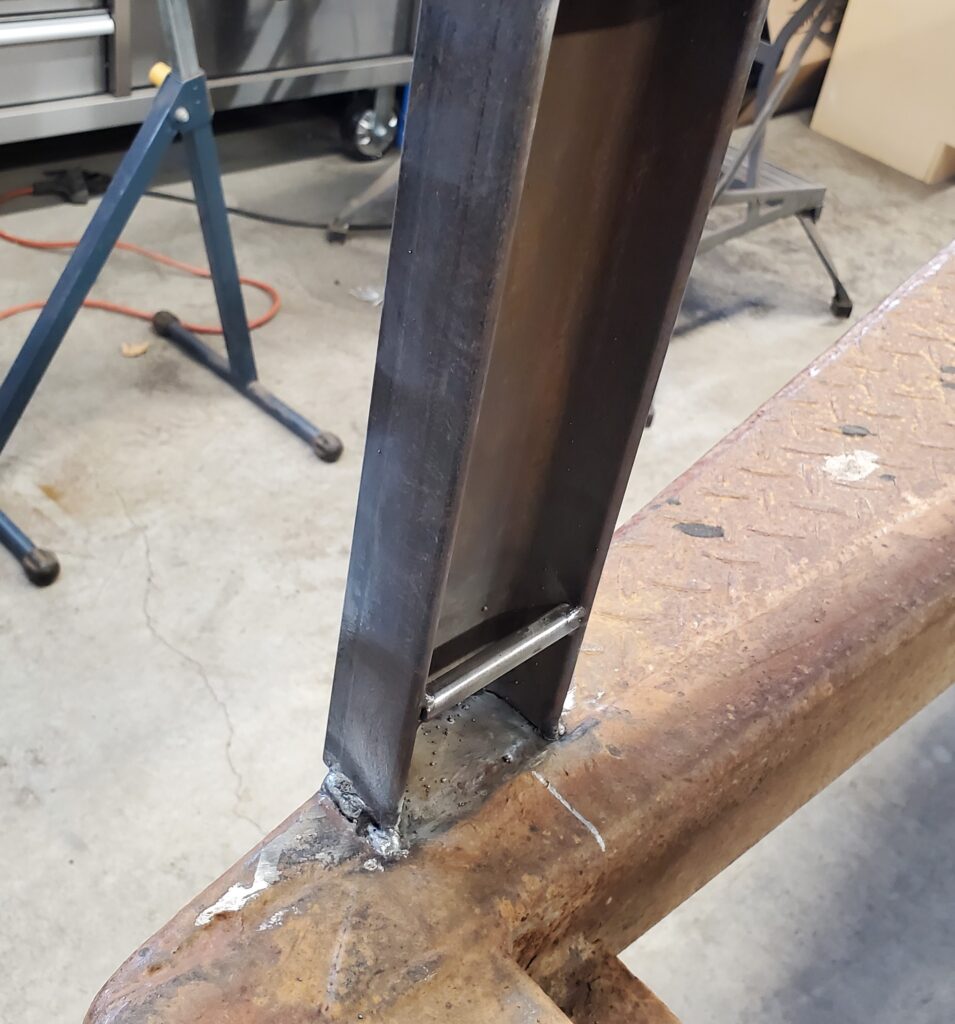
A place for the battery and my wiring junction box is next and I need to replace the hitch too. I made a very “scookum” battery holder. The angle iron is for the electrical box. A new coupler is self explanatory ! All these things need to be done before flipping the trailer over. Once it’s upside down More welds can be done easier. I started tacking the side rails in place.
The rear post is taller to hold the tailgate closed. Got both sides done now. Just need to put a top rail across the front.
What I had envisioned is taking place.. and turning out great. Adding little touches like these “tie downs”.
Another few days of work and I’ll be setting up the gantry to flip the trailer over. I still need to figure out the tail light mount. And now it’s time for a new page in this post… as the work continues.
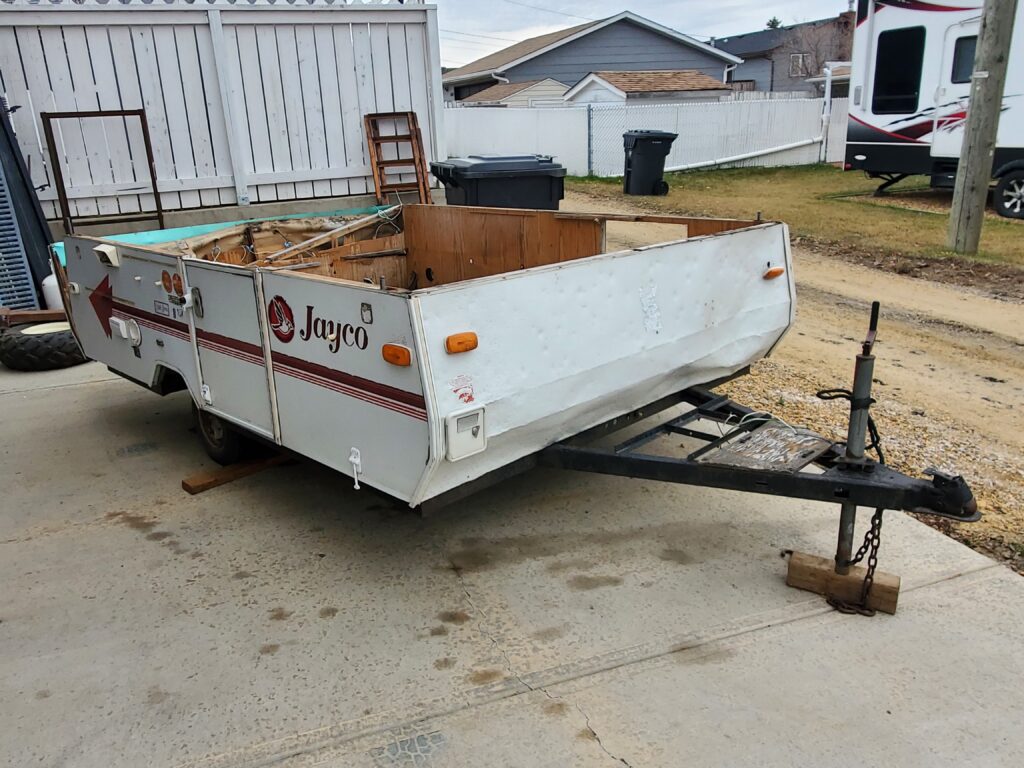
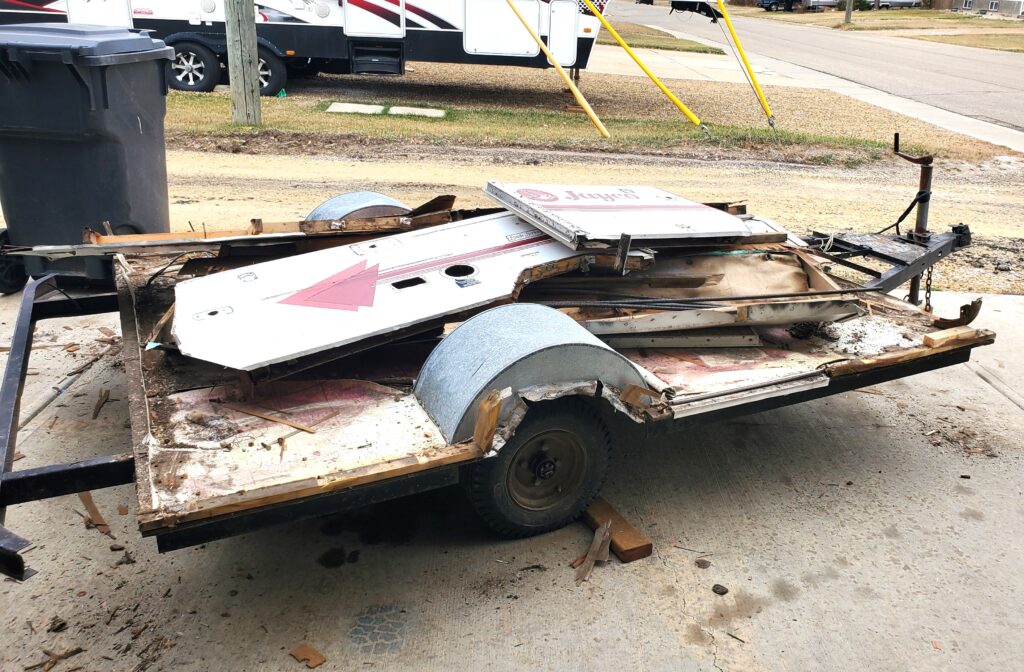
The story goes that a strong wind ripped the roof and tent off. The fella I bought it from took the the rest.. I got the body and some lights.
But I only want the frame. The frame is 8 ft long and 6 ft 3 ” wide. The hitch is another 46 “. Very light .. I towed it home like this about 80 kms. Those darn 8 inch wheels survived the trip.. I hate those.. They are not staying ! I’ll go with 12 ” better on the highway.
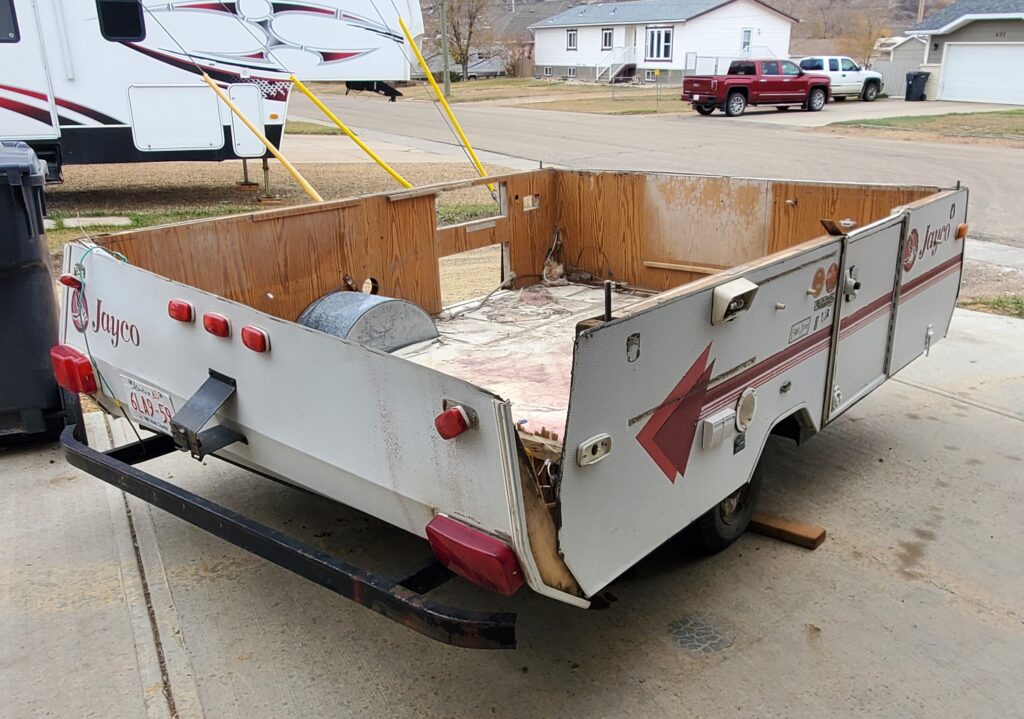
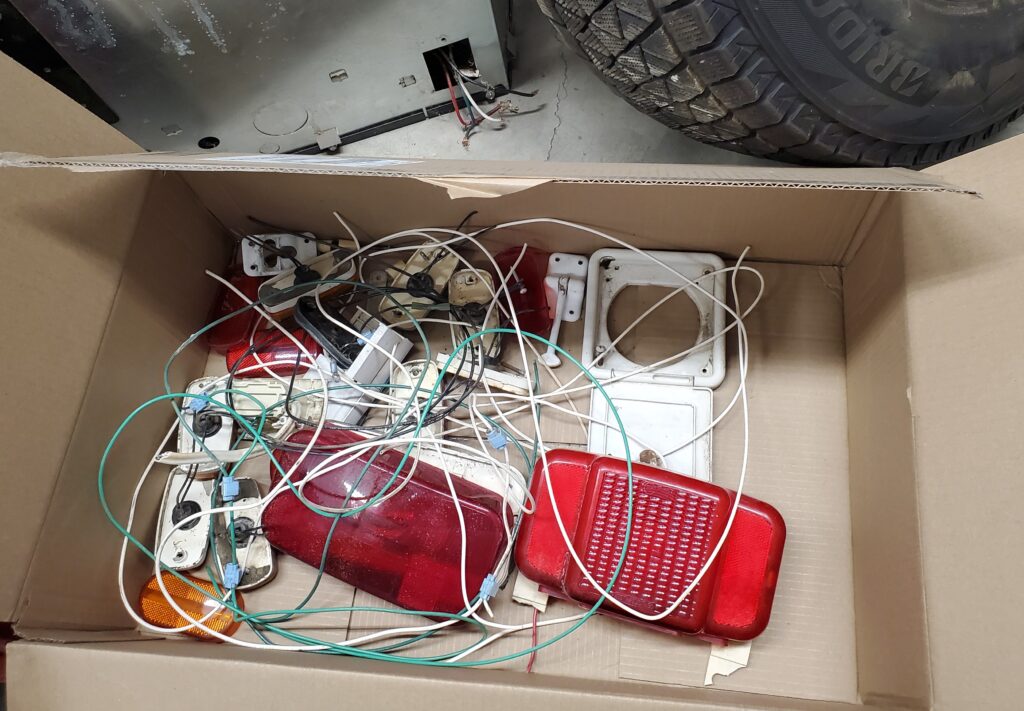
When I got home I noticed the back of the trailer was coming apart! Well I’ll just finish that job.. I don’t know why but I saved all the lights.
Some wire too… always need wire ..right ! And then I made a pile out of the Jayco.. Because like I said .. I only want the frame.
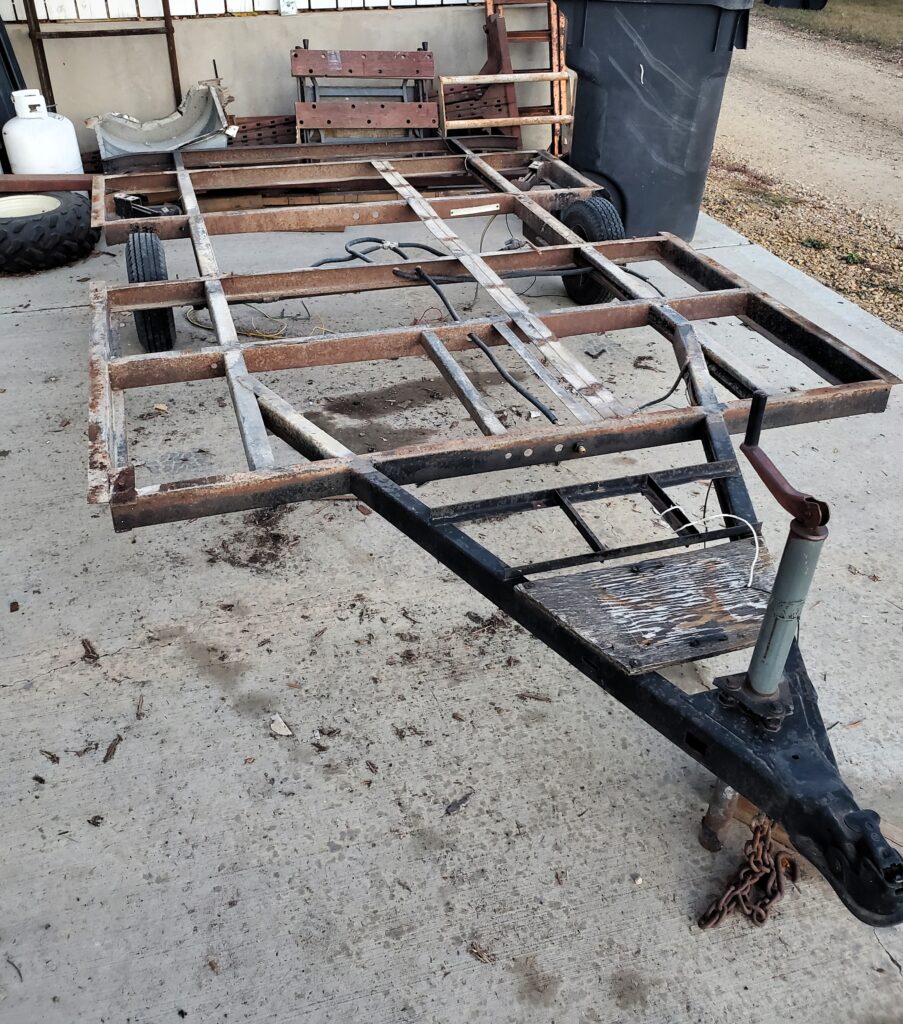
Some of the wood was rotten in the walls, and a lot of the screws were not holding anything. Hence the pile. One thing is for sure… it will no longer be a Jayco tent trailer. Even though that’s what the registration says. Okay now we have a trailer frame & wheels !
Oh ya with torsion suspension too !
Hopefully not wore out yet. So there we have it…
What should we make of it ?
I’m kinda favoring a little tear drop style trailer. It’s the perfect frame for that. Then I came to my senses and saw how much work that would be..
Update: Dec 2023..
Got a good deal on some trailer goodies.. All of it new !
Don’t need all of these things for this trailer… but those wheels would look sweet.. And a wheeled jack would be a good thing for this project too. This will be next winters project.. 2024-2025.
Change of plans… I’m not going to be planning for next winter. There is a few things I’m not happy about the frame. I would like the hubs to be 5 bolt, and the wheels to be a few inches wider. SO ! I’ve decided to change and build a utility trailer. I have most of what I need and far less work. So Let’s get a new page going for that shall we…
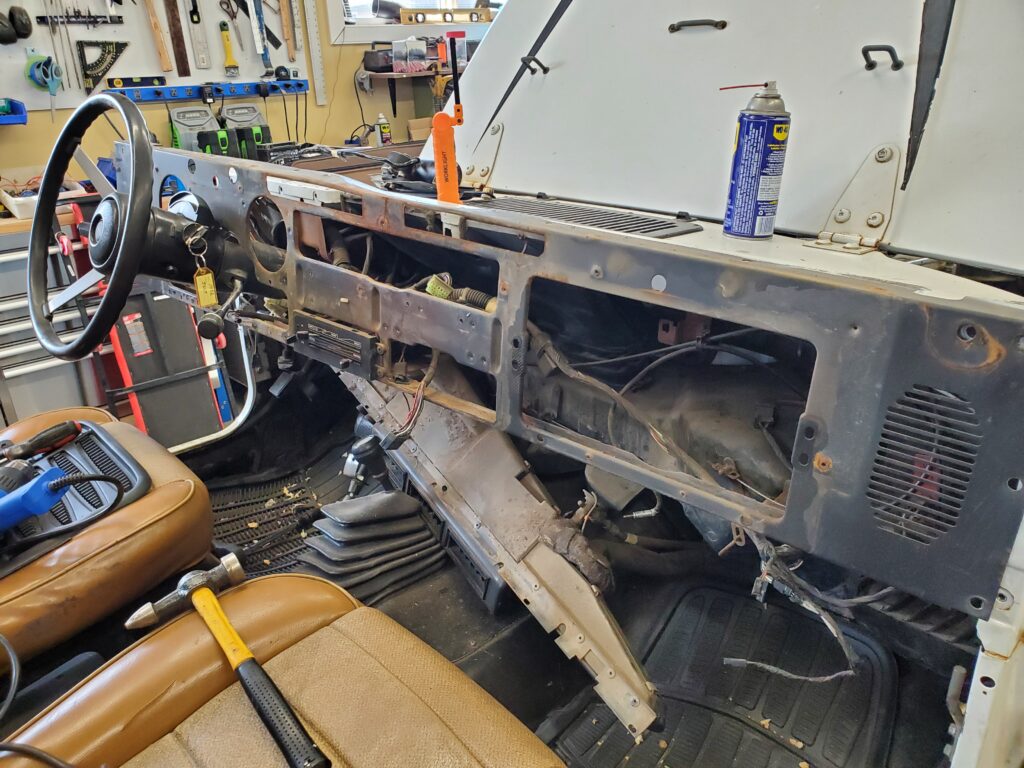
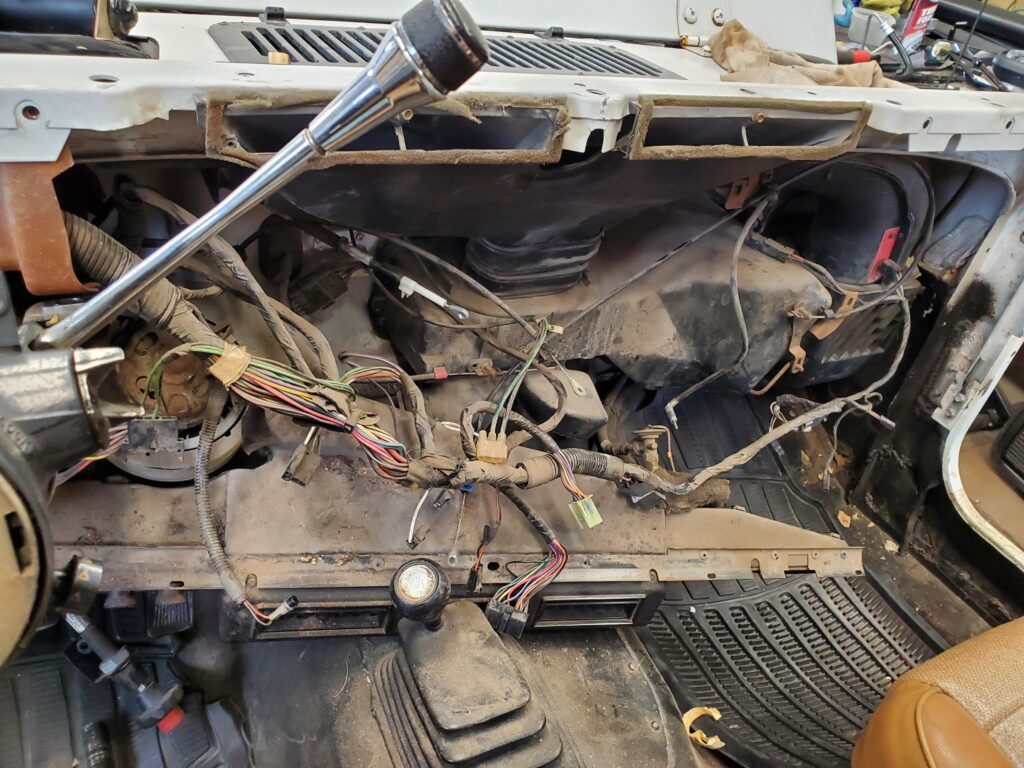
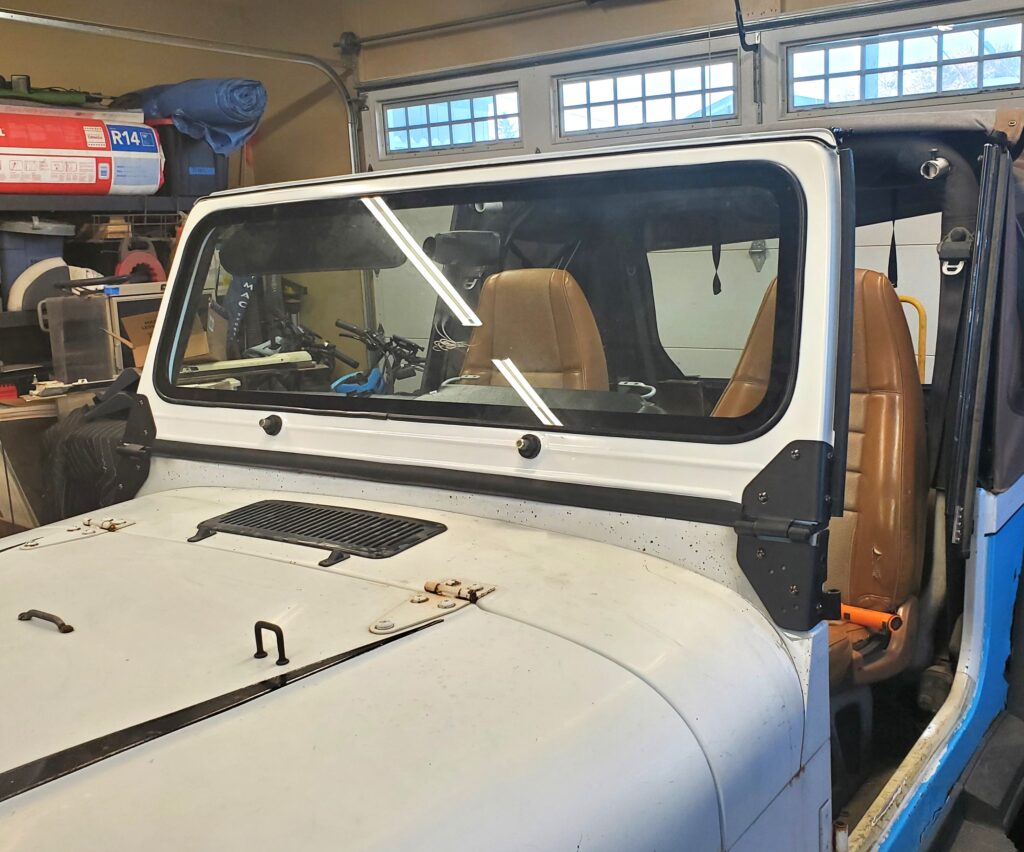
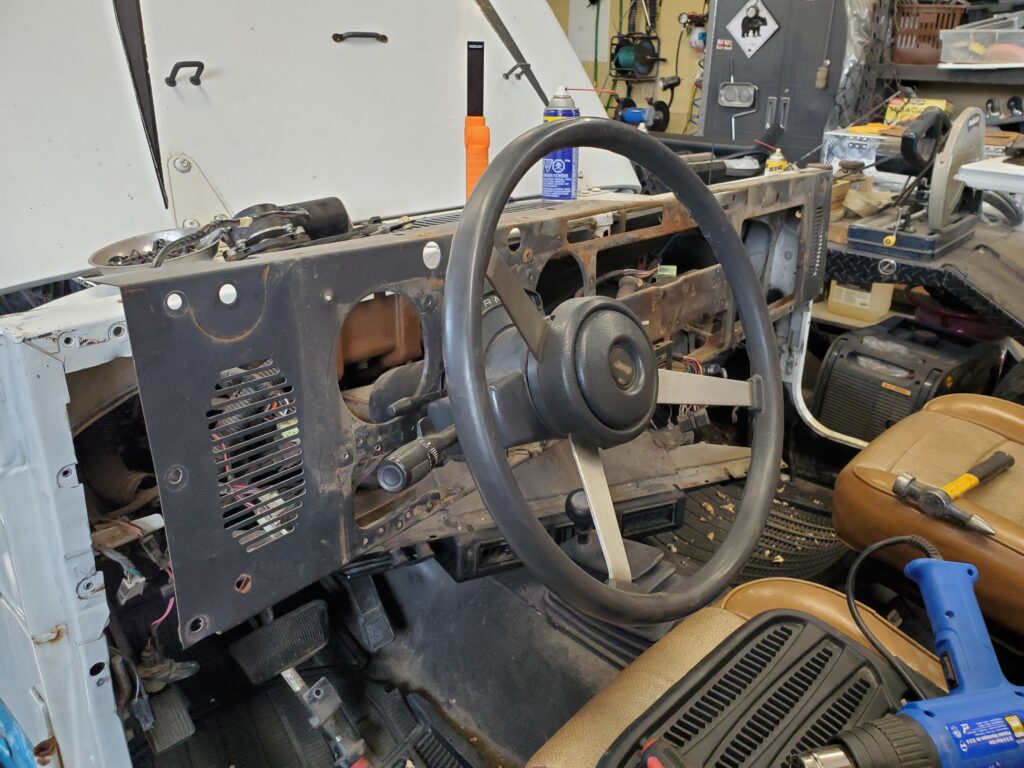
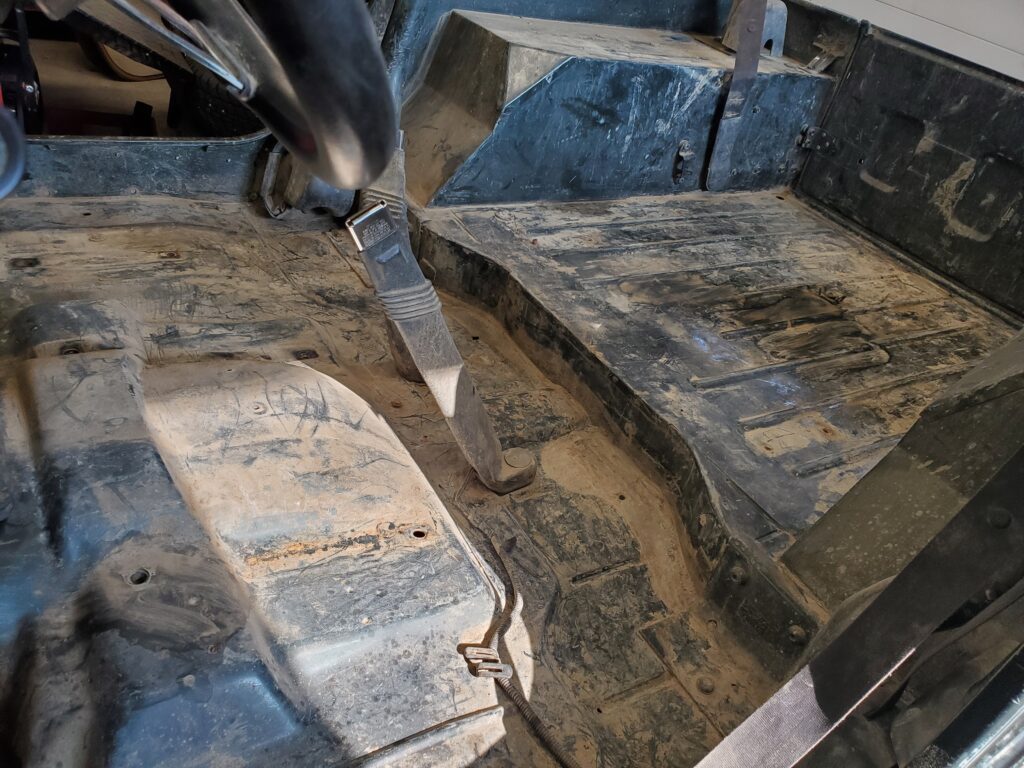
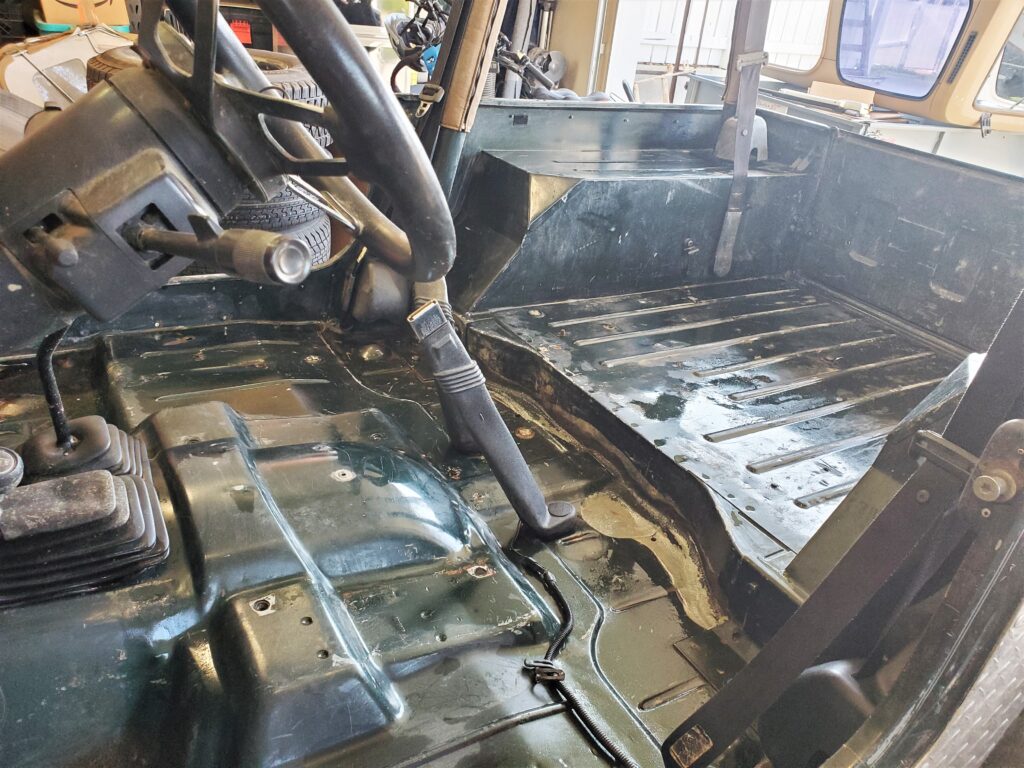
But work is starting early on the dash and things around it. This has to be done to install the new window hinges. There is nuts on the back of the lower hinge bolts, behind the dash !
For a day I’ll be cleaning the dust & dirt. I have to admit that this work will be easier without stuff in the way. The steering wheel will have to come off so I can get the metal dash back out.
As you can see it’s got some rust and needs a paint job. I made a video about the process .
As I take things apart I’m testing , poking and prodding. I’ve ordered up a few new things like 4×6 speakers. Way easier to install those while the dash is apart. The same goes for new LED lighting for the gauges. But first is that cleaning… Badly needed !
Let’s make this the before photo. Yup it’s dirty..
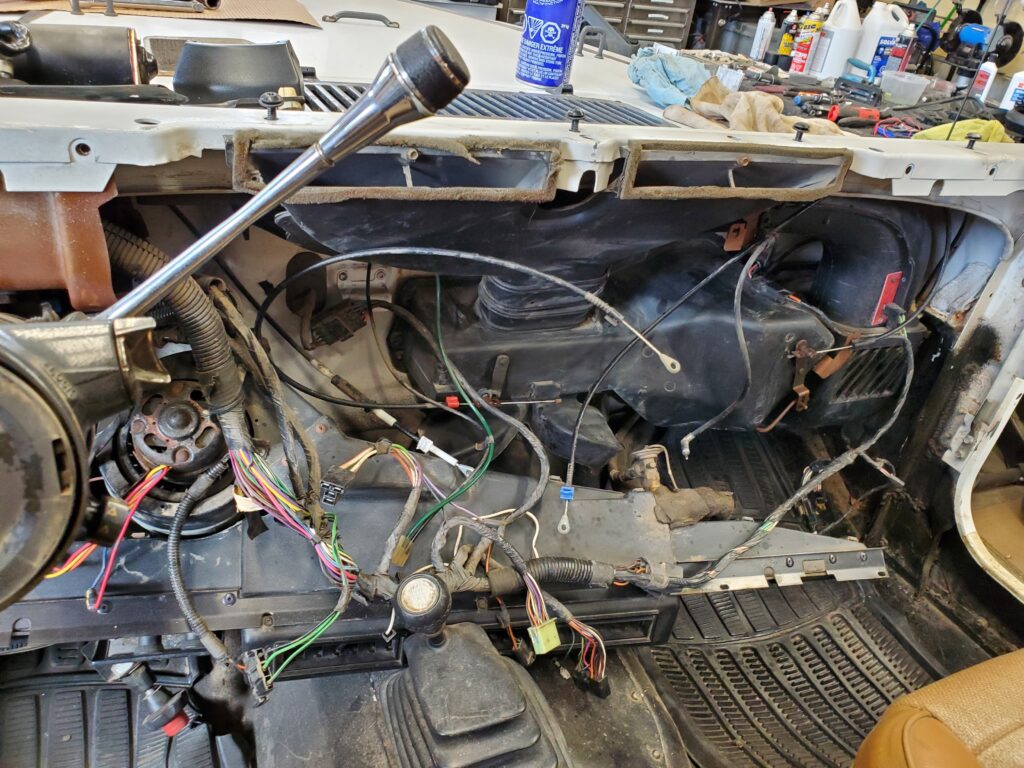
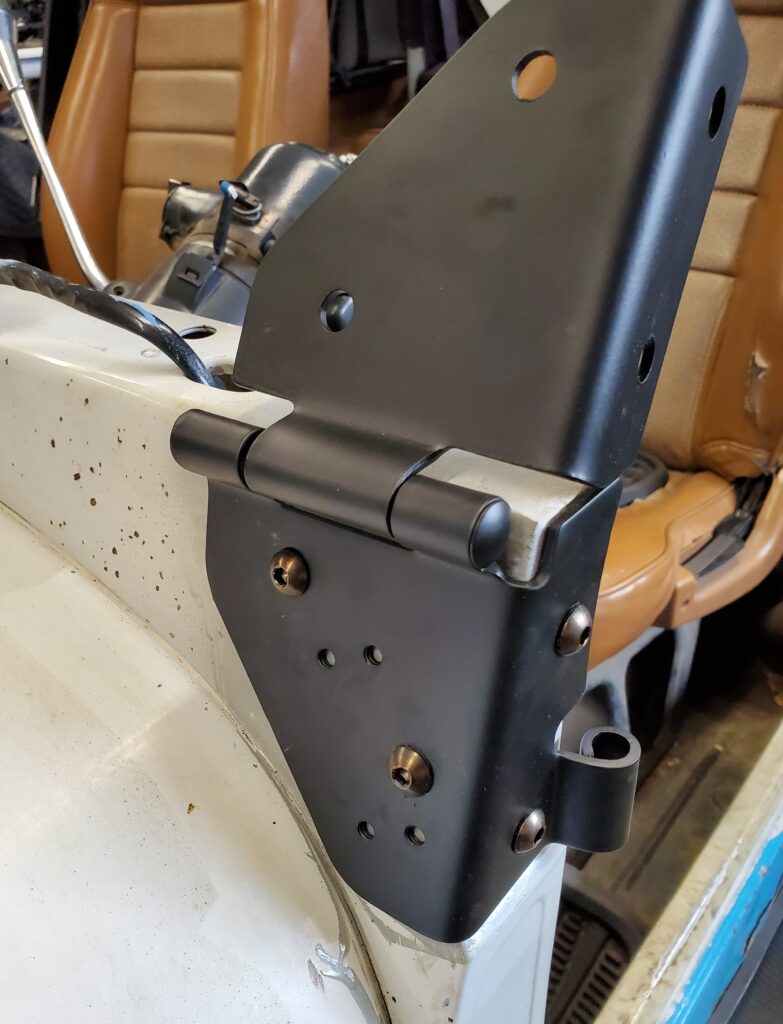
And the after… less dirty Checked a lot of the wiring and found no issues. Lubricated the three heater cables. Cleaned the contacts & plugs. Plus I mounted the new hinges. I needed to understand where the grounds were, the illumination wires and stereo wires.
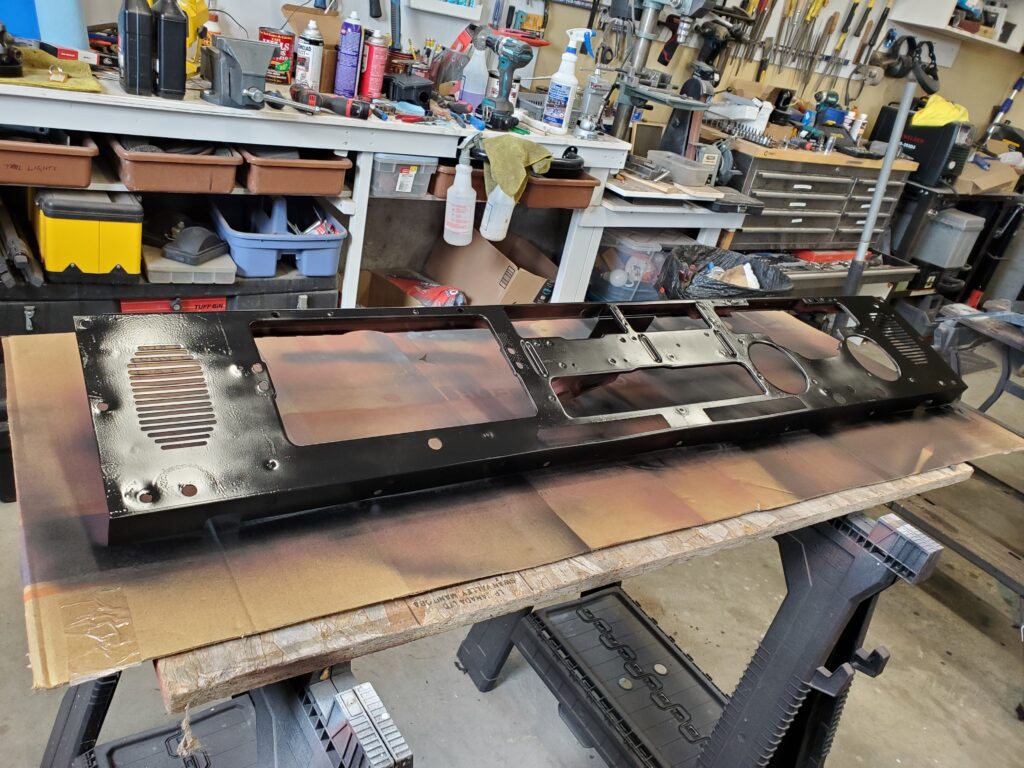
I like the new allan head bolts. Used locking nuts and washers so I won’t have to worry. Also started the painting on the dash backing plate.
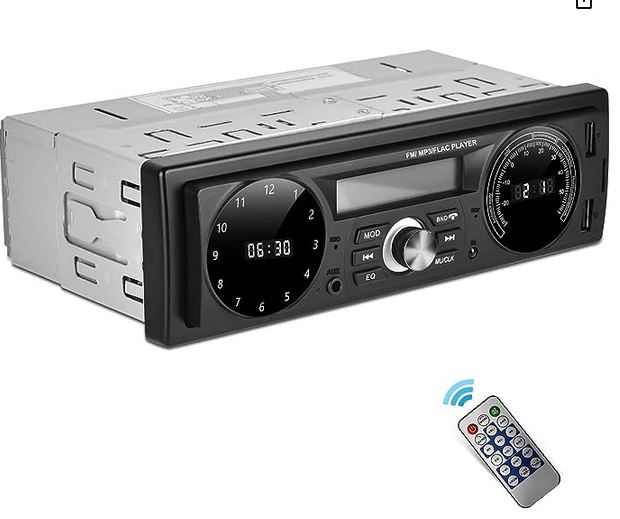
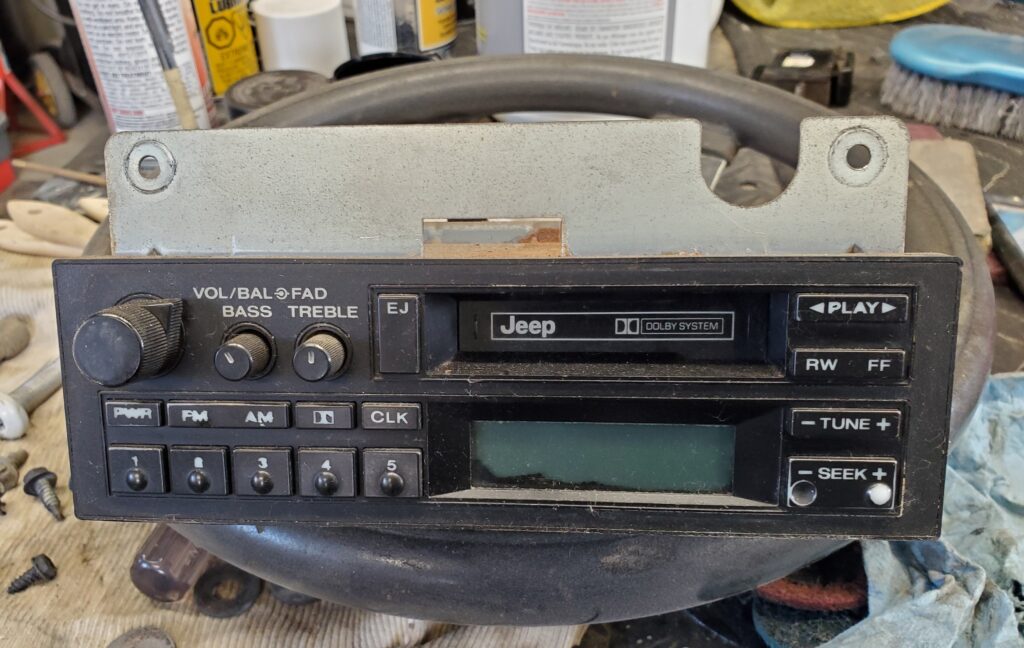
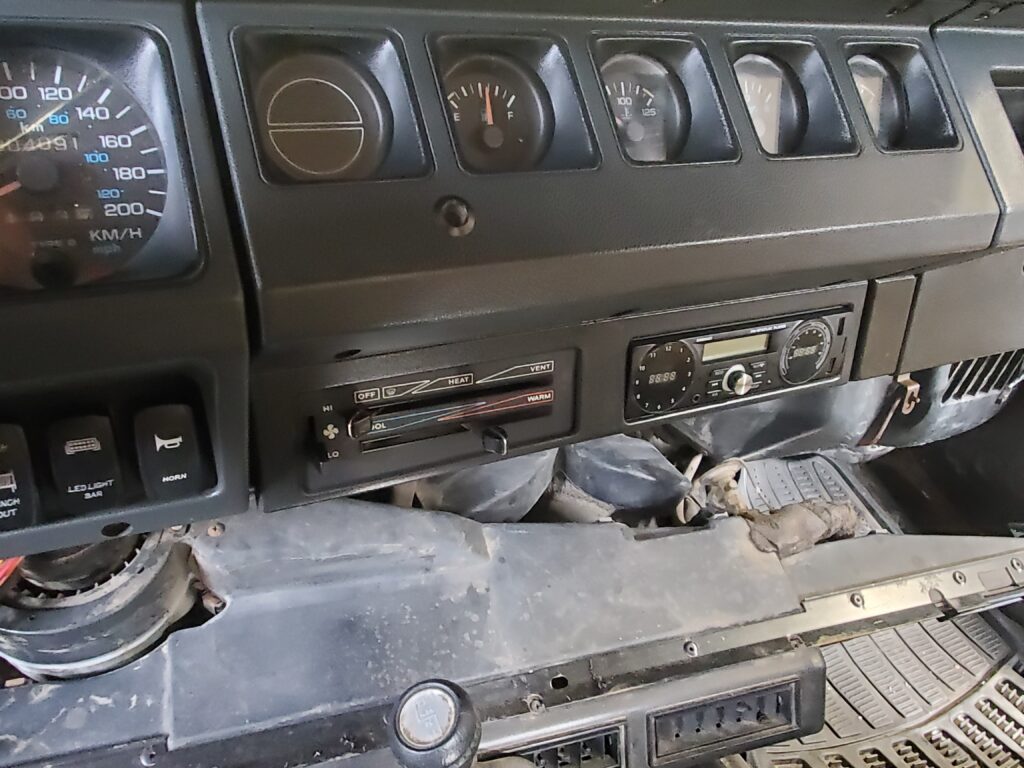
And then I found a new set of speakers in one of my bins. So I guess I’m going with four speakers ! Nothing wrong with that. I ordered an interesting stereo for the Jeep.
Car audio is mostly the same these days, all digital. no cd’s, no cassettes. This one I liked because it has a clock and the temperature. AM / FM , USB and SD card. What more do we need these days. It’s good that the wiring is in place behind the dash for rear speakers for a four speaker system. The factory “Jeep’ stereo did too but only used two, The Jeep stereo has seen better times.
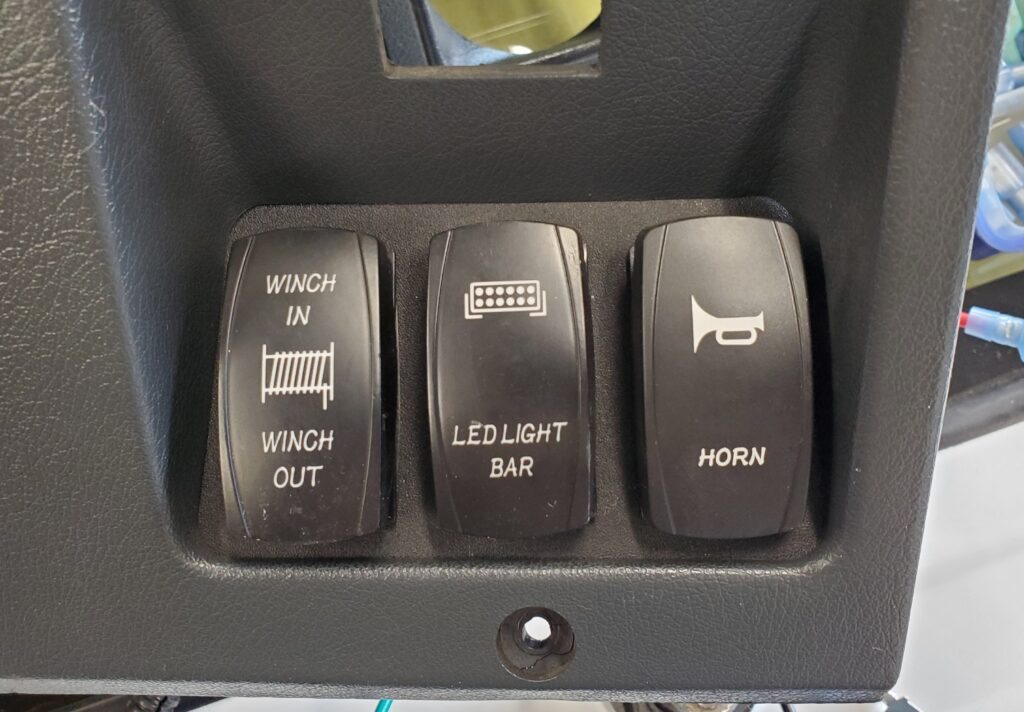
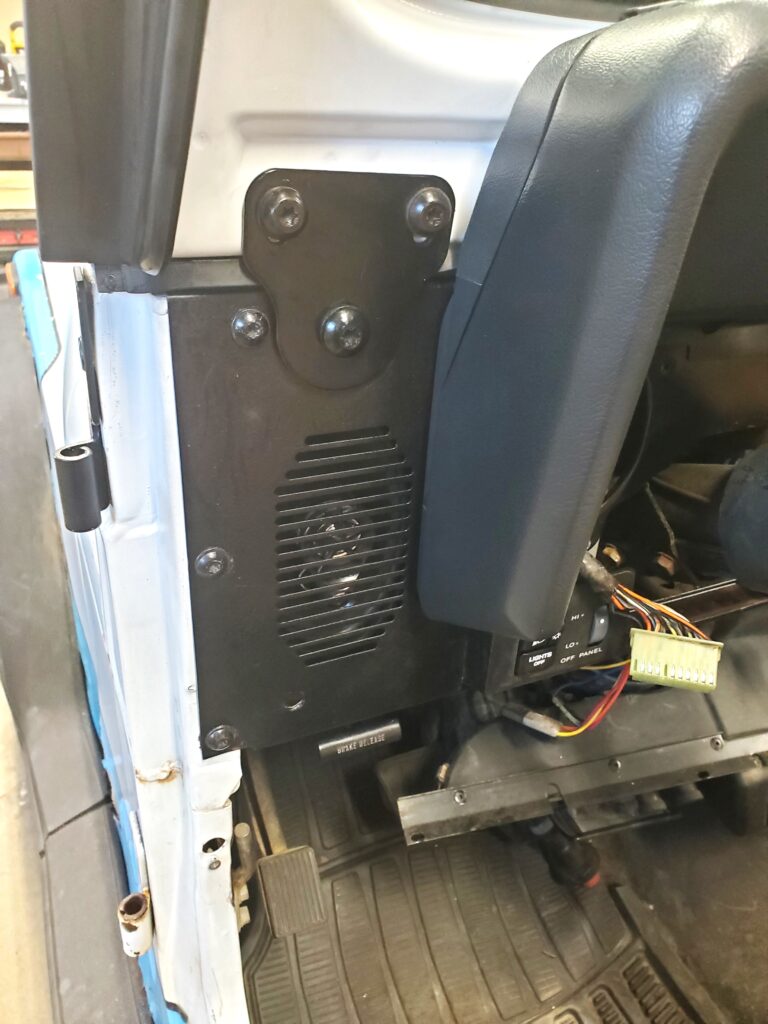
Past due for the upgrade. So onward I go with some extra wiring. Easy to do now rather than later. I ran the speaker wires to the back, and made up two LED courtesy lights for under each side of the dash. I’m using the blank place where the rear window wiper and defrost switches would be. And installing these !
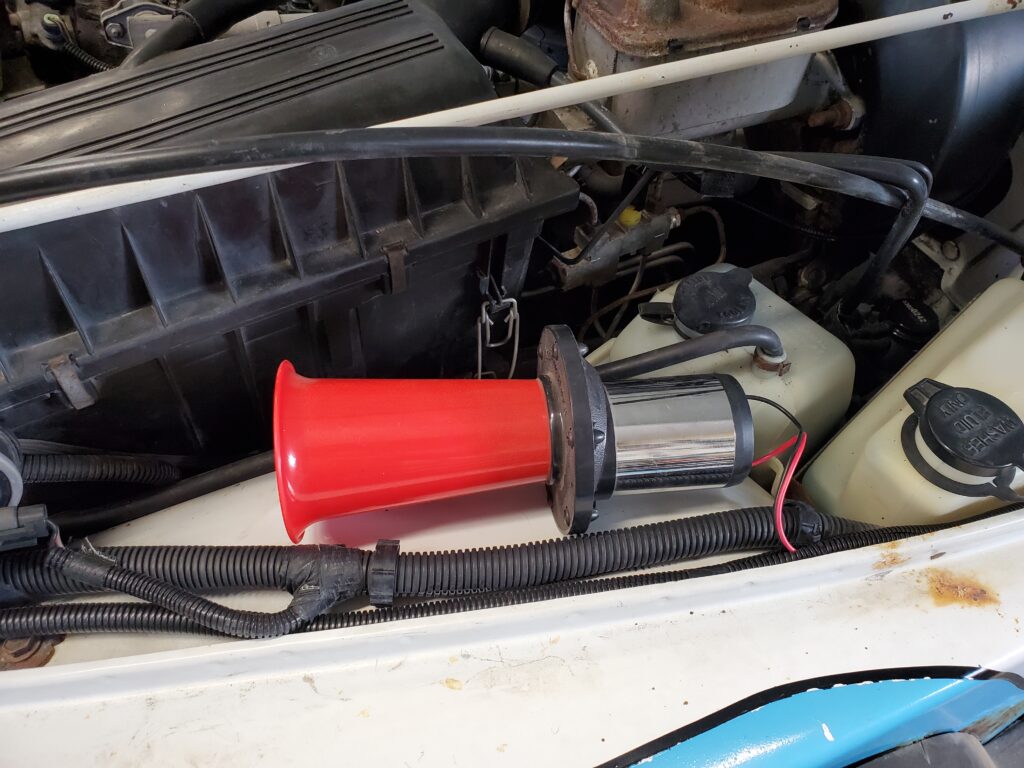
Thinking ahead here.. The horn is my OOGAA horn that I’ve used on my ATV in parades. What the heck .. why not. I have a pair of small LED light bars for when I build a new bumper. And of coarse a winch at some point too. All pre-wired now, but the OOGAA horn is installed.
It’s like this spot on top of the fender was made for it. And now the new window is on the Jeep too.
As soon as some more bits and pieces arrive I can finish the dash. It’s looking good so far.. The repaint is nice and the new speakers too !
The dash is complete now.. Everything went back together properly with only the frustration of using the Phillips head screws !
New stereo fits like it was always there. Same goes for my new switches where there was a blank spot.
New and improved night time lighting for all the gauges. And now it’s time to button the roof back up and sell the 95 Jeep. This Jeep will go to the shop and have a few things done. All done for now.. It will be months before I get back to the Jeep.
Change of the plan:
Just a little bit.. I need to work on the Ponoka Trailer and sell it to help with the costs involved with the 92 jeep. The 95 is not selling. So the 92 is parked out side for the winter. Any work will wait for now. I did find a way to insure it so I can transfer and plate it. And this is without it passing an inspection. That was great news. I can now take all the time I want to get this jeep back on the road. It’s tucked up beside the house for the winter. Plans are going to change by spring .. you know it.
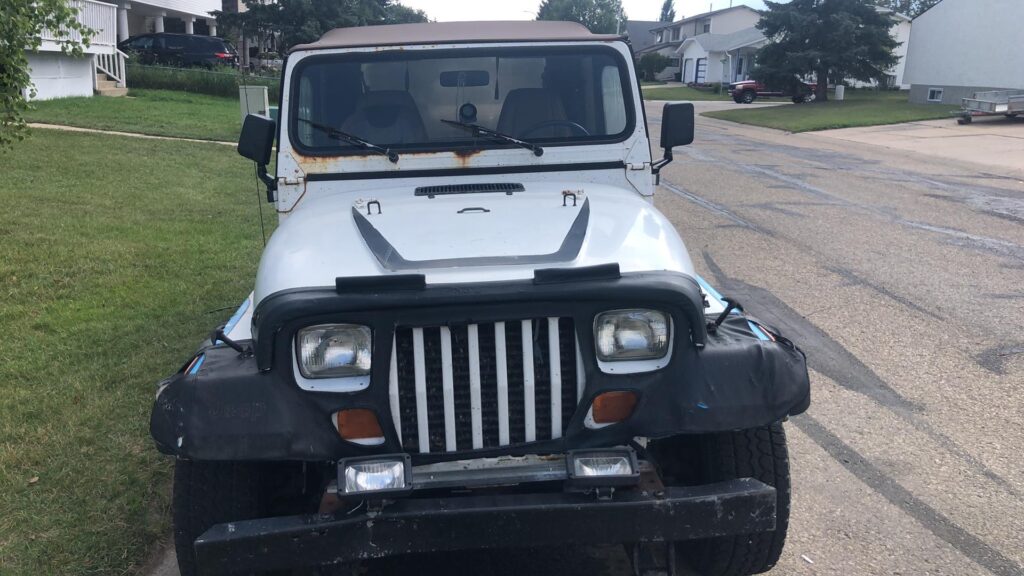
When the first Jeep you buy is looking like a real money pit… Then you just go get a different one ! Just make sure you pay less… then you have more to spend and you feel better. But it’s more than that.
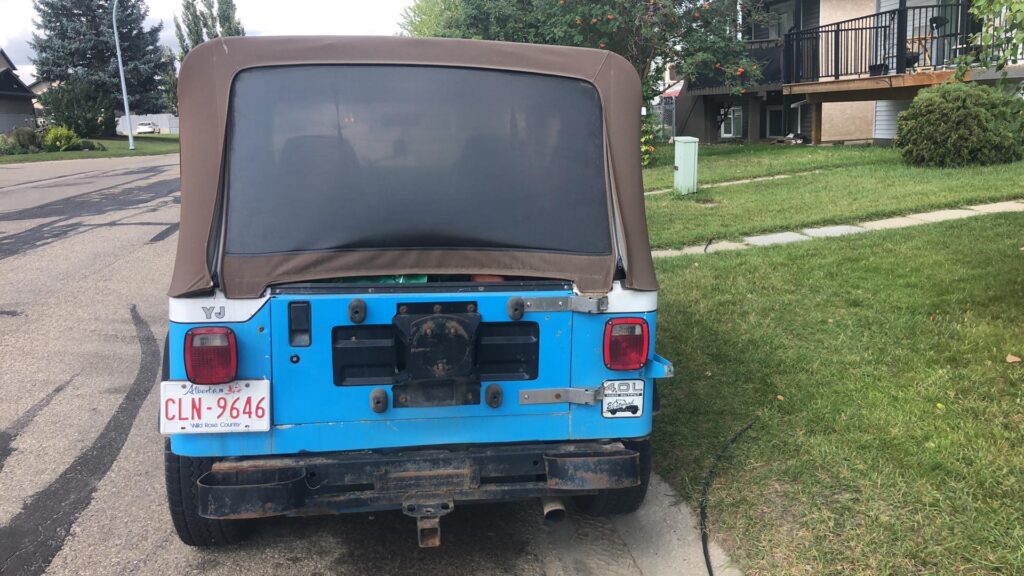
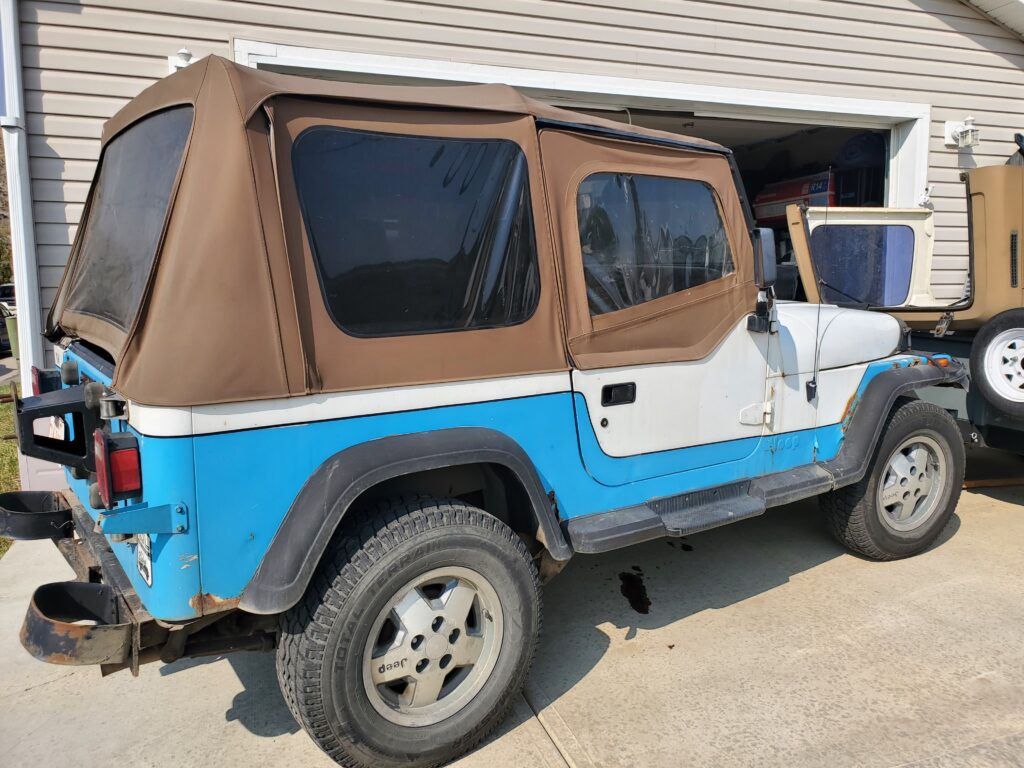
What do I mean MORE. Well let’s see… I drove it home 178 kms on the highway (not towed). You learn a lot from that. And it did great ! I like to drive automatics.. Really ! Clutches and 5 speeds are over rated. And another thing that’s a big part of the “Jeep” experience is the open air… so a soft top is a huge bonus.
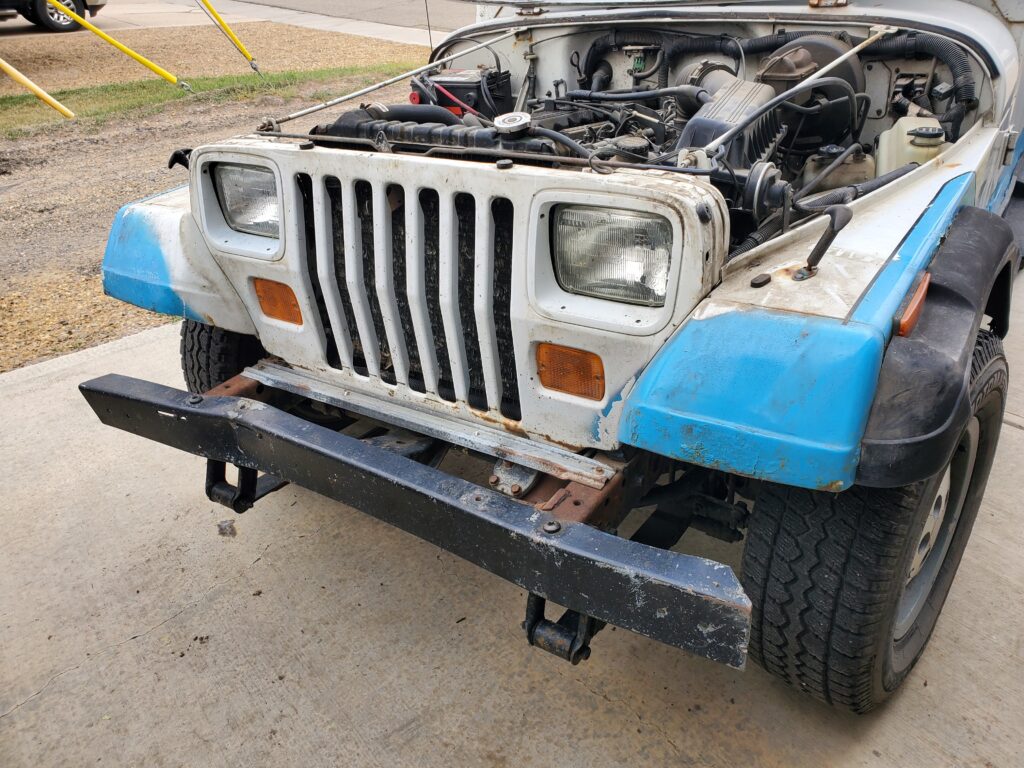
“Unmodified” .. I don’t want to repair or remove someones bad ideas. This one still sports the “jeep” rims, steering wheel and mirrors. Even those ugly “bumperetes ” are there… bent but there. Same with the front bumper.. bent but there !
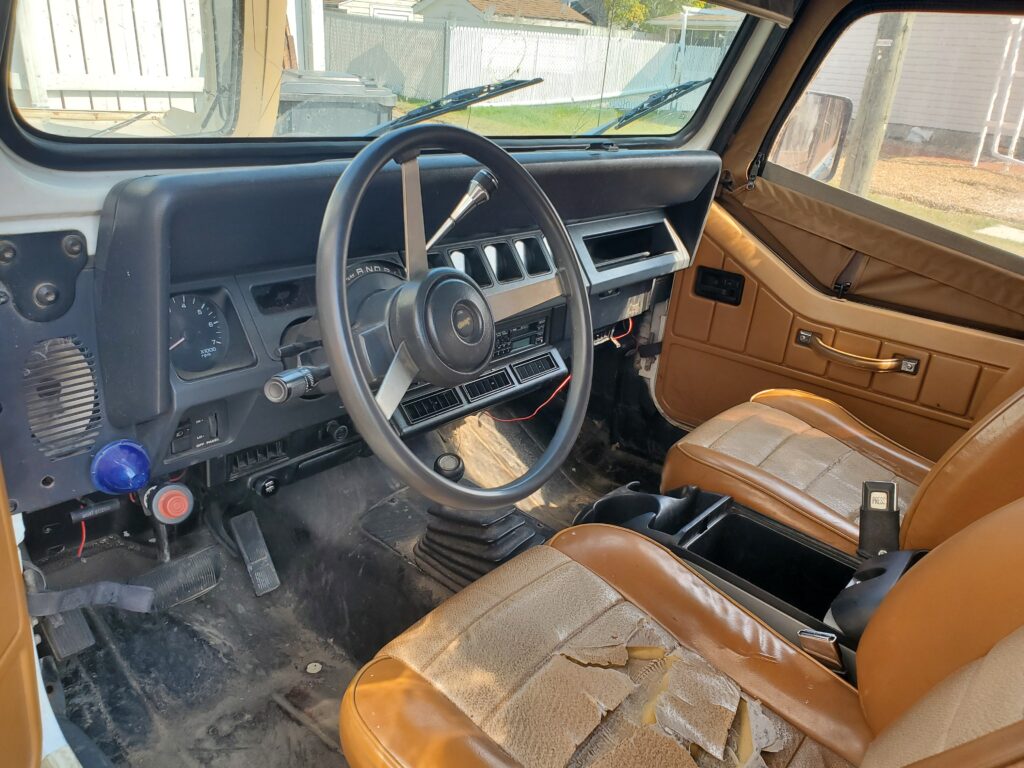
Even the interior looks like it’s 30 years old(seats for sure). And we are talking a cassette player ! Wow so 90’s. And what’s with the blue light? That has to go bye bye..Those are A/C ducts under the dash, Factory ! You don’t see that in many old Jeeps. And look the jacking tools were still in the holder under the hood.
And I had some time with not much going on SOOO…
I made these look “newish”
You know there is the “good stuff” too. still got the good inline 4.0 L six motor. And it runs great. There’s factory A/C if I can figure out how it works. I like the half doors better than the full doors.. and these don’t need work. There is one very good modification the manual pull ( red button) to lock in the 4×4. Deleting the vacuum operated one that is prone to failure just when you need it. The hinges on all three doors are good and NOT loose. I attribute that to the half doors. They weigh less than the full doors. The spare tire carrier is ready for the spare. The fender flairs and running boards are NOT painted and in great condition. The tires are new, and the proper size. The top is only three years old and in great condition. The cost of the top and the tires add up to what I paid for the whole Jeep. These are the pluses. What about the bad things ? Well let’s have a look first. I’m sure more will be found by the mechanic on it’s soon to be visit. But what are the things I’m know about. Leaking transmission ( somewhere). Leaks in rear diff ( input and axles). A vibration at 70 km/h ? ( don’t know where). Right side front window hinge is seized. Lots of small things to tinker with. Like some of the gauges not working. All fixable, and worth fixing.
This was the window that came with this Jeep.. now painted back. See the post about the windows HERE. I had to learn how the soft top goes down and back up. in order to remove and replace the front window. Not hard at all. I also (as part of the window thing) had to fix the roll bar pieces that go above the doors and hook up to the window. Today I was washing our vehicles .. so I decided it’s time to remove the “crispy” bra on the front of the Jeep.
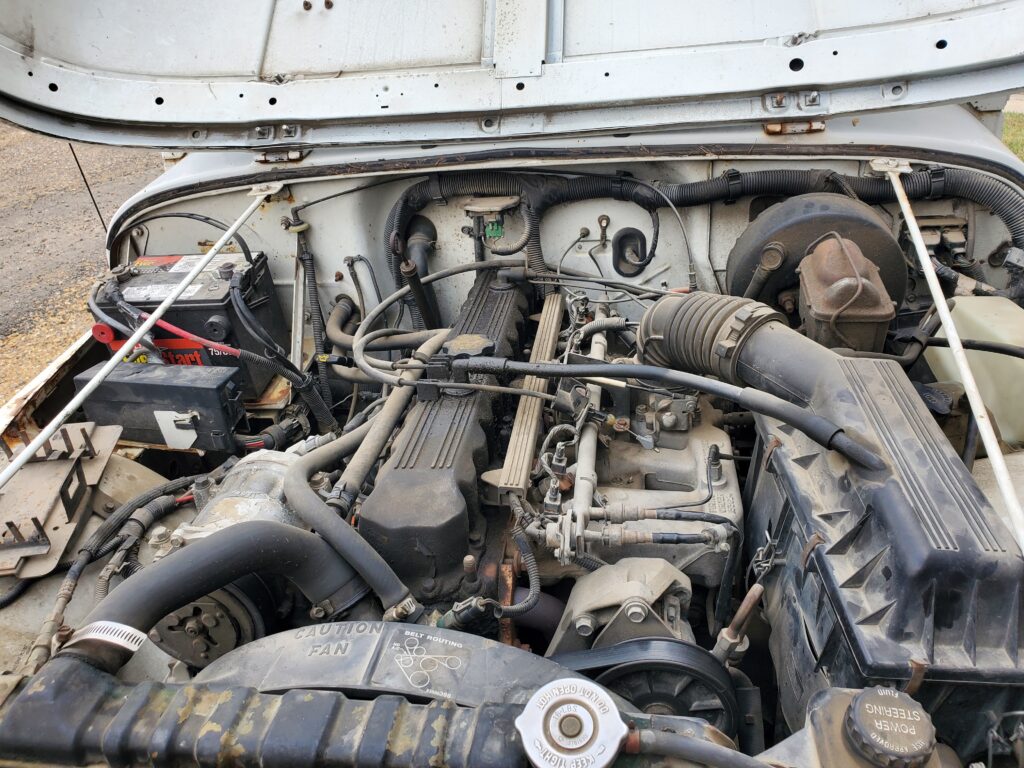
Looks better now. Boy that bent bumper bugs me ! I want to build a new one. Then I gave the motor compartment it’s much needed bath. Here’s a before photo (yes I remembered).
I’ve seen worse.. the idea was to get rid of the caked on dirt and oil on the engine. Here’s the after….
Again it’s not a profound difference. And overall things are looking good under the hood ! Ready for it’s date with the shop..
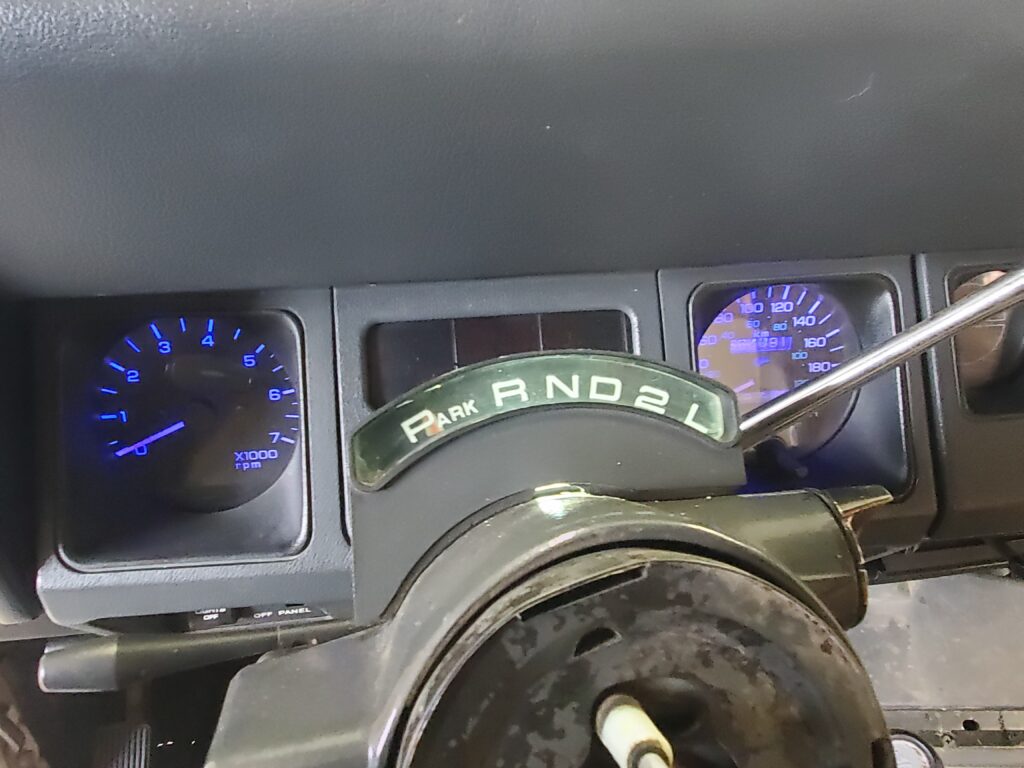
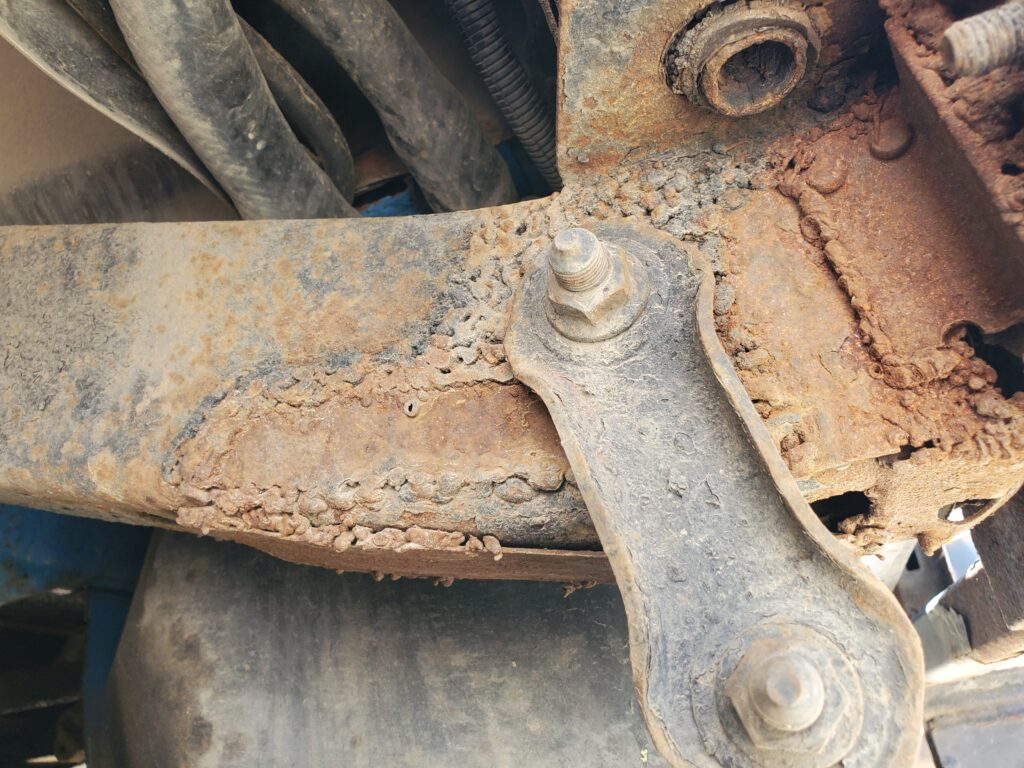
Okay… now I know what’s needs fixing from a professional. Lets go from front to back. So first on the list is new ball joints for the right side. Then there is a main rear seal on the motor. A leaking seal on the transmission. And the trans needs a service. now here’s a big one. The whole rear axle needs replacing. Too many issues to list. And finally the welded patches on the rear most of the frame for the spring hangers need to be re- done. So what now ? A welder is going to have a look if he could fix the rear spring mounts. So we will see about that. I could swap out the rear axle from the 95 (if the ratio is the same) . I could pull the trans and take it to a transmission shop. and then I can change the rear motor seal. I would get the shop to replace the ball joints because I don’t have the tools for that. The debate still goes on about which is the better jeep to spend the money and time on.. I like the 92 my Son likes the 95.
Here is the frame problem.. What a mess with the welding ! This is the rear of the frame and that is the rear spring hanger. And this is a common place for the rust to happen.. They make new (weld in ) frame sections for here. So a fix is possible.. and good.
I just solved one of the big problems. I found a used but good rear axle that’s a perfect match. Only a leaking pinion seal.. I can do that..
No other leaks. Came from a jeep that had a bad frame.
Here’s a new video I just made..
Well due to a problem switching the windows the 92 Jeep is now the one in the shop. Had to remove the dash to get to the backside of the hinges. So I guess I’ll be working on the dash and things behind it.
Five thousand screws later I have the dash apart. Now is a good time to start a new post cause things are going to get serious !
Except the gaskets and window channels. The Jeep is ready to go to the shop in two days. so I’m picking away at the doors. I removed everything except the window regulator. Those four Philips screws will not budge. There’s no repairs needed so I’ll leave well enough alone.
Same with the hinges. Not going to chance damaging the torx bolts. The hinges get the red paint anyway. After washing the mud out and doing a few repairs I have started the painting. Satin black for the door frames.
Sampled the regal red from the spray can… not thinking it’s dark enough. But we’ll let it dry and see.
The Jeep is off to the shop now.. and another thing we’ll see is what they find wrong.. That was the longest drive today.. and I have some thoughts.. I think the clutch needs adjusting. Wanders a bit on the road . So maybe a wheel alignment. Well it turns out that there is lots wrong ! The transmission has NO 4th and 5th gears. That’s bad. One front bearing needs replacing. The power steering is leaking because it was poorly installed and buggered up.. So that needs to be replaced.. And of coarse we knew about the exhaust system.. And lets ad to that a new front window and a new rear window… The cost is starting to get crazy. However I have been told by “Jeep guys’ that a fixed up Jeeps are worth it. And the only thing that would halt spending money on the Jeep would be a rusted out frame. So we shall keep on with it…
Back to the doors… with the extra room in the shop I started working on the driver’s door. Welding the cracks that all Jeep doors apparently have, and fixing the rust. Then this happened !
Tap tap with the body hammer and a rusty spot became a holey spot. No worries I’ve welded a new plate on there. And the doors have the new paint on the parts where gaskets go. I finally made a new video..
And this reveals the plan to sell this Jeep and switch to the 1992 Jeep.
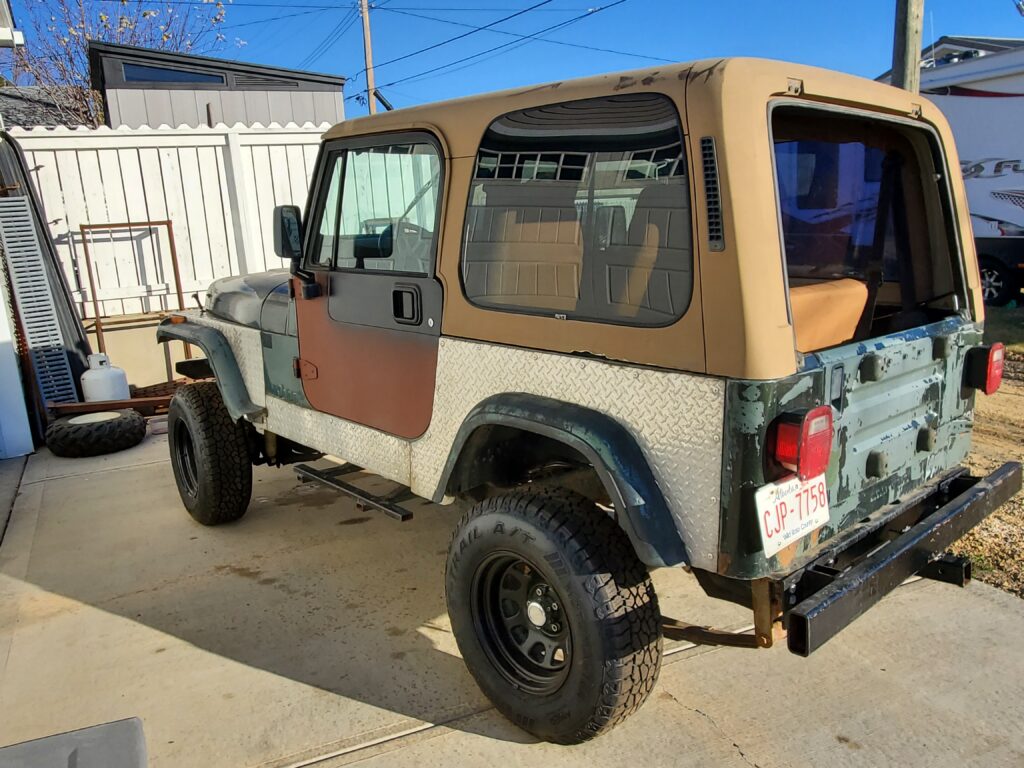
So let’s have a look and talk about the second Jeep. A few years older (92), but it’s in very good condition.. But most of all it’s 99% factory original. With the only modification being the popular manual 4×4 axle engagement. Best of all it comes with a full soft top (that I wanted), half doors (which I also like ) and it’s an automatic, which I very much like. Sneak peak…
This one cost less than the 95 YJ.. It runs and drives. It too has almost new tires. A/C, trailer hitch and the spare tire mount I wanted.
The body has rust holes, and there are some leaks to fix and some electrical stuff. Not lifted ! The good old 4 L inline six too. Runs great !
That Bra is ratty and is coming off. As you can see the windshield frame is rusty so the new window frame and glass will go on here. This is the Jeep I should have bought first time.. but it wasn’t for sale then. So I will correct that by selling the 95. By the way does this photo look familiar ?
Ya.. This is the year of YJ Jeep they used.. Those are the factory rims painted red. Interesting I live in Drumheller. Don’t worry I’m not thinking of that paint scheme. It’s just a white Jeep with a blue splash. Quite likely it will stay that way.
Enough about the new Jeep.. It will get it’s own post here:
1992 Jeep YJ Wrangler:
Back to the 1995 Jeep.. Well work on the doors is complete, and they are back on the jeep. Next up is the Jeep front window switch-a-roo. And because it involves both Jeeps and it’s own unique work it warrants a new post: Jeep Window Post
Jeep Front Windows :
I’ll get back to the 95 Jeep after the window fiasco. The plans are to install the back painted window on this Jeep and the top back on . See what the newer wheels and tires will look like on the 92. Not sure yet what other bits we will transfer over. And the debate over which jeep is best also continues.. That means there is a lull in the work.. However I am fixing the power steering leak.
Cleaning is first on the to do list.. The motor and under the hood was very dirty. So much easier to see what you’re doing without the dirt.
trust me this is way better then what it was. I forgot to take a “before” photo. Not much to do under here. The leak in the power steering reservoir , a new belt and could use an oil change.
OOPS ! we had a little mishap. As part of the cleaning Ben and I took the hardtop off.. And it was heavier than we thought it would be. and … we dropped it on the tail gate and broke the rear window.. Darn.. One more thing for the auto wrecker list.
I removed the passenger door so I could do the repairs. AND clean the caulking off the vent window.
WHY ? Was it leaking ? What a pain.. I did get it all off and the window works again. I’m going to take the door completely apart, and rebuild it.. And I have some new parts for the doors coming. I like the full doors so we will fix them up like new. Let’s see now, doors off, top off and now the seats are out too. Time for a bath on the inside.
And boy is it needed ! Years of mud and dirt. It will look different tomorrow.
Much better ! Now we can see what’s under the dirt . Also… A topless jeep is kinda cool..
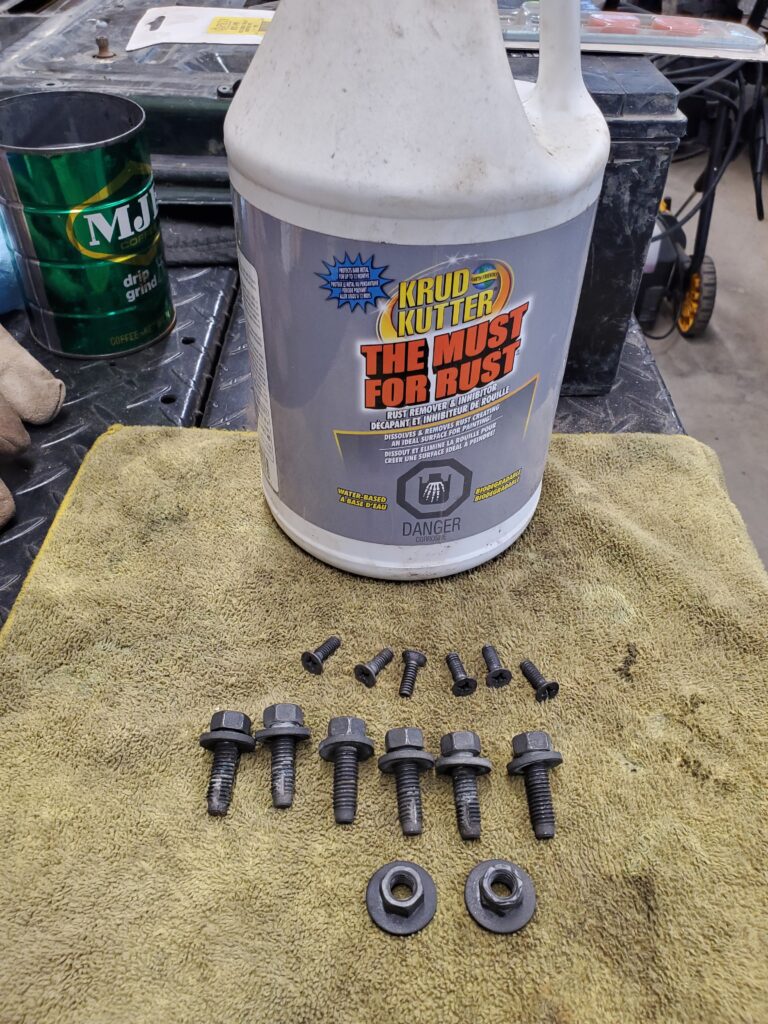
I’m trying a product I bought years ago for turning rust into primer. Can’t remember what project it was.. But it works. I’ve soaked a few of the rusty bolts and screws in it and wow do they look different.
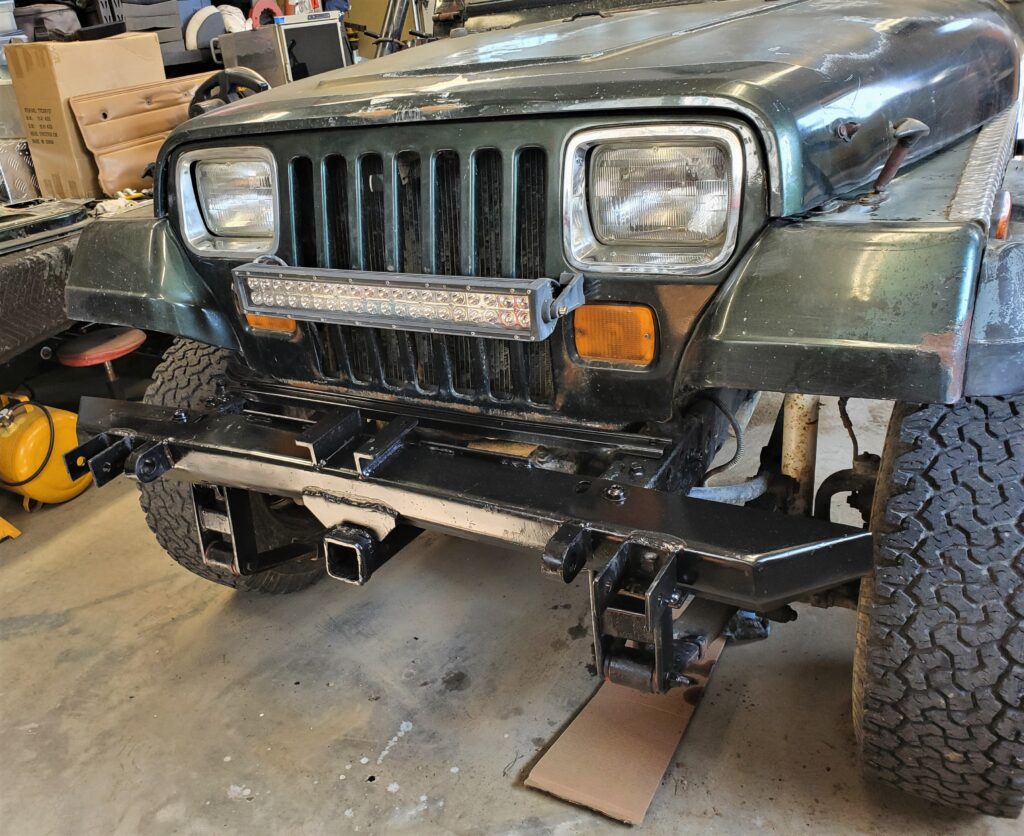
These were very rusty seat bolts, and the screws that hold the mirrors on. So I used it on the front bumper, let it dry and painted it semi gloss black.
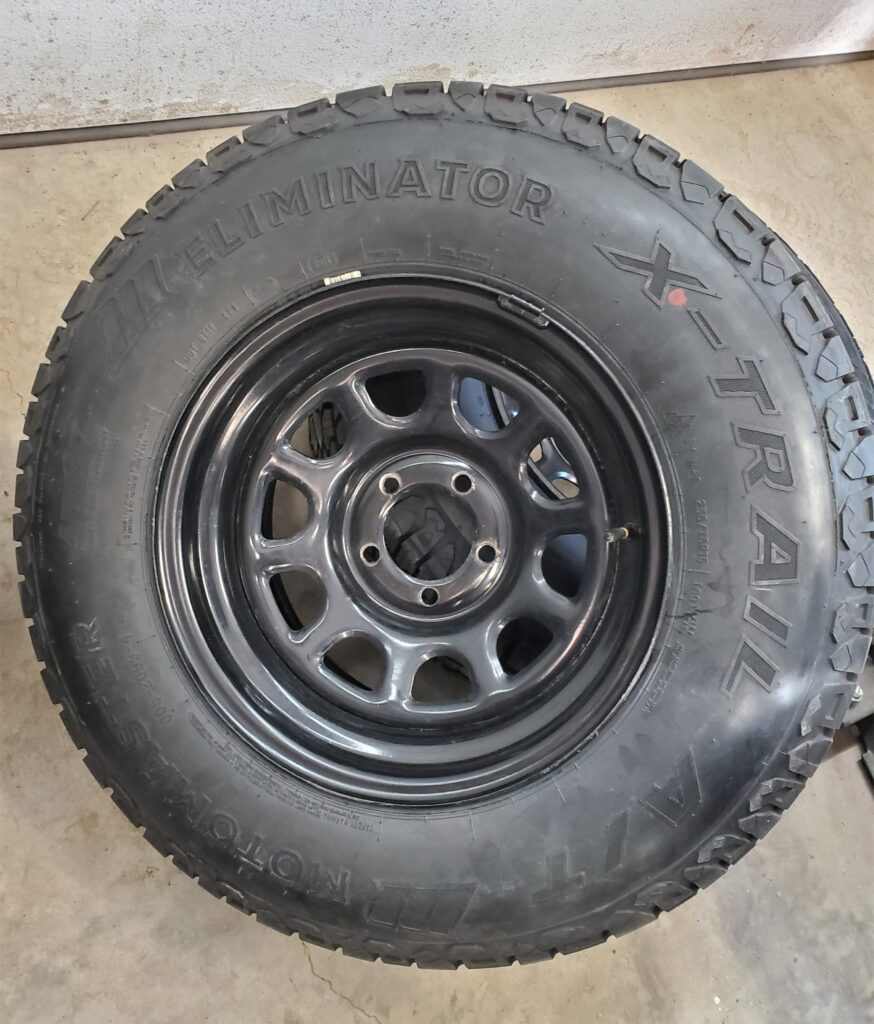
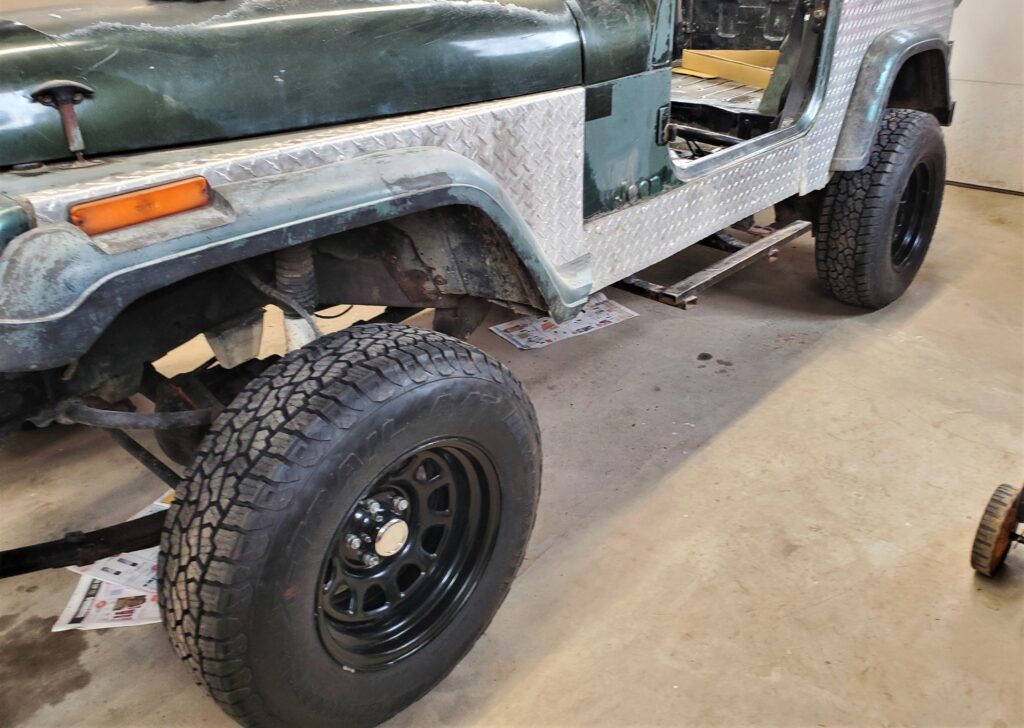
Now it’s time for some new tires. The ones I chose are multi use , trail , snow, mud and the good old road. So I had them mounted up and now I need to freshen up the semi gloss black on the rims. These are not the big fat tires that were on the jeep, but a much more reasonable size. In fact close to the factory size. There was some rust on the rims … I treated it and repainted them .
Looking good where the rubber meets the road. Next I’m painting the seat frames, and they will go back in so we can drive the jeep.
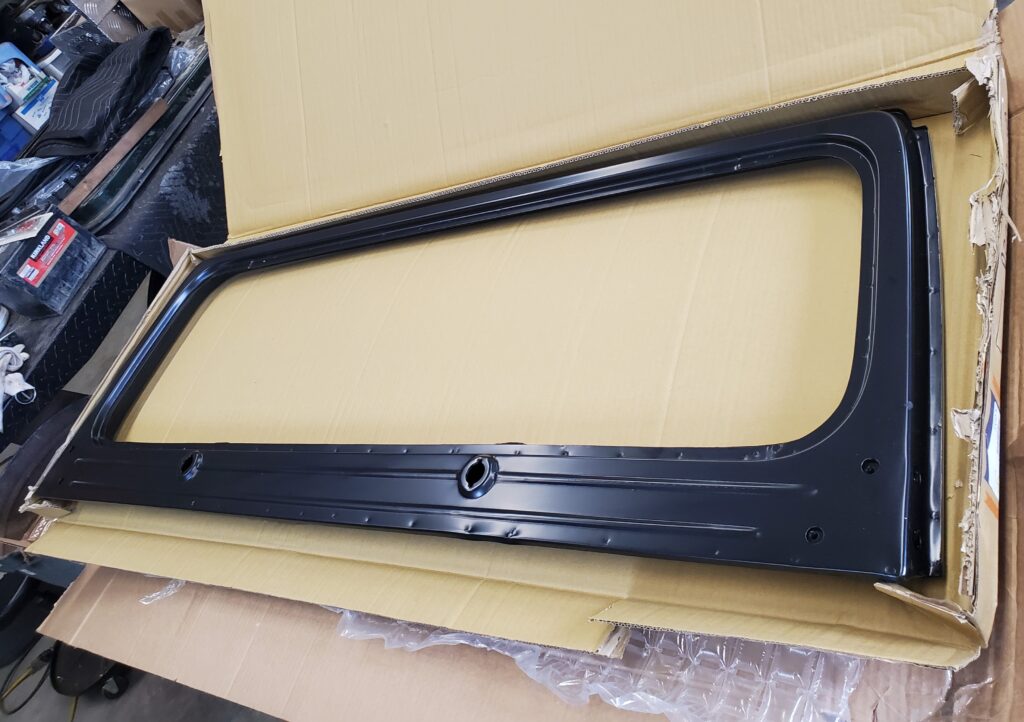
And here we are with the new tires on. Some nice new center caps to fancy things up a bit. Today my new windshield frame came. The old one is rusted through and dented up top..
This will make it so a new window can be installed without worry. Putting the seats back in today. Ordered a new steering wheel too. In a few days the Jeep is going to a shop to have some work done. They will install new tail pipe, a new belt and fix the leak in the power steering. Also we will see what needs to be done to pass the safety inspection. While in the shop I’ll rebuild the doors and paint the window frame to ready it for new glass. We’ll start a new page for that work..