It’s the beginning of March and it feels like spring out there.. But I carry on with getting the jet together..
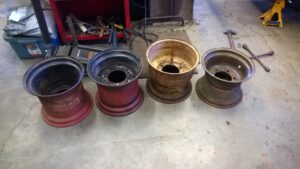
I did get the tires off the rims.. and I did order new tires.. but about these rims.. the two on the left are real Terra Jet rims.. 12×12 with a 8″ off set. The other two are different.. I’m thinking that this Jet being the first production model they hadn’t figured a few things out yet. Like the length of the rear axle. Let’s just say these rims compensate for that nicely.
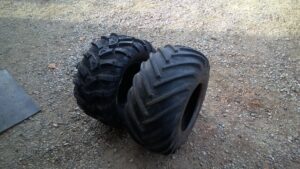
It’s very hard to source the proper tires that are used on the Terra Jet.. these come as close as I can.. and they are a good price. Should arrive in a week. Also waiting on more chain.. I used all ten feet on the front drive.
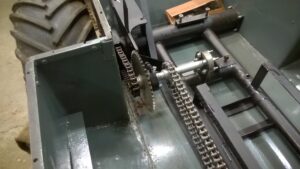
The new drives chains are on and we made a new idler sprocket for adjustable tension. There is new nylon in the bottom of the chain trough too. So many parts & pieces were missing from this Jet.. Having to make a lot of things from scratch… But that is also a chance to do it better .
Mid March:
And this weekend I went and got another Terra Jet all in pieces.. So here’s the Post for that.. HERE
I think it’s more than just pieces, I’m thinking a third Terra Jet.. could be had… the important stuff is there … I may just take two of the rims & tires.. and the best two tires I have from the 400E and keep the new ones for one of the other Jets..
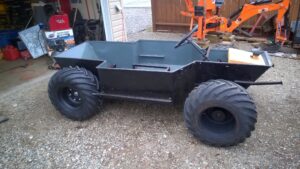
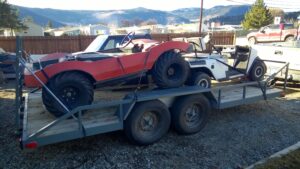
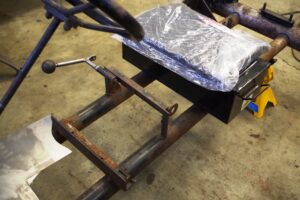
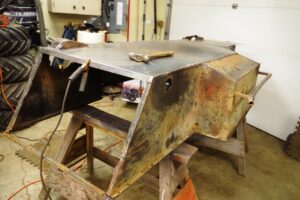
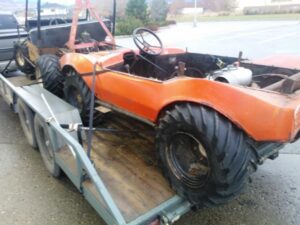
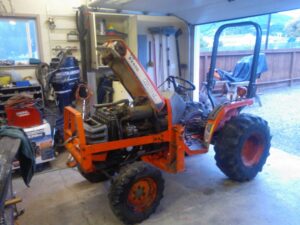
Got the tires all mounted on the nicely painted rims.. Tubes in the tires will keep them good.. And I put the wheels back on and pushed the Chassis out the door for a photo.
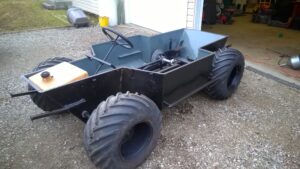
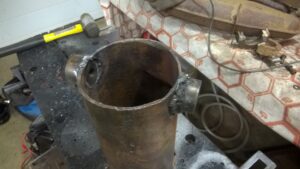
YES.. getting closer to that drive.. That’s the proper Terra Jet fuel tank in the front.. needs a repair.. but that’s where it goes.
Getting closer.. If I wasn’t so lazy.. and took less breaks.. I might just have finished the jet today.. but it still needs wiring and the brake caliper installed.
Unfortunately this is as far as I got before the yard work was calling. It’s full on spring now and lots to do.. So I moved the Jet out of the shop and tucked it away. Fully intending to get back to it in the fall.
Feb 2016…. Update:
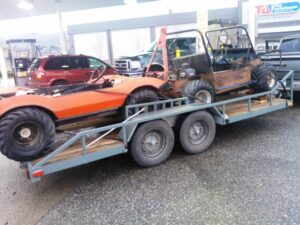
In the fall I agreed to sell the Jet to a friend in it’s un finished condition. To be picked up this spring.. So it was left under cover for the winter.. I had a look and it’s all good.. tires are still up and only a little surface rust on the bare steel bits. So very soon it’s off to it’s new home.. Kinda sad I did not finish.. But I have a newer Jet that I can work on next winter. So off it went…..With an old golf card for company.
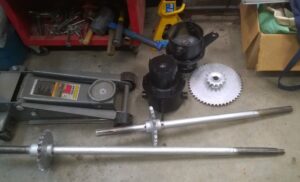
We are almost finished restoring all the bits & pieces.. But enough to start putting things back together..
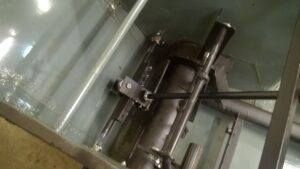
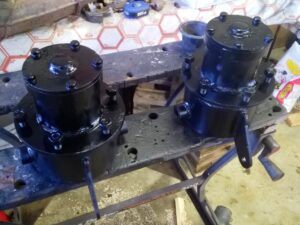
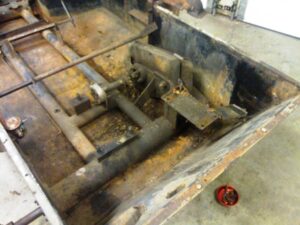
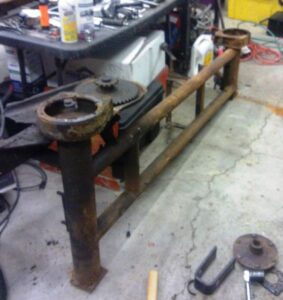
Back together again.. The newly painted frame goes back into the (painted a month ago) tub. First is to get the axles , bearings and housings bolted back together.
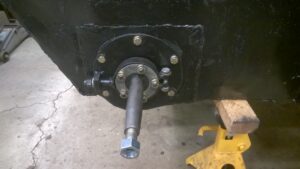
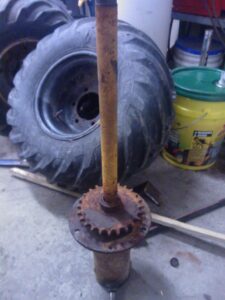
The rear axle is in and sealed.. this is the drive gear side… Interestingly it’s adjustable for chain slack. For the very short chain from the jack shaft. This Terra Jet has three chains.. Something not found on 1973 and up models.. which only have one chain running between the front and rear axles.
This is the other side.. New bearings & seals. The front is next. Plus stuff like the jack shaft.
Meanwhile back to the steering:
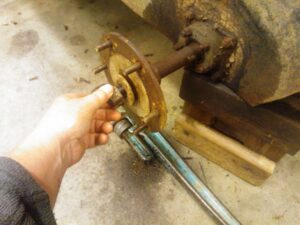
Can’t assemble the front axles with first fixing the steering. As talked about on page 4. I saw a friend with a metal lathe today and made 4 new collette’s.
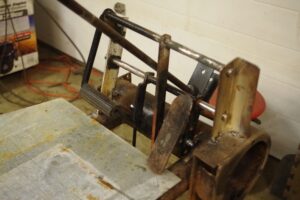
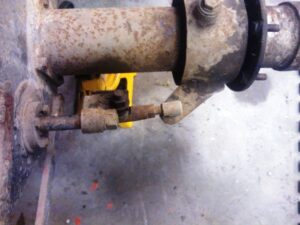
Here is one sitting where it goes on the steering tube. Once the bolt is adjusted correctly the allen bolt will lock it in place… SLICK. There will be a hole made and the collette will be welded in place.
Here above you can see the newly welded in place colletes. Big gobs of weld.. Have to be strong. Now isn’t that better than nuts welded on. Time to clean up the mess and paint them..
Today we got the front hubs back on.. and the new steering bushings work great..
We also straightened out the rear wheel hubs.. they bent a bit when we were using the puller to get them off the axle.. All better now.. I will be installing new wheel studs. Imagine… have all the nuts on each wheel… so many things I’ve brought home have missing wheel studs or nuts.. Not happening..
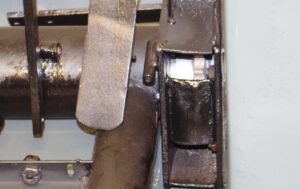
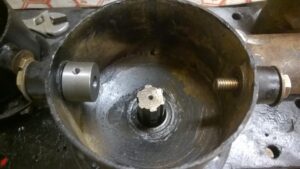
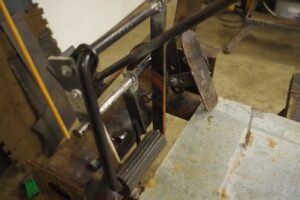
Oh Oh… I noticed a problem.. The front sprocket is not in proper alignment.
If you look at the above photo.. you can see a bit of the front sprocket hiding in there.. and you can see that it’s too far to the right.. That means the chain will hit the welded nuts. Oh darn ! The only way to properly fix this is to remove the front axle. I assumed that this sprocket was in it’s proper place. Not so.. And this may explain why there was no chain on the front drive. It most likely broke. So we had to take apart the front again.. Sigh.
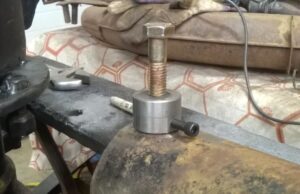
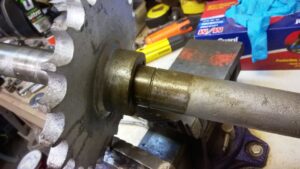
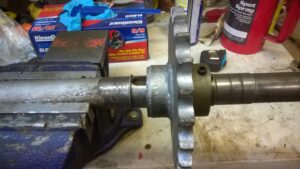
Of approximately 3/8″ .. See that distance up to where the E-clip goes.. ya.. that’s a lot. Tried to hammer the sprocket into place.. nope. So off to the press and we pressed it off the axle. Out comes the emery cloth.. and cleaned everything good .
And I don’t want this to happen again.. so I drilled and tapped for a set screw.
Just need to slide the sprocket up to the E-clip.. and lock it now.. and Then.. back together.
March 3 2015:
We got all the front axle back together ..and the steering too.
No play in the steering.. solid as can be.. It’s true rack & pinion steering..
Lots of grease on the parts.. Even did an EYE BALL alinement. And we got the threads fixed on the rear axle and the hubs …with their new wheel studs are on..
Wee ha.. got a rolling chassis now.. if I put the wheels on… They need the paint first.. … And this post is getting long.. time for
Today we did a compression test on the cylinders. The results were good.. 110 psi in both. not the best but good. We decided to fire up the motor again and see how well it would run with a gas tank. I had the GoPro ready but pushed the wrong button.. so once again no video. 🙁 We ran it for a good minute and had to stop the gas flow to shut it down… Then tried to start it again… nope. It’s flooding very easy. Once the carb kit is in and the carb adjusted good that should not be a problem. So I went back to reassembling the drive line and hooking the controls up.
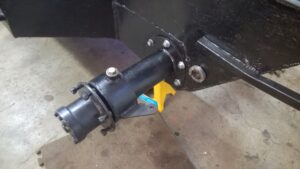
Here’s the Transmission all done and secondary drive, disc brake too. I need a castle nut for the brake adjustment, but everything works good..
It bothered Dave that we could not re-start the motor… So he wanted another try. With this run the transmission is installed.
Here’s the promised video.. I think the belt is just a tad too wide.. it can stall the motor when you apply the brake. Otherwise everything is working great.. as it’s supposed too.
Work has been slow as I think about the cables and try to find some ambition.
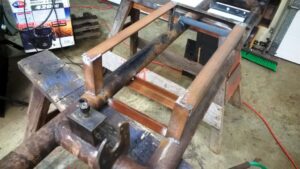
Got it.. Just a bit more welding and I’ll paint the frame..
I’ve also been working on the front hubs.. just to do something else. They are all done now. Cleaned re-greased and painted.
These are three times bigger and heavier that most Quads.. In fact these could work on a farm tractor.. The U-joints are the same as on my rear PTO on the tractor.. I can see how one could install locking hubs too. Something to think about for the Jet I’m keeping.
Meanwhile back at the FRAME:
I’ve welded more seat support , a battery holder and new nuts inside the rear axle case. Now it’s paint time.
Here’s the underside with a coat of Por15. It’s a very hard frame paint for cars. Not sure if this is better that good ole rust paint.. After all the Terra Jet frame is protected inside the tub.. But water may be there too.. so. We’ll see. Everything I do to this Jet is a test to see what will work the best..
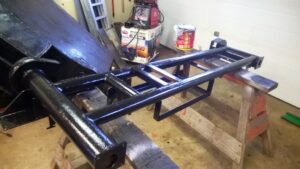
All done now… And I’m reserving judgment till it’s cured.
I was in a painting mood.. so I got some of the other bits painted too. And I turned some attention to the front steering.
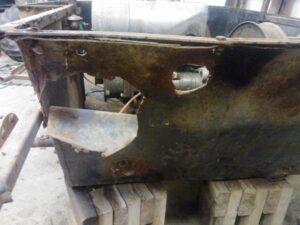
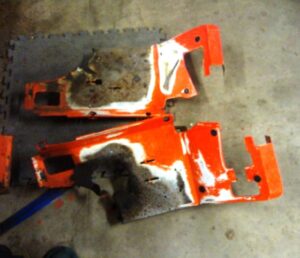
Axle Tubes ? Don’t know what to call them, and when you look in the Terra Jet parts catalog… they don’t either. Suffice to say they hold the bearings and are an outside extension of the frame. The steering pivots on these.. So yes they are very important. The one on the left has one of the original collette’s still in place.. The rest are 1/2 ” nuts welded on ! What a mess. No good… I want to make new collette’s and have set screws to lock the bolts instead of someones holes with bent nails through them.. GEEZ. These pivots need to be strong with a good surface area. Think of the forces on here.. Continued on page 5
New years resolution… to finish the Terra Jet.. for now..
The frame is a very important part of the Terra Jet puzzle. Everything but the steering linkage is on the frame. With a bit of welding you could add that too. Then you could go cruising around no problem.. The tub is basically just the bottom of the body.. and the “boat” part too. It’s a very cool design overall, and has stood the test of time. I will be experimenting with a few “improvements” of my own, such as better pedals, linkage and a center floor board.
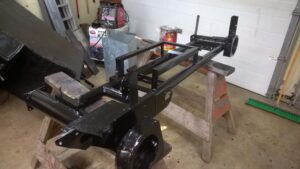
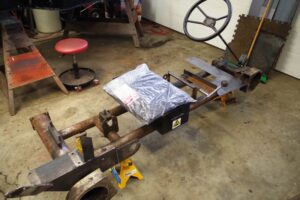
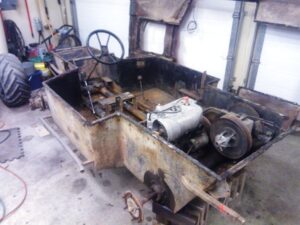
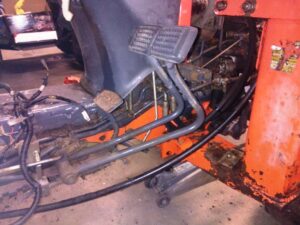
Here’s the frame up on jack stands ..with the steering wheel attached. I’m testing the seating position. Turns out a bench seat straight across will work best. I was concerned that the steering wheel would be too far away for comfort. And was considering a middle seat that was forward more. Not necessary.
Also the pedals… these are just wrong! However right foot braking will be necessary due to the narrowness of that part of the tub. So a pedal on each side of the steering shaft. But a better design, and just a bit closer to the seat. The steel plate is just there to rest my heels on. Plans do include a floor across this part of the frame.
Also turns out this is a good place for the shifter. So I need to keep it here and I want to have the choke and key switch in this location too. Now it’s time to remove the unwanted stuff and weld on new stuff.
Control Freak:
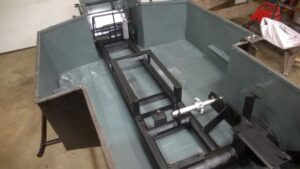
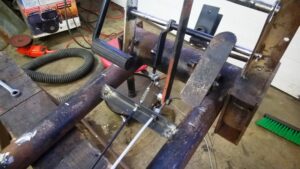
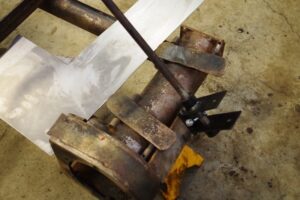
I spent hours looking through my scrap metal and thinking about how to rig a better pedal set up. I wanted them to be comfortable and the brake pedal to have good leverage. I wanted the throttle pedal to be adjustable. And both to have the leavers go down between the frame tubes. I believe I have done all that!
looks a bit complicated.. If you took away the steering shaft maybe not so. Yes ! I used an old brake pedal from a lawn tractor. Upside down from the way it would be on the tractor..
View from the other side.. you can see the adjustments I have for the throttle pedal to make it comfortable. The sheet of metal you see represents the floor and where it will come too. So that should be fine.. But they have to hook up to the things they control. So I figured I better mount the motor and the transmission and get all the linkages proper. May have to weld more bits & pieces to the frame. It’s looking like a cable would be better for the throttle.
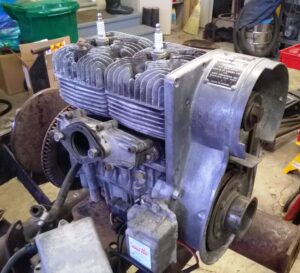
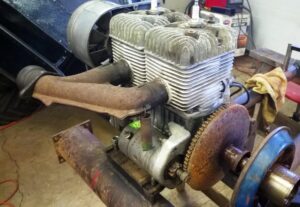
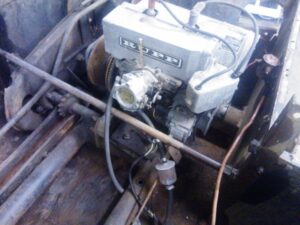
The 340 CC motor.
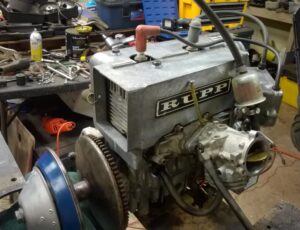
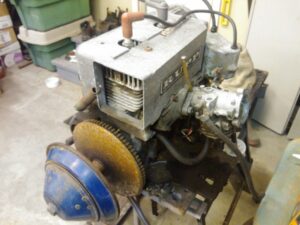
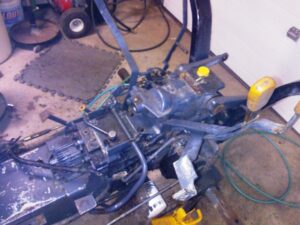
Well here it is in place on the frame.. seams like a good place to work on it. The Carb is off and the covers too. The pull start and fan cover are missing. I’m planning on making new ones.. because finding those would be hard.
This is a snowmobile motor ! Air cooled , high RPM , but very simple. I hope the carb works good. Before we get carried away though we need a few tests on the motor like we did with the BAZOO. There needs to be good compression in both cylinders for the motor to run proper.. So that’s the first thing to check. And spark ! won’t run without spark.
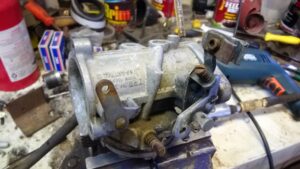
Here’s the Tillotson carb ready for a bath and inspection. It was amazingly clean. And the motor too… I’m thinking it wasn’t very long ago that this ran. Optimism builds.
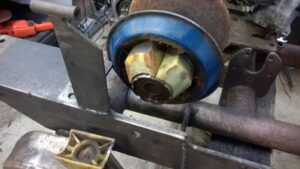
Attached to the motor is of coarse the clutch.. this is an interesting one. When I pulled the cover off I see there is these four plastic / weighted thingys.. I forget what they are called.. When the motor speeds up the weighted “Things” push the two halves together engaging the belt. Typical snowmobile stuff. But usually they are metal rollers.. Hmmm. This is very rusty and in need of lubrication.. Badly. So I hope it will work. I cleaned it the best I could and greased up the sliders. Put it back together.
Jan 12 th :
Dave came over today so we could run the motor.. We could not get it to run for more than a minute… just whatever gas was in the carb. But it fired right up… so Thinking if we had a gas tank and proper adjustment of the carb.. away it would go.. I forgot to get a video to prove it.. so take my word. But we now know that the motor will run.. I also found a throttle cable in my bike parts. So that’s one of the next things to do.
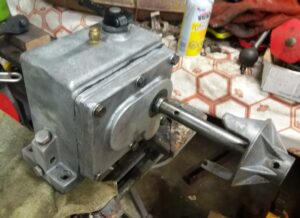
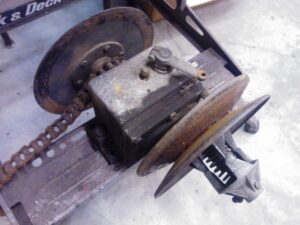
The Transmission :
Same transmission as the Bazoo.. So I’m very familiar with this.. And like the Bazoo it works fine.. But the silicone job joining the two halves is poor and leaking. So once Dave helped me get the secondary clutch disc off the shaft I was able to do a clean and Re & Re on it..
Is that clean or what.. I took my big sander to the two halves and flattened the surfaces good.. With better gasket stuff should be no more leaks. Also the end of the change lever that rides in a grove was warn a bit so I built it back up with the welder and got a better fit. These transmissions are tough.. This one is very old but works like new.
Ta Da… Ready for installing.. after I put the secondary drive back.
Today I took the frame and axles to the wash bay and degreased them.. nice and clean now.. makes it a bit easier to finish taking them apart. Did not clean the tub..because I’ve decided to replace most of the bottom of the tub. Front and back too.. Just too many holes and thin beat-up metal.. So I’ve ordered a 4×8 sheet of 16 gauge steel. this is a bit thicker than the factory 18 Gauge of the tub.. I used this same steel to make a hood for the Kubota F2400 mower that I restored. Got to bend it with a torch because it’s too thick to use the bender. But it will be easier to weld than the 18 gauge.
Holes like this will be gone.. the 16 gauge will take more beating on the bottom than the thinner stuff.
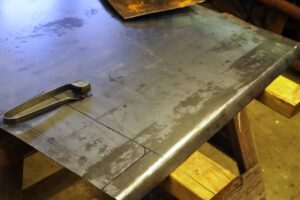
Here it is.. nice and new , no rust.. I use the jig saw with a fine tooth metal blade.. makes a nice cut.
Well it’s more of a bump.. and it hangs down under the body, one front one rear.. This is where the chain sprockets live.. and this is the rear one and it’s in good shape so I’ll save it. The front one needs a rebuild… is full of holes.
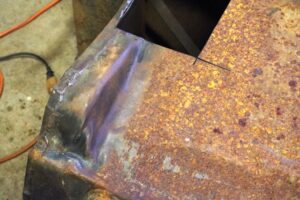
This is the rear of the bottom.. and under the striker is the place to cut out for the rear bump. We have also bent a 1″ lip to the correct angle for the rear piece to weld to.
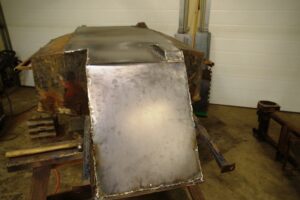
Now you can see what I’m up to… and how much of the bottom I’m replacing. Lots ! I need to weld as much as I can then flip the tub over and cut out the “unneeded ” old metal. That will take some patience.. I did not want to remove much of the old bottom so as to keep the form & dimensions. When the tub sits flat on the floor “like in the photo” the shape will be intact too. From the factory the tub was in just two pieces, and a press was used to put those bumps in for the chain runs.. And other bends too.. Can’t work that way ..so we’ll now have three pieces, and my front bump out will be welded.
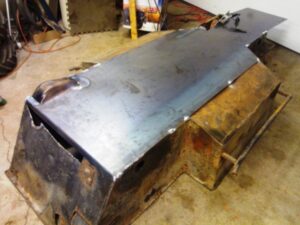
The Bottom is 90 % welded in place now .. And I’ve cut away what was left of the rear..
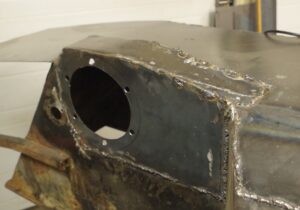
As tough as these Jet’s are.. this is one weakness. 18 gauge steel is just too thin. 16 gauge is not very much heavier, but I feel it will take more beating before failing. Another weakness is those aluminum bearing hubs.. We actually got the one out of the front left housing INTACT. ! Wow. Here’s the new panel for the rear of the Jet.. all welded up.. just needs grinding.
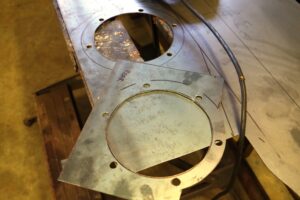
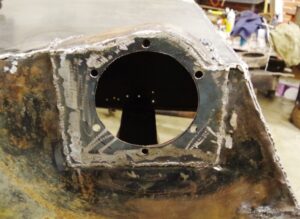
Here’s one ..the rear one .. of the axles holes for the tub. The hole is six inches round so you can get the chain sprockets inside. Then a cover plate goes on with the bearing holders. If you look back you will see that these only on the chain side are bent & beat up.. Welding new pieces with smooth new metal will make the seal work better.
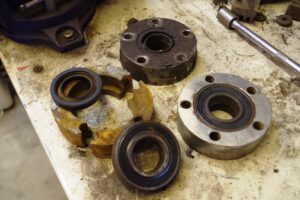
And speaking of seals & bearings… Above you see I have only two good holders.. Both the rear axle holders were cracked. I would like to replace these with machined steel holders and four new bearings and new seals too. It just don’t make sense to have heavy 1-1/4 ” axles… nice big bearings and put it all in a wimpy aluminum holder. ?
Dec 15 th 2014:
Meanwhile back at the Tub…. I put the frame back into the tub so I could line up the new mounting plates. Then I removed the frame and flipped the tub back on it’s side.
Here’s the rear one all welded. I’m not the best welder. it’s a bit messy.. but the whole tub will have a thick coat of black paint… And most of where I welded would not be seen unless you look under the Jet.
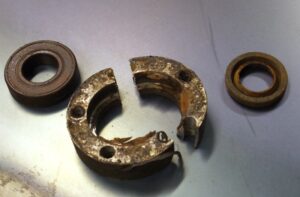
A bit of fancy bending needed here… and some trimming too. This part of the tub gets sandwiched between the inner frame and the hubs that hold the bearings.. I will make thin rubber gaskets instead of just using silicone. Also today I went to the auto parts store with my one good bearing.. and they had the perfect match.. So I bought three more. They did not have a seal that matched .. sigh. So I’ll be looking for those. Got the front all welded now.
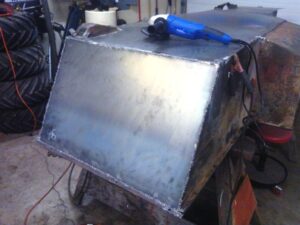
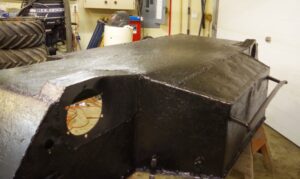
Getting closer to finishing the tub.. just a bit more welding and a lot of grinding.. and cleaning. I’m considering using truck box liner paint.. it’s thick and tough. So Here’s a Video of where I’m at with the tub and stuff.. Got a GoPro for Xmas..
It’s a so so Video.. My first attempt.. I’ll do better.
December 27 2014:
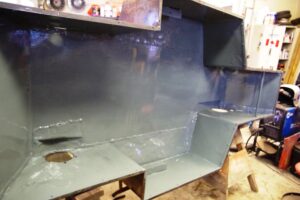
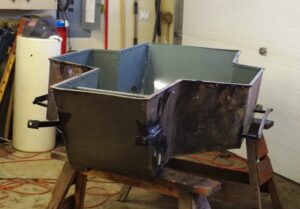
Christmas is over and I have more time to get back at the Terra Jet. I got all the welding finished now .. No holes that I can see. Everything is all cleaned up.. and today I ran urethane caulking around the inside of the tub.. And I gave the tub a coat of grey paint.
Grey ! I thought that I would try something different that the back. And I had a can left over from another project. Keep in mind that this Terra Jet is my learning one.. When I get to fixing up the second Jet I’ll know what works..and what I like.
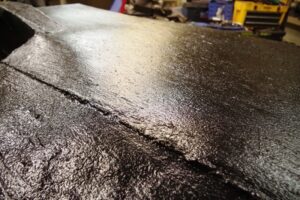
Like this … Box liner coating for trucks.. It’s a two part epoxy thick coating.. much like tar..but hard. and very durable. I’m hoping the this is the ultimate coating for the bottom of the tub.. When they do truck boxes with this stuff and seal all the cracks.. the box holds water.. for months ! so if the opposite is true ..than this tub with never leak through my crappy welds.
However if your wanting a smooth surface this is not the stuff.
And with these photos the tub is 100 % done…. now to start the frame on a new page…
This POST will be for one of the two Terra Jets I have for restoring this winter… There will be a separate post for the other once I start it. The 400E (in the shop now) looks like a Corvette with monster mudder tires. This is the start of a love for these rare amphibians.
Yes they are different !
All About A Terra Jet:
What we have here is a power train similar to the Bazoo that I restored last winter. A 2 cycle snowmobile motor and belt drive / clutch. A simple transmission with just forward , neutral and reverse. The difference is: Far less chains, a steering wheel instead of leavers, Four wheels not six. Like the Bazoo there is no suspension to cushion the ride.. just the soft tires and hopefully a soft seat. Controls are a gas and a brake pedal very much like a little car . Ahh but a 4×4 car.. all four wheels are driven.. full time. Very simple straight through axles.. I would imagine that turning would not be tight with the two rear wheels trying to push you straight. But you would have tractor like traction.. AND you also have an AMPHICAR that floats and the wheels paddle it through the water. How cool is that ! Well its’ so cool, and the design is so good that 44 years later they are still making these.. Yup you can buy a new one.
When it comes to taking things apart I do not wast too much time . But I wish I’d stopped long enough to take more “before” photos. Hopefully one can glean a picture of the sad little Terra Jet from this shot above. SOOOO Got the wheels off and the body off.. The body get’s set aside for later. Once I do work on the body You’ll get a better idea of the roughness of that. The wheels will come off the rims so the rims get cleaned and painted. But first I need to start with the tub and inner frame.
Things to deal with:
As I dismantle the Terra Jet I’m going to find the stuff that needs attention. Here they are:
Holes: Yup there are a few..if you want to cross a river or go out on the lake you can not have holes. This is a steel tub so it’s patchable just like a car body. And I have two welders !
Some play in the steering.. caused by this interesting steering gear. It shouldn’t be a problem to fix. Some guys replace this with an auto steering box. Oh you can sorta see those foot pedals… real crappy.
In this photo you can see the little short steering tie rod. they are worn and so I’ll need new ones from Princess Auto.
Before I use this motor to anchor my boat.. we will test the compression and look it over good. It does have a better carb, but it’s a noisy 2 cycle..
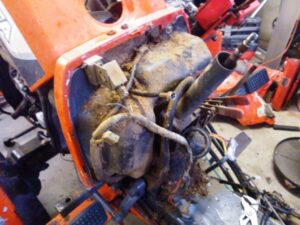
As we carry on taking things apart.. there is lots of rusted and seized stuff. Like the nuts on the end of the rear axle.. Big wrenches needed here.. Got the motor and transmission out.. and chains off the sprockets..
Here’s the motor liberated from the Jet.. Couldn’t resist cranking it over a bit.. Hmm we think it would run fine..
Oh ya… deja-vu The very same trans that the Bazoo had.. So I know what to do.. sure hope there are no cracks in the body.. But they are built tough so I’m doubting that. The big disc for the brake is a bit bent.. and it seams too thin.. Maybe I’ll get a thicker one made.
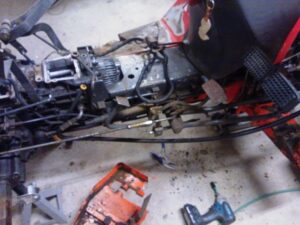
This is where I’m at .. the hubs and axles need to be removed ..then the frame will just lift out.. and boy it’s not easy..
The Left Rear Hub: These parts are all seized together.. Needed a very large wrench to get this nut off. And still the hub is stuck.. I guess a torch and a puller is the way. Once this hub is off and the bearing and seal slid off, the whole axle pulls out through the right side. Same with the front axle.. comes out the right side.. because that is the side with the drive sprockets, and larger holes in the tub for pulling them through.
OPPS.. I broke the aluminum bearing cup. The bolts were so seized in there that while trying to punch them out the casting cracked in half. This should be a steel part so it won’t react with the steel bolts. The bearing was toast too.. Ah the start of the parts list. And I’m shearing bolts off constantly… Oh well it’s all good fun , and part of restoring something old and rusty.
And speaking of rusty ! I did get the front axle out. That’s good but it still needs to come apart. The steering came out without too much swearing.. So that’s out of the way.. I only sheared off two bolts for the front hub.. They are in the frame…so once the frame is out I can remove them.
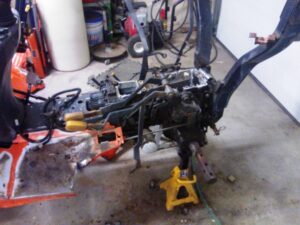
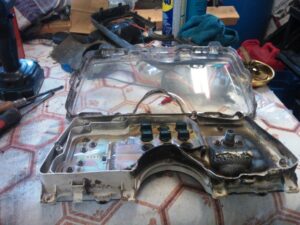
Well after much toiling and foul language.. We got the hub off the rear axle .. and the frame out of the tub. Here’s a photo of the frame standing up on it’s left side. Tomorrow it’s off to get pressure cleaned and de-greased.
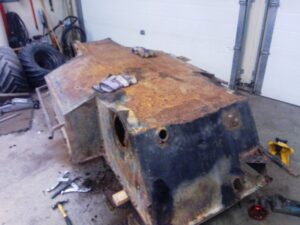
We flipped the tub over to see just how bad things are.. Yup there is a few holes…well lots of holes.. Once it’s clean and I run the sander over the metal I’ll see the bad stuff..
Some is obvious.. Like this hole for the rear axle. Going to weld in a new piece here for sure. There has to be a gasket here..so it needs to be good.
This is a big project.. and will need several pages. Now that the destruction is done, it’s time for cleaning and repairing.. on to…
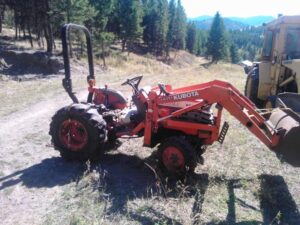
This is a Kubota B2400… And this is where I found it .. Way up a rural road.. Way up.. Truth is this is the second time I’ve seen it .. The first time was the winter of 2012.. and it had a lot of snow on it and it was down at a shop in the Kettle Valley. And I was not very impressed. However the owner dropped the price .. a lot.. And I hemmed and hawed.. for a year and a half.. What the heck.. I can’t really lose.. The motor runs.. and it’s a Kubota ! would be a great winter project just like the Kubota F2400 was. This too has been sitting for years .. because something went wrong in the gears… locking up the rear wheels.. The owner did not want to pay thousands to fix it ..so here I am.
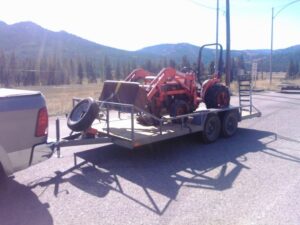
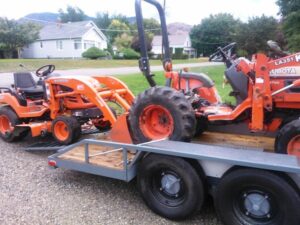
And there it goes… great way to try the new trailer out.. This photo was taken quickly at the Midway Scale.. Yes this is a small tractor. And fixed up it will fetch $6000. to $7000. so hell yes I’ll fix it..
I had to use the BX to lift it because the rear wheels would not turn.
The Loader alone is worth quite a bit.. But the loader & tractor together has more value.
It’s more than just the gears. Cosmetically this tractor is a hurting unit.. Needs new tires too. So it’s not a cheap fix. But ! This is a Kubota.. and I know how hard they work and how durable they are. This was a very nice one .. with lots of good features. :
Hydrostatic Drive with Hi / low range
4 wheel drive
Bi- Speed Power steering ?
Separate wheel Brakes for fast turns
Two Speed PTO.
Mid PTO.. so a Mower deck can work to.
Legendary 24 hp 3 cylinder Kubota Diesel
What more could you want..? Maybe someone to figure out where the pieces go.. Naa I’m good at that. But there is a lot of levers and no labels. But I’ve got the Operators manual… and the Shop manual on my computer.
How does this Kubota Differ from My BX :
Aside from the size.. And the B2400 is a bit bigger, both the wheels and the motor. There is some more conventional tractor stuff.. a clutch, split brakes, also a cruise control.. Missing stuff.. well even though there is a mid PTO all the mower deck hook ups are missing. The BX has turn signals.. the B2400 just has hazard flashers.
I’m not thinking this tractor ever had a mower deck.. Given that all four farm tires were filled with calcium for weight .. this was just a front end loader tractor..
Into The Shop :
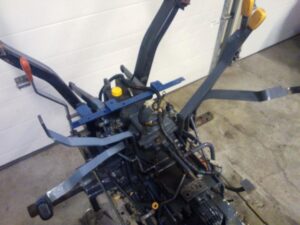
First I took the chains off the rear wheels.. Then with the BX I could lift the rear..UGGG.. well I guess there must be calcium in the tires.. because it’s heavy. The little guy could only bare some of the weight.. but enough to move it.. And that lifted my rear wheels off the ground.. Good thing for 4×4 ! Once I had it in the middle of the driveway.. I used the BX to lift the loader off.. and set it aside. Now we can asses the situation.
The Work Starts:
I’m actually starting this project kinda early.. so there will be a lot of time when nothing is done.. and I’m playing with other stuff.. No worries..no hurries. Better stock up on brake cleaner & penetrating oil… there is a lot of rusty bolts. I putzed a bit on it after getting in the shop.. The rear wheels need to come of .. But the nuts won’t budge. I removed the remaining fender.. motor covers.. the very dead battery.. Peeked into the top of the differential case.. hmm The mechanic had taken some stuff a part to see if the problem was obvious.. so all the covers are off the transmission and diff.. and some leavers are hanging there too.. oh fun..
LOCKED WHEELS…. FIXED !
Dave got home from the coast and was really wanting to check out the tractor.. last time he saw it was when it was buried in snow. So curiosity got the best of us.. And here’s an example of how good Dave and I are at diagnosing a problem when we put our heads together. First I have to say that the mechanic that looked at the tractor and said “big job to fix” did not raise the rear wheels off the ground.. AND may or may not have noticed that the floor boards where the return springs for the foot brakes are attached… were so beat up that those springs were gone.. (I have them in a bucket of parts).. Not that he is not a good mechanic.. no I would not say that.. I think he just wasn’t interested in the job …. SO with the wheels in the air we are able to turn shafts and try different levers… to see what was stopping the wheels.. One of those things was the brakes.. Dave was able to wiggle the wheels just a bit.. and so I thought I’d try the brakes to see if they worked.. Well there was not much movement in the pedal… but they seamed floppy. so I pulled back on them and …. the wheels turned ! The freak’n brakes were on! Just the weight of the big brake pedals was enough to hold the wheels from moving ! Wow are those good brakes. So the cause of all the problems is the poor condition of the floor boards.. They are seriously bent up and the metal is broken in lots of places.. They are interfering with the operation of the brakes as well as the forward & reverse controls.
See how beat up they are.. the bottom one in the photo is the one that caused the most grief. It even has a hole worn in it..
In the above photo you can see how the weight of those big pedals and their arms can pull on the brakes.
SO now I need to put those covers back on the transmission.. Move the tractor back outside and give it a good bath.. Then replace the filters and new fluids.. and see how it runs.
Ok I got the three covers back on the Transmission.. Had to sort out which bolts go where.. and Clean everything good. I use Permatex silicone gasket goo.. for sealing thing up. It now makes sense what lever is what.. and where it goes.. Looks like I’m missing the control knob for the rear lift. Considering all the bits & pieces were in a soggy falling apart box.. I’m doing good.
Rob Puttith together… Rob Takeith apart:
No not the stuff I just put together.. I want to clean up the tractor.. One hidden area was behind the dash panel. So I took that apart.. And look at the crap there.. Plus after I pulled the steering wheel off I noticed a missing bearing or bushing ? So that needs a fix.. Also the wiring is back there and that needs attention. Oh ya..
The Kubota light switch is a weak spot. I had to fix the one on my BX. They are not very water proof.. and tend to stop working.. Good thing I made sure to check this one out.. Look at the wires they are melted ! In fact there was a bit of a fire in the dash.. because a few things are melted.. Mostly wires .. no real damage. Now that switch would not have worked well.. or at all. and could have caused the meltdown or fire.. I’m thinking that replacing this with two sturdy toggle switches would be wise.
Got most of the parts:
And I’ve also given the tractor a much needed bath.. Now that things are clean ..it will be easier to work on.
And the motor too.. Next step is too change the oil , the filters and run the motor… test the drive & hydraulics .
It’s the thanksgiving long weekend.. and I can’t get the new filters till Tuesday.. So I did two things.. Cleaned and repaired the fuel filter.. The shut off was not working so I took it apart and found the handle just bent enough that it would not make contact with the valve in side.. FIXED. and the new fuel filter was installed. That’s one step closer to starting the motor. Clean Fuel ! Also I did the cleaning and checking of the dash..
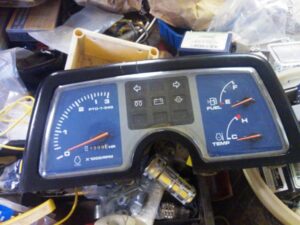
You can see the damage done to the back of the dash panel.. none of that is seen on the front.. Lucky me !
See it’s now clean and no damage.. Almost 6000 hrs on the tractor.. It’s 17 years old.. but hasn’t moved for at least 3 years.. so 14 years and that would be about 430 hrs a year.. That’s a lot..
I polished the lens and painted the bezel.. so it’s ready to go.
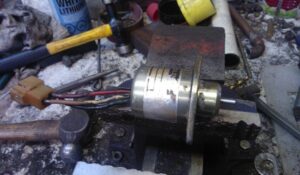
While I was waiting for the oil filters .. I thought I’d hook up the battery and see that the starting circuit was working.. Well that’s where I found out the Fuel shut off solenoid has failed.. went through all the tests and it’s hooped. The rest is good .. the motor turned over , the glow pug light is on.. So with a new solenoid we should have the diesel running in no time.. ( I’ll be working alone now that Dave has gone hunting so he will miss that starting up of the motor) .
Oh and no you can’t run the motor without it .. cause when you turn the key on ..it powers the solenoid to open the fuel injector. turn the key off, no power ..solenoid shuts off fuel.. that’s how this diesel stops. Some diesels have that the other way .. power needed to shut down the motor.. those motors will run with no battery too. So add a solenoid to the list of parts needed. Ordered and on the way..
Meanwhile……
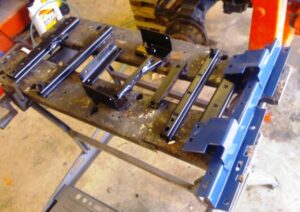
Went and got the new filters today.. but still can’t test the motor.. So I turned my attention to the seat support.. which also holds one of the levers .. the Bi-Speed steering control.
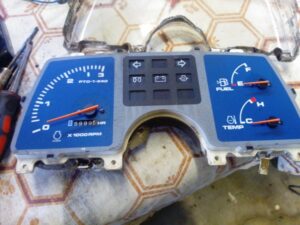
Yes SIX.. here you can see the rear seat mount (blue) and how it holds the Bi-speed select lever (red knob). Now all the levers are in place and proudly functioning they way they should. They look kinda weird .. but when the fenders are on and the guides, it will make sense. See the very first photo to see what I mean.
These seat slide parts were badly rusted and a weld was broken. So with a liberal amount of liquid wrench.. and the impact I got everything into a pile of pieces. Not sure about salvaging the seat.. one of the bolts broke off.. The seat has a slider for back & forward adjustment..and it was locked up tight too.. The seat mounts help hold up the fenders.. witch help to hold up the floorboards.. everything is connected.. so it’s important to fix these parts and making them stronger is my goal.
The new box of parts came and they sent the wrong solenoid ! so I need to go to Kelowna and exchange it. Good thing I’m not really in a hurry.
Ok I got the right parts now.. and put things back together.. air filters, solenoid.. Filled the motor oil. And I thought it would be good if I turned the motor over a few times to get the oil moving… and Bam! the motor started.. WTF.. there is no diesel in the tank.. or fuel lines.. But there must have been some in the injectors ! It ran for less than 30 seconds and I turned the key off.. Well I guess the motor is OK.
I put some fresh Diesel in the tank and ..this time ran the exhaust out the door…
And here’s a short clip… proof that the motor runs.. and good too !
But the wheels still won’t turn……
Nov 11 2014:
By running the motor I could test the drive train.. and found out the the PTO’s both work fine. The clutch is working good.. The three point lift arms go up and down.. We already know how well the brakes work 🙂 . But the hydrostatic moaned and did nothing.. So after alot of studying so as to understand how that unit works .. we tried to get the hydro motor to turn using the rear wheels.. and that took a lot of pushing on a big bar & socket on the axle.. But we did get it turning.. Maybe Buddy kept tromping on the hydro drive after the brakes locked on.. and heated things up … and we are hoping no damage was done. Oh and to do the test we needed to drain the tranny and remove the top cover to see make sure the shafts were turning.. And of coarse that meant dropping a part down into the tranny.. No today I’ll fish that out clean the filter screen , reseal the covers and refill the fluid.
Also of interest … I made a trip to Salmon Arm just to get a three point hitch setup for this tractor.. so now I have these much needed parts..
Well not so good news… The HST is pooched.. so it’s rebuild or replace ? Makes a lot of not good noises.. This could be a pricey part.. so some thinking has to happen here…
Ok thought about it.. I put the Kubota up for sale as is.. and see if I can at least get the money back that I’ve spent.. and I sold it within two days.. to a local fella.. Actually same guy I bought the tandem trailer from.. And I used his old trailer …now improved to take the Kubota over to his shop.. GONE SOLD… on to better things.
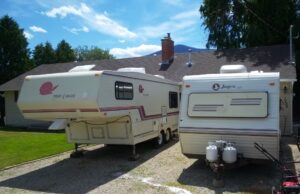
I know.. can’t tow two RV’s ..and where do I store a second one anyway.. However when it’s FREE.. .and my Nephew was going to need a place to sleep while reno’s are happening … then you say YES !
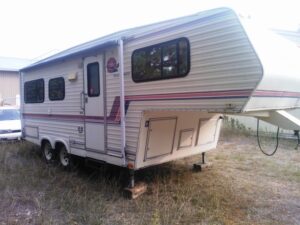
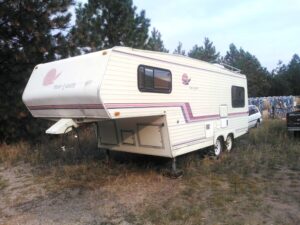
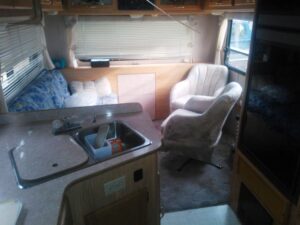
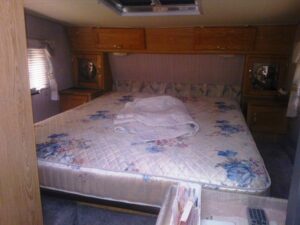
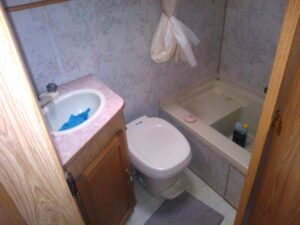
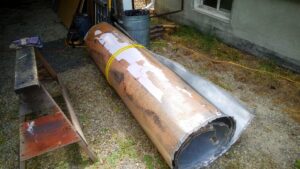
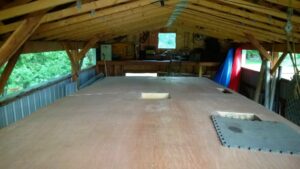
A friend and long time customer of Mo’s .. husband got ill and has been in the hospital for a few years now .. she sold the house and is moving to a condo… also getting too old for towing a trailer around. all those things and then the roof got a leak…She just wanted it gone. The whole trailer is in great shape except the roof.. In fact it’s a very deluxe trailer.. all the goodies you need for “Glamping”
I also got the hitch.. and I’ll mount that in my truck.. Free stuff does not come without work.. and so the roof needs to be peeled back and repairs done.. That will be next spring. For now we will tarp it for the winter and deal with it next year.
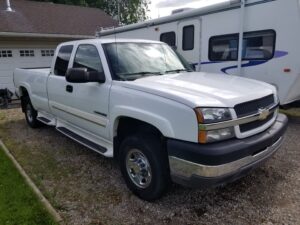
A new Chevy 2500..
We decided that a more reliable truck would work better. I bought this one before I quit the car lot.. This truck came equipped to pull trailers. Even has the fifth wheel hitch installed.. Also has the heavy duty Allison Transmission and a 8.1 L 399 hp V8. It’s a big truck .. the quad goes in the back with room to spare.
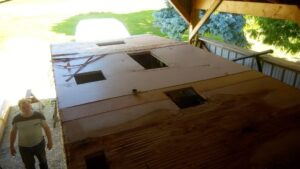
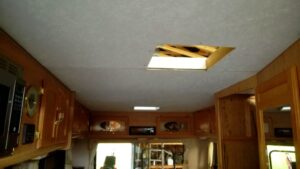
Well it’s June 2015 and I’ve got the Fifth wheel in the Franknport to get the roof fixed. It’s taken a few weeks just to remove all the vents , A/C and the trim from the roof. I’ve now rolled up the aluminum roof..
The roll of tin. not going back on.
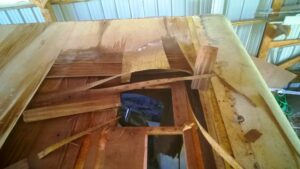
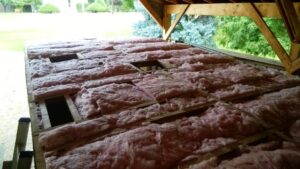
Well you find out quickly how bad things are once the aluminum is off. It’s still wet under the metal.. even after months of no rain getting on the roof. Quite a bit of the plywood is de- laminating .
I’ve got about half the roof off.. the rotten half. Once I’m done with the demolition I will clean up …then it’s construction time !
July 5 2015:
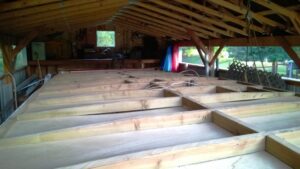
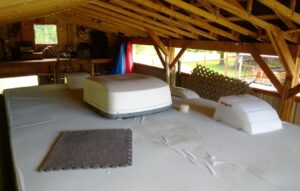
The Roof is completely cleaned off. The mess is gone… and we are ready to build a new roof.
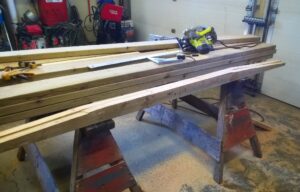
I have all my supplies : new rubber roof/ glue, New fridge vent & cover, new plumbing vent. Maxair covers for the roof vents. I also have enough 2×6 treated lumber for the rafters.. And because I don’t want the roof to sag ever again.. I’m custom cutting all the rafters to be arched on top.. Thicker in the middle where it’s needed. I’m building in 4 ft x 8ft panels so they can be lifted into place easy.
I have now got four of the five sections in place.. Only the rear one is screwed down.. Once they are all up I’ll attach them with ceramic coated screws.. they won’t rust or react with the treated wood.
A thing of beauty.. There is finish strips for the seams, lights and vents.. The big whole is for the A/C unit . I laid the tin roof out and copied the location of all the vents and A/C.. fudged just a bit on some to get the right spacing on the rafters. But it’s all back the same .. Minus the skylight.. and the TV antenna.
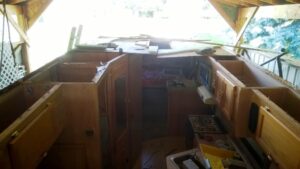
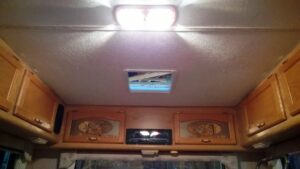
The whole roof is on now.. Interior I mean. and most of the finishing inside is done as well. Like this new light I added to the living room.. It’s close to the kitchen so it benefits from some extra light. The wires went across the roof anyway so why not add a light. The new ceiling is a brighter white as well, making it far less dark.
Onward…
I now have all the insulation done and today I got the 1/4 ” ply on the roof.
Getting there.
And here’s the 1/4″ Ulay ply installed.. lots of screws.. 5 sheets did the whole roof. You can really see the slight curve in the roof.. Now to glue the rubber on.
July 19 2015:
Well … Git R Done.. and with only a week to spare.. So close to a finish.. The wrinkles are ok.. you should never stretch the roof.. and I was working with a fast drying glue.. As you can see all the vent’s, covers and the A/C is back where they belong.. All the trim is back too.. Just some fiberglass repair and a bead of RV sealant left and we are ready for whatever mother nature can throw at the roof.
Well the Fiver can come out to play now.. Install the fridge and give the plumbing the once over.
Update … Well after a few years the roof leaked again at the rear this time.. And no matter what we tried we could not stop the leaking. The damage was done so it’s not being used and destined for scrap. SAD.
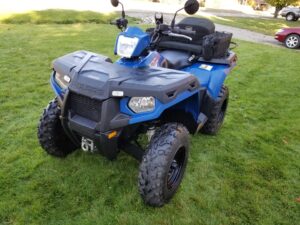
Time for a new Quad. Everything came together .. I sold the 300 Polaris… These were on sale till the end of Aug. Very low financing rate.. If I take good care of it … should last me a long time.
New And Blue !
Here’s what it looks like without the extras. I’m adding a few goodies.
Here’s what it looks like in my shop after a quick trip to get it. I am thrilled .. brand new . Because I’m enjoying quading so much.. and the older one was… old.. and would always need help. This is going to be a pleasure to ride.. can’t wait till Sunday. I need to attach the accessories I got .. the photo above shows the new bag I have..
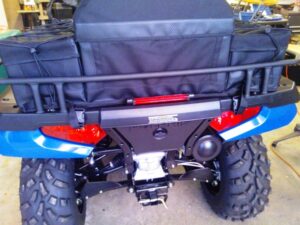
Last night I got all the goodies mounted up.. A railing around the rear rack, My new three compartment bag and the mirrors.
I also mounted the LED brake light .. but I need to figure out the wiring to hook it up. And I had to cut slots in the rack to run the hold down straps for the bag through. A draw back for a big flat rack.. but with the padding in my bag and that flat surface.. things I put in the bag will stay protected. Plenty of room for my little gas can too.
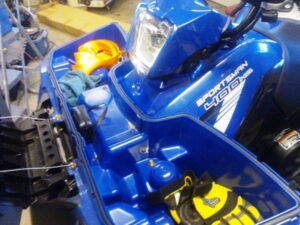
When you add all this front storage .. I have way more than I need. This is a cool feature of the Sportsman, dry, hidden and lockable. I don’t like anything on the front rack to block my view so this is nice to have.
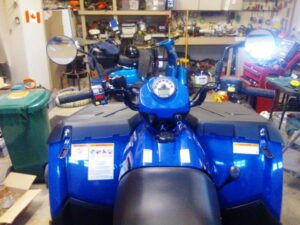
The mirrors are fold away and very rugged.. I’m hoping that they work well and I don’t grow to hate them.. On lots of rides there is always someone behind you.. and I like to check to see that they are still there.. Compared to the 300 the body of the 400 is way wider.. the fenders cover the wheels and then some.. The foot wells are huge. I could wear shorts & sandals… but I wont. The quad is quite a bit higher too.. but that’s because we are now riding on 12 ” wheels not 8″ and the clearance under the 400 is close to 12″ wow. I also think that at 688 lbs we are now more than 200 lbs heavier. That should translate to a better ride.
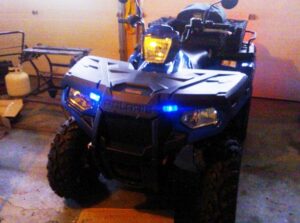
I could not resist at least one pimp… I found these in one of many boxes of goodies from the motor home. LED marker lights that you can change the color.. Red, green, yellow.. but Blue is cool. I was nosing around under the access panel to the fuses and found two auxiliary power wires.. They would be for things like hand warmers. So I used one.. Also noticed the wires are in place for a winch. And yes I’ve got a winch.. 4000 lb one is now on the front..
I’ve been on no less than 8 rides now.. 20 hrs on the meter.. and I love this quad.. so smooth.. quiet.. so far reliable.
Jan. 2019: After enjoying this quad for years I traded it for a 2014 RZR 570.. same color of blue.. Post is HERE
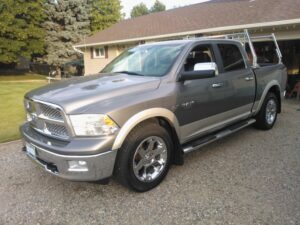
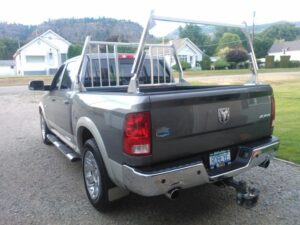
This was a good deal… and we felt it was time for a truck up grade.. The decision was made to advertize the Avalanche and see what happened.. it sold within a week.. so home came this LOADED.. Dodge. Just in time to go camping.. So I had to get some racks installed for the kayaks..
These quickly put together racks turned out to be great.. And this truck has 100 more hp than the Avalanche.. so the trailer is no problem.. Has trailer mirrors and factory built in controller. In fact it has every option possible for the year.. Nav, heated /cooled seats, back-up cam, remote start…. on and on.. Check out my new plate.. yup “robeye”. The Interior is very nice .
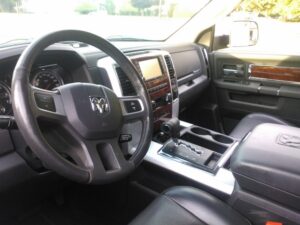
This photo was taken by me for the lot.. hence the price tag.. I’m a console type of guy.. so this suits me just fine.. And I’m very fussy about gauge placement, and Dodge got it right in 2010. I also don’t like cheapness in the trim. They got that right too. The knobs feel good to the touch. And everything is trimmed nicely. Even the top of the dash is stitched leather… nice.