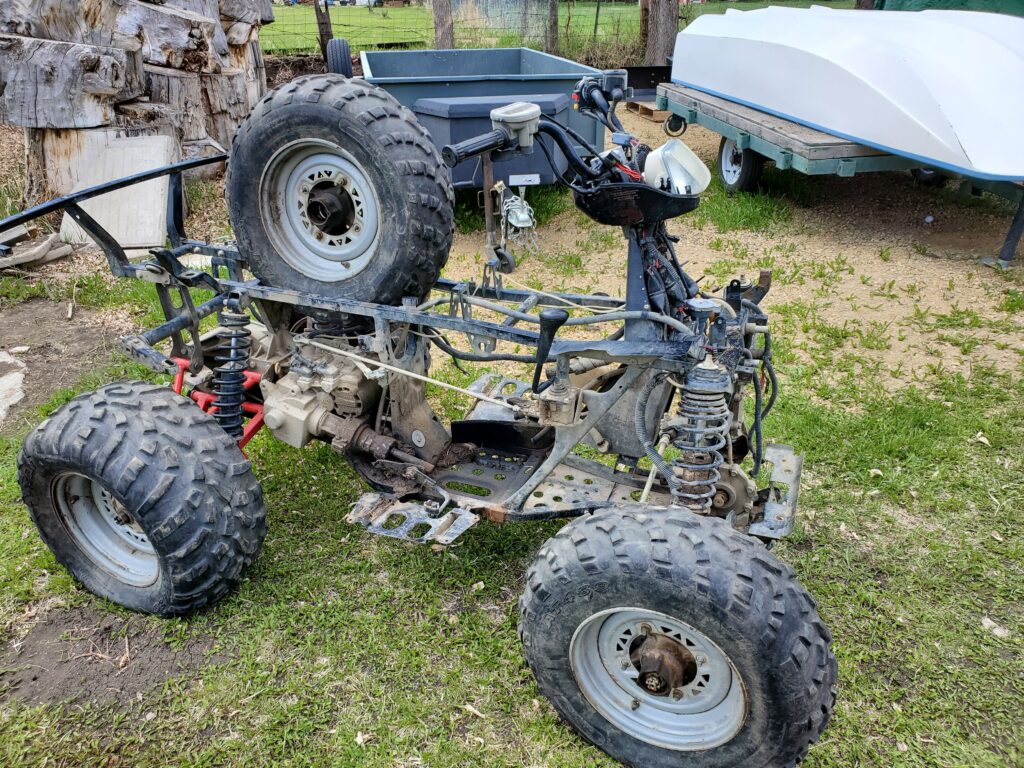
The price was right and it came with extra parts quad.
It runs …it drives .. But there are a few issues, like no brakes, and some electrical gremlins. Probably bad connections. We fix. The plastics are faded. And the bush bar is a little bent. The factory winch works, and the tires are good. Someday I’ll bring it in the garage and look after these things.. What I really needed was the wiring harness that the parts one had. That harness with / should bring my 2005 back from the dead.
Here’s the parts frame. I’ve since removed the wheels , wiring and the handle bar. And I put it on a pallet so I can move it easily.
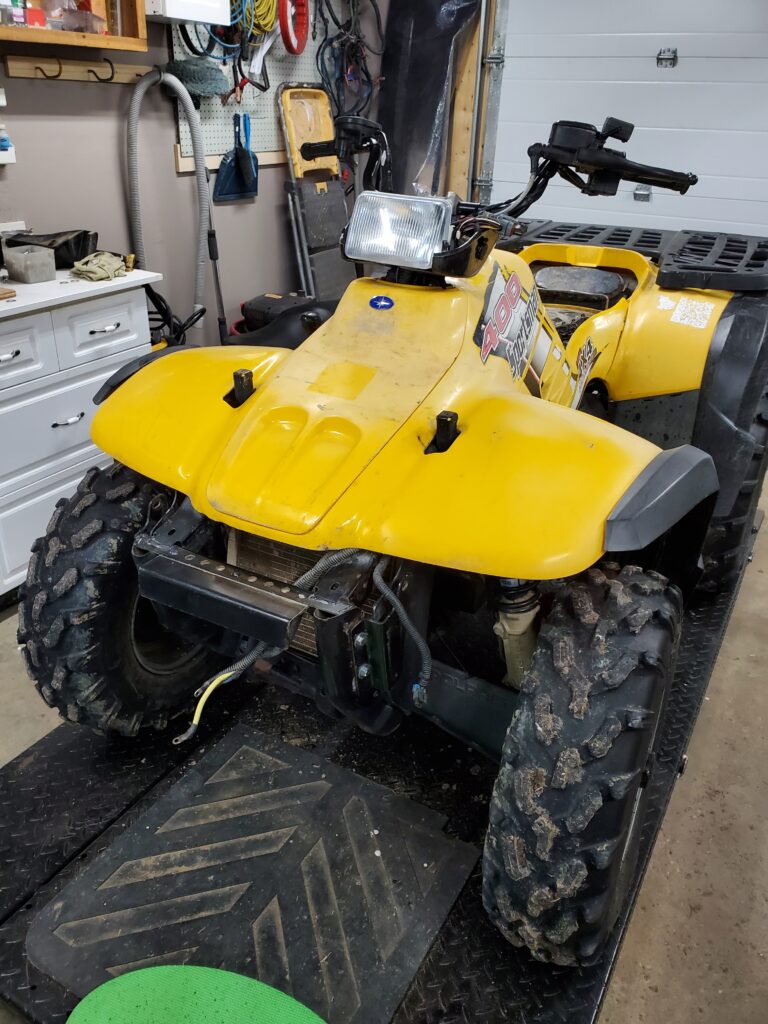
So this 2004 yellow 400 is just to hold me over till I get the 2005 going.. I’m not sure when that will be, hope it happens this year.. So I’m going to put some effort into the yellow 2004 one to bring it up to my standards . Here’s what I see is needed..
Wiring: bad grounds and possible corroded connections. I noticed the head lights are dim. and the kill switch isn’t working.
Check brakes, hubs and all bushings and bearings: Just cause !
Plastics: I’ll remove all the plastics and repair and polish them.. Make it pretty again. Repaint the rims too. And fix the bush bar.
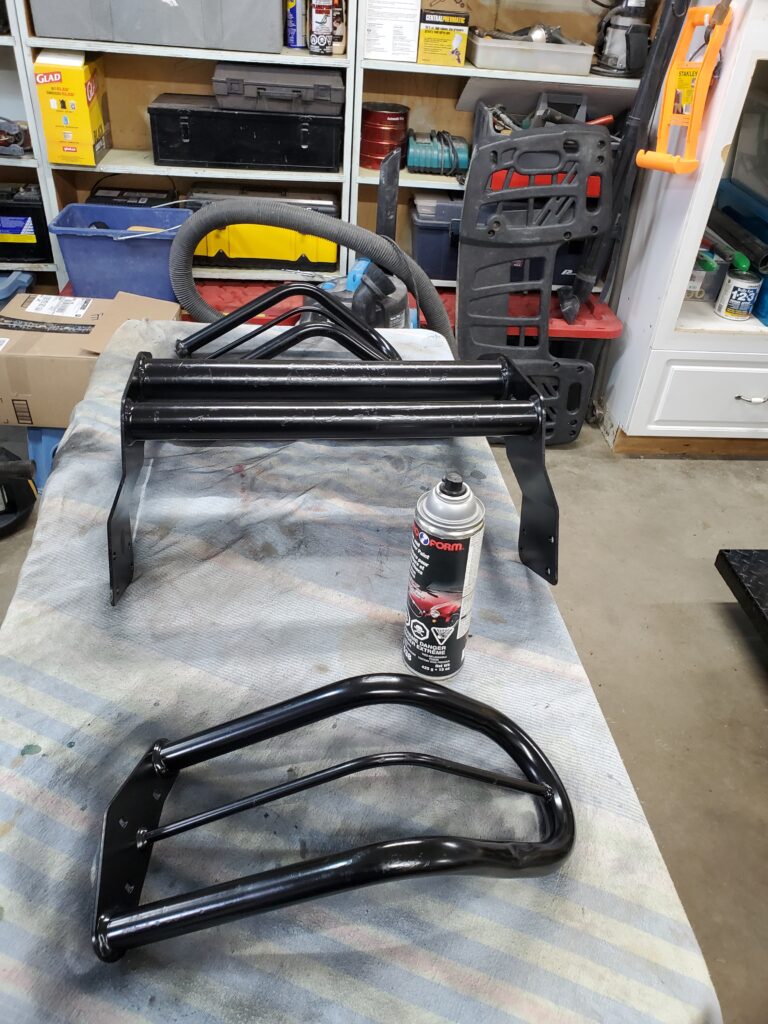
And with the garage all organized and clean.. In comes the 400 to look after those things.. First thing remove the front rack and the bush guard and front trim. Need to get a good look at the wiring.. I also removed the handle bars so I could tweak the the mounting plate a tad. The bars and nacile had a bit of a tilt to the left.
While the guard was off …why not give it some fresh paint and bang the kinks out.
I was able to find the bad wire and now it starts and stops with the key.. Cleaned a lot of connections too. Next I need to remove all the plastics.. this is were I find the broken bits.. But let’s start a new page
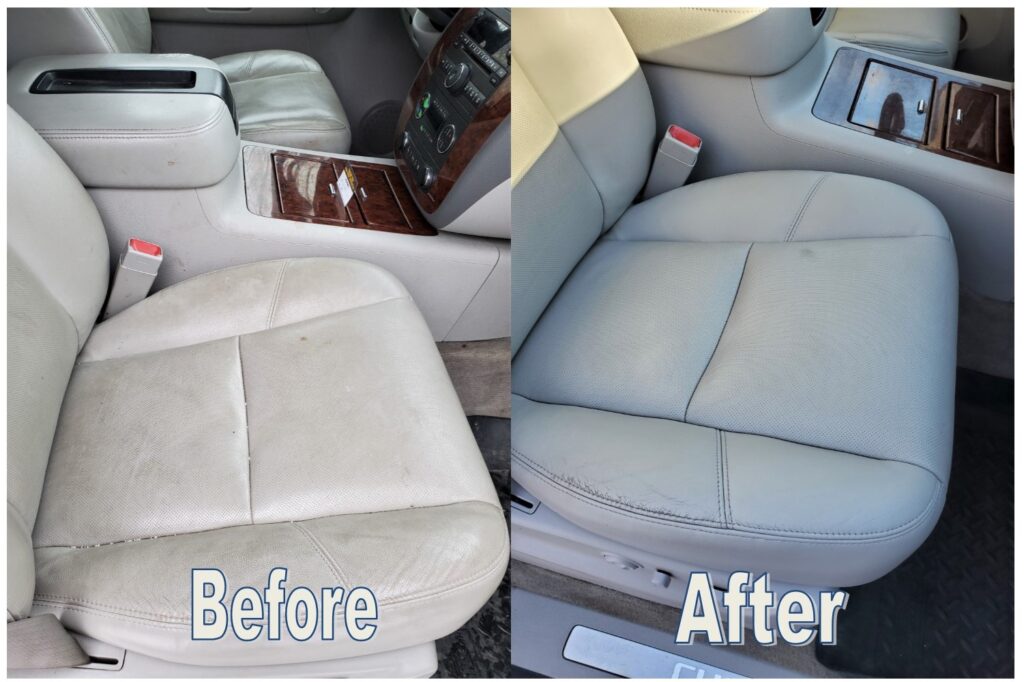
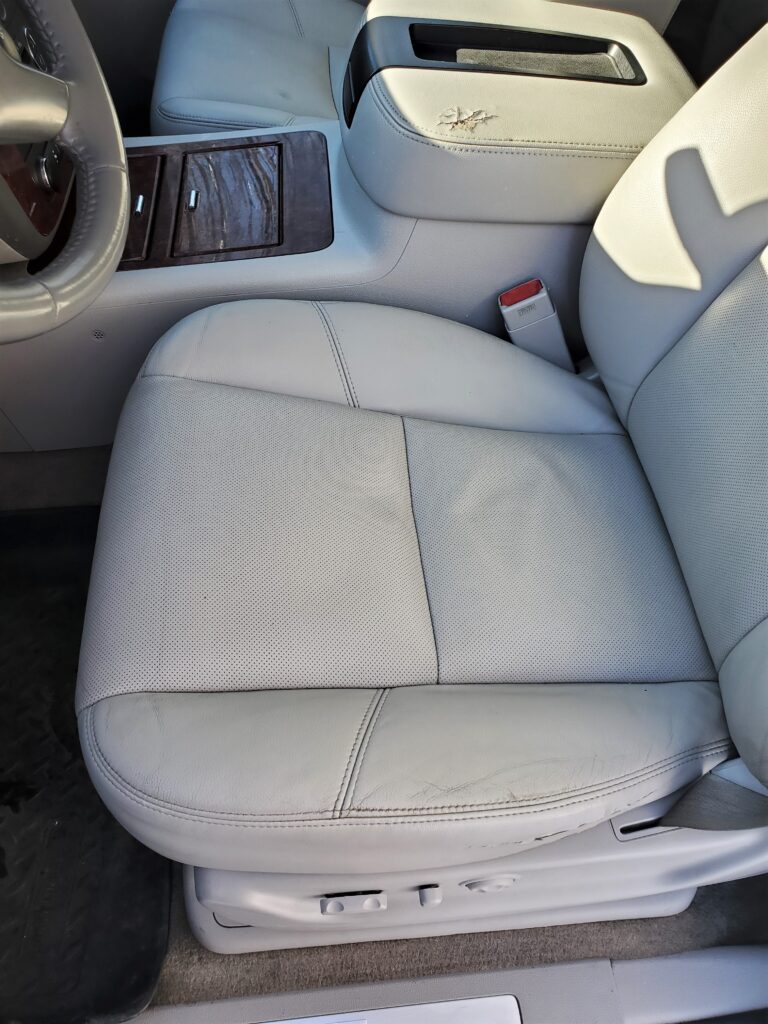
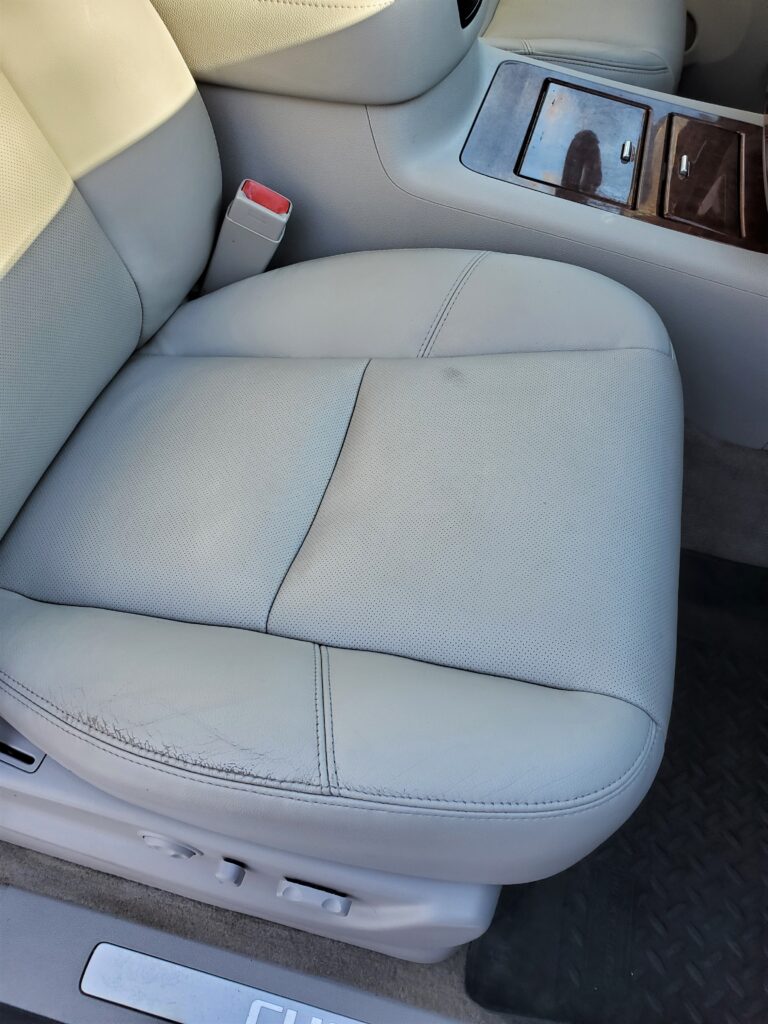
Getting warm out so lets see what we can do. First off I wasn’t happy with some of the work the detail guy did.. Carpets are good and the headliner too. But he dropped the ball on the seats.. So I gave them another go.. !
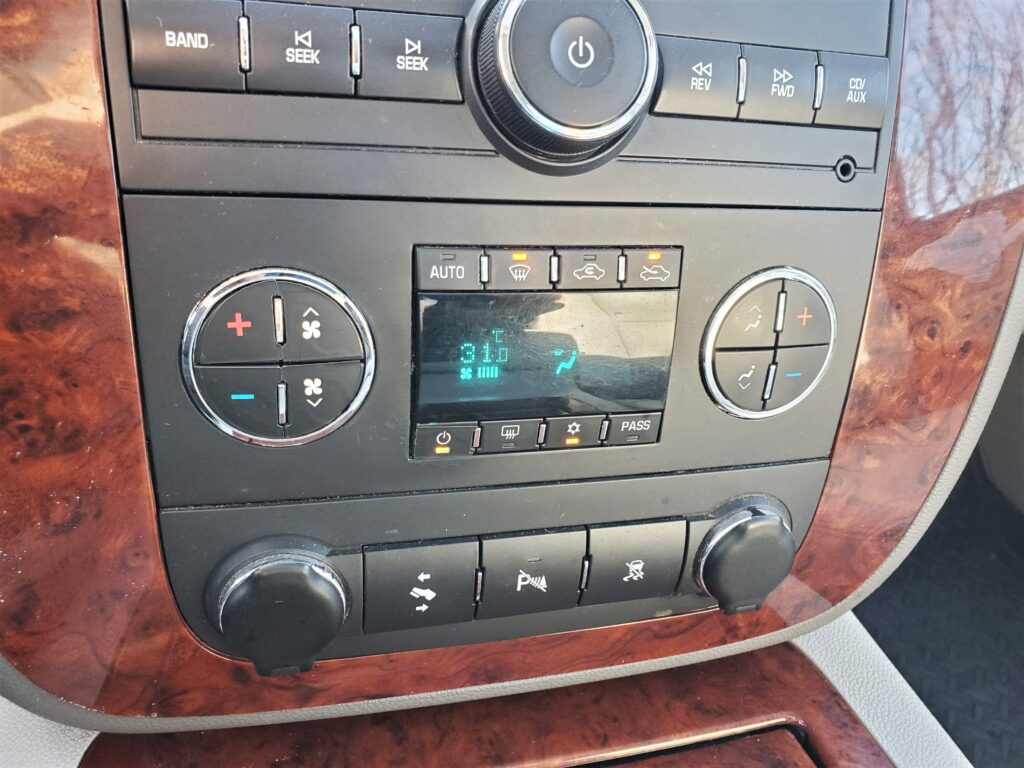
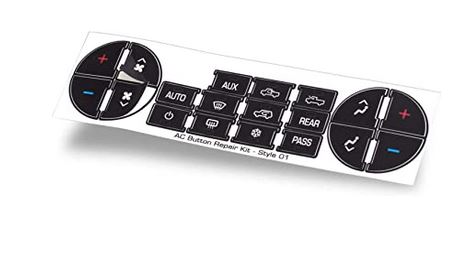
Just got to scrub a little harder.. Then I used some leather conditioner / protector. Nice… I then used the decal kit for the HVAC controls..
Again… Nicer.. Once I get all the bits for the stereo install I can get that done.
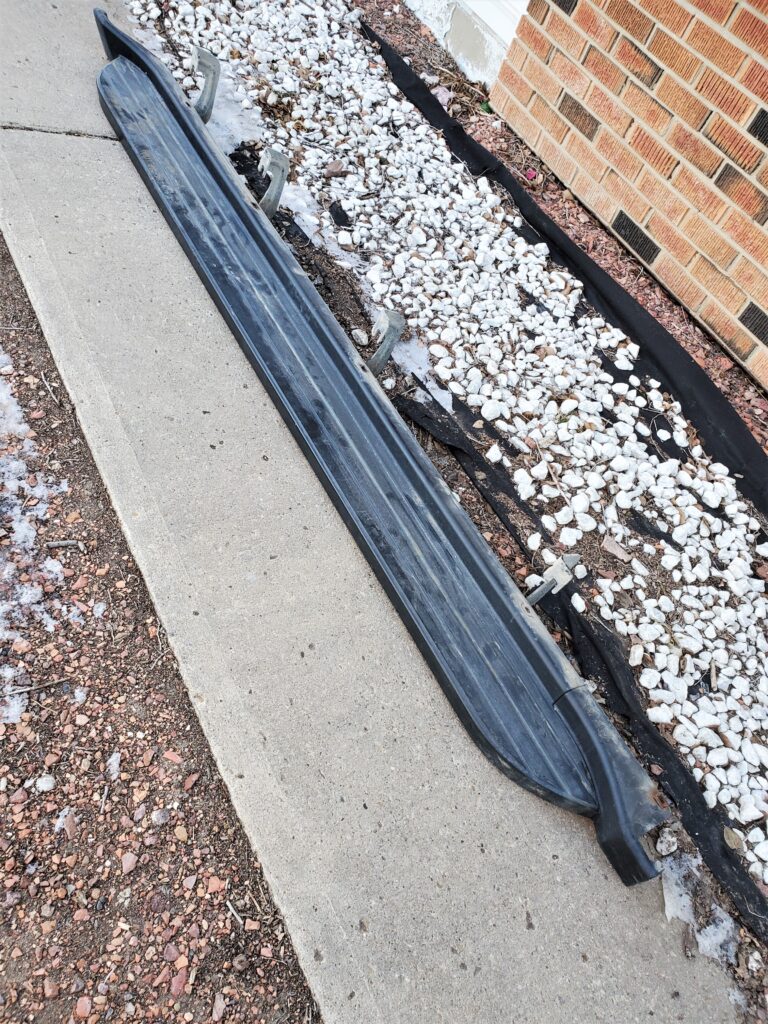
I did find the passenger side running board at a wrecking yard in Calgary. It’s a good thing Albert-in’s crash a lot.
Also grabbed a good driver’s side tail light. The other one on the vehicle is cracked. These won’t be changed till the painting is done. And speaking of that…. I’m getting quotes from small body shops. We will see how that goes..
Update: May 2022
I now have a guy who will do all the body work and painting . Local too. He’s got the parts I bought..and soon the Avalanche too.
Future Me : None of that worked out I drove the Avalanche till March 2024 As is .. Then got tired of the repairs and sold it..
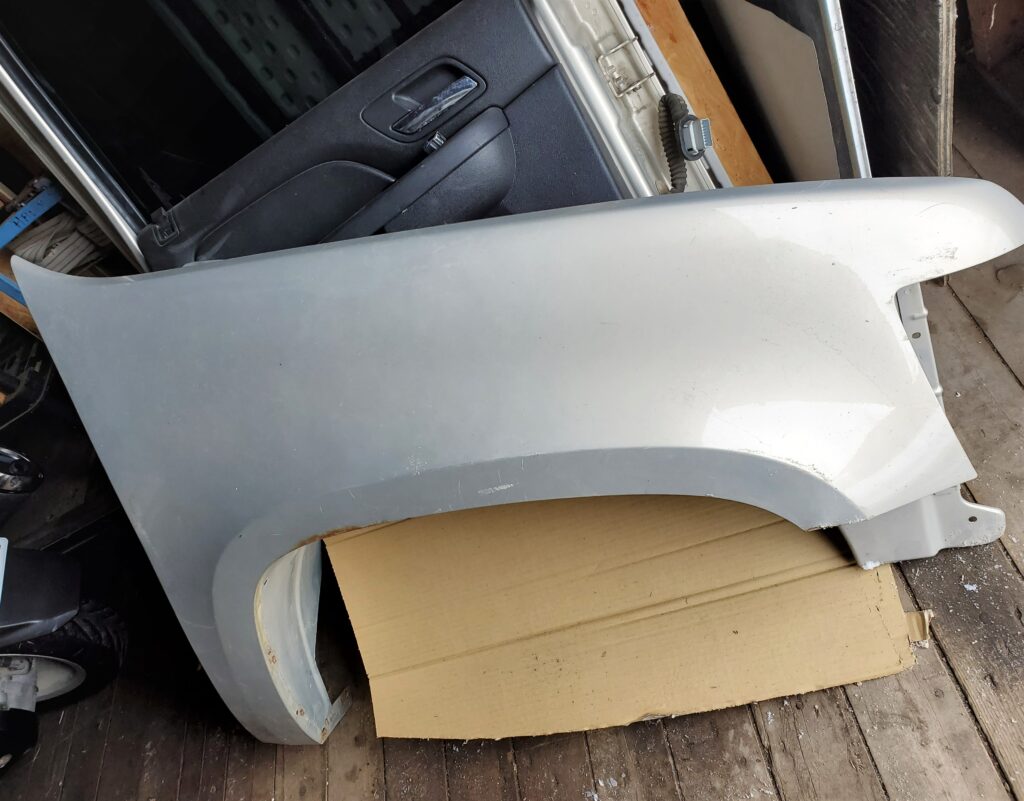
Referring to the body of coarse… after having a close look and assessing whats needed and what could be fixed. I need to replace both rear doors, both front fenders.. and maybe the front bumper. Also I need a right side running board. These are where the most damage is. Found a body shop in Strathmore that was selling the body parts off of a 2008 Avalanche. $100 bucks each for the doors and fenders. Wow my quote from the wreckers was $400 ea for doors.
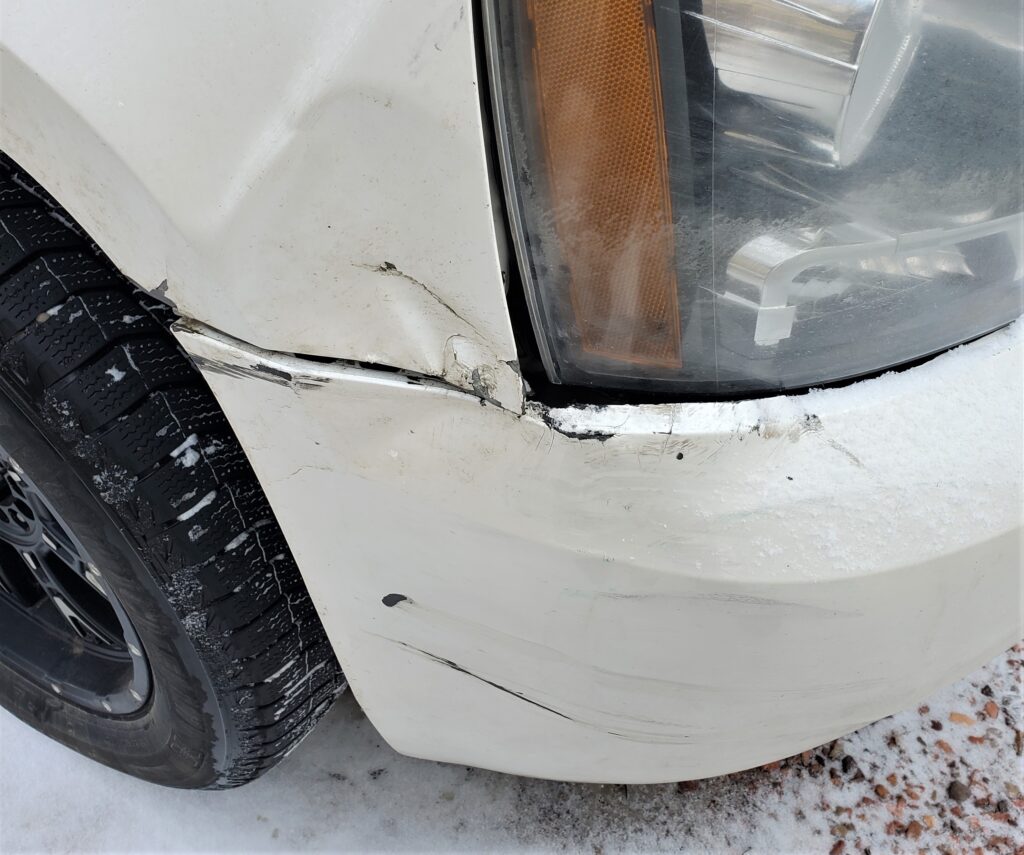
I also got a white front bumper and the bottom air dam that finishes it. That will fix the worst goober on the right front corner.
This ! Wonder what they hit.. ? The right side fender and the front bumper cover will fix this…
The left fender will make this disappear. Unfortunately I can’t get the same color parts.. So some painting will be needed.
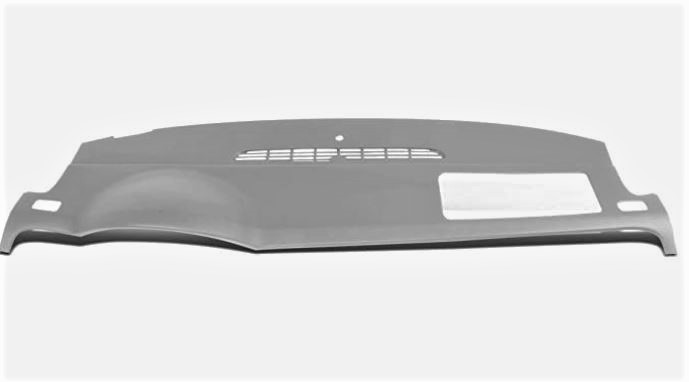
You know I don’t really need the pearl paint.. It’s very expensive. If I just settle for a nice off white one step paint I could save a lot and do the whole truck. For now I’m stopping the rust, and sealing it. And for now it’s too cold for any body work. SOOO I’m concentrating on the interior. As I said I’m having the inside professionally cleaned. That is happening today and tomorrow we will see how that turned out. I have ordered the bit and pieces to repair the few things not right inside the avalanche. Starting with the dash.. Wouldn’t you know it one of the cool things you can get is a new dash cover.
Glues right over the old one. easy fix! The other cool thing I found was a kit for fixing the heater controls. The typical scratched off finish on the most used buttons.
would ya look at that.. even if you found a Hvac control at a wrecker it would still look like mine and cost more than the twenty bucks for these.
Back from the detailing shop..
Well… it’s better .. he did a good job on the carpets.. But could have got the seats cleaner.
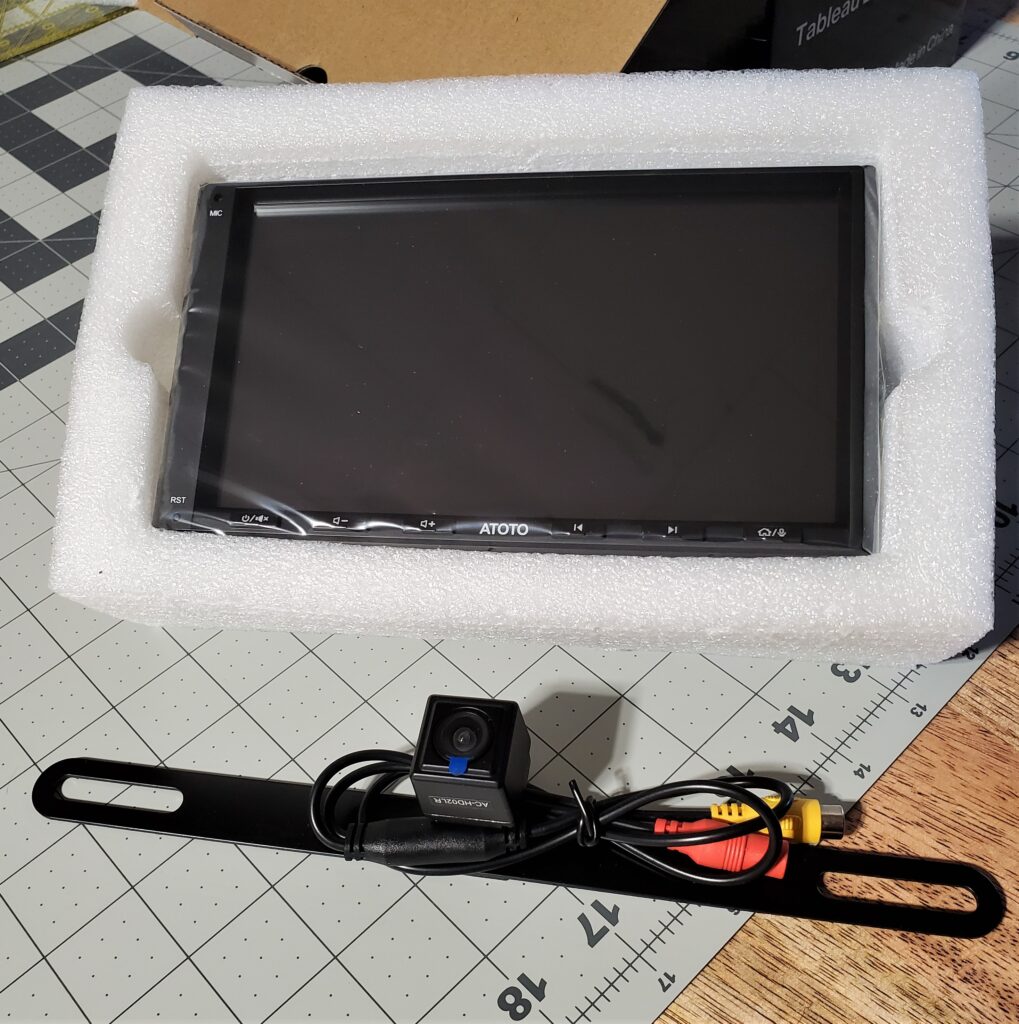
At least it smells nice.. More bits and pieces are arriving soon. The console lid, the dash cover. And a new stereo system.. that will give me the backup camera. I found out what the 12v plug in the console was for.. it powers up the two DVD players in the head rests.. Hmmm don’t need those so I left it unplugged.
The new stereo arrived today..
This is a media player. It uses the Android operating system. It does a lot of things, basically anything my phone does. All I need still is the dash install kit and the GM interface module. And some warmer weather. This will bring the tech in this 13 year old truck up to date. And the “Loaded” term will apply. Also had an inspection done and only found two small things to fix. That will be done next week with a service. I’m not worrying about the ride control anytime soon.. The Avalanche rides nice and the nagging message is not happening any more. The weather is warming up….SOOO let’s start a new page.
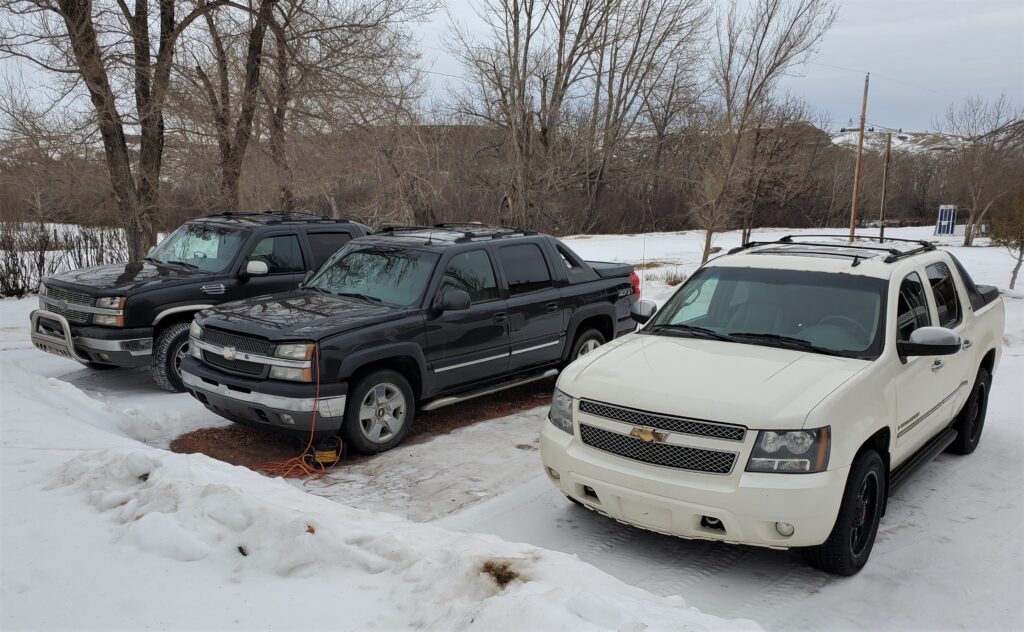
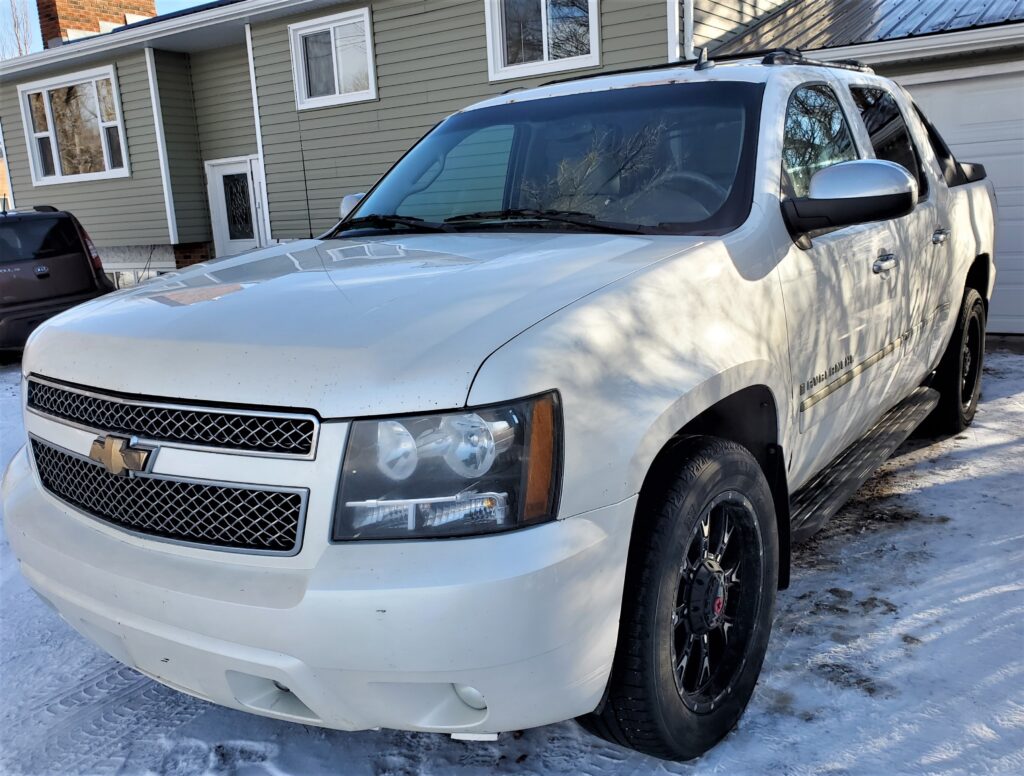
It’s the one on the right.. Yes I have three. Yes the oldest one has the least Kms. But those two will be gone soon. So time for an upgrade for me. A bit newer and a whole lot more fancier. Like one grill away from being a Cadillac, but without the expensive parts ! Now for some Avalanche history.. The last year Chev made Avalanche’s was 2013. This one is a 2009, and there is only a few changes in those last years. New this one would have sold for big bucks… on the plus side of 50 thousand. The LTZ model is top of the line, and the only two things missing from this one is Nav and the rear camera. So it’s definitely what you call “loaded”. ( I’m adding those)
Hard to tell but this is the pearl white paint. Which is classier than just white. From the factory it would have 20 inch chrome wheels , But these are new after market 20 ” “Worx” rims and new Michelin winter tires. That’s a bonus for me, and so was the new windshield.
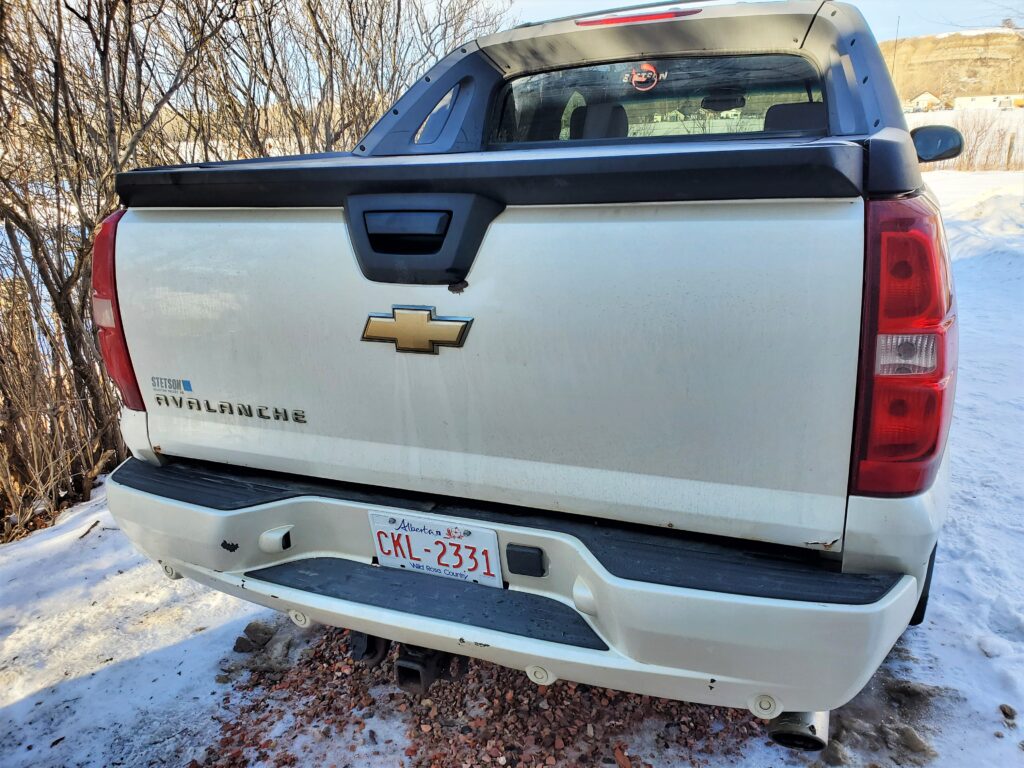
It’s nice to see a bumper that is not bent, ya some paint chip and scratches but not bent.. The parking sensors work ! and the trailer plug too. The rest… well nobody ever cleaned the interior. And something very heavy was put on the dash and cracked it. But no other damage inside. Lets have a look , and consider these the “before ” pictures.
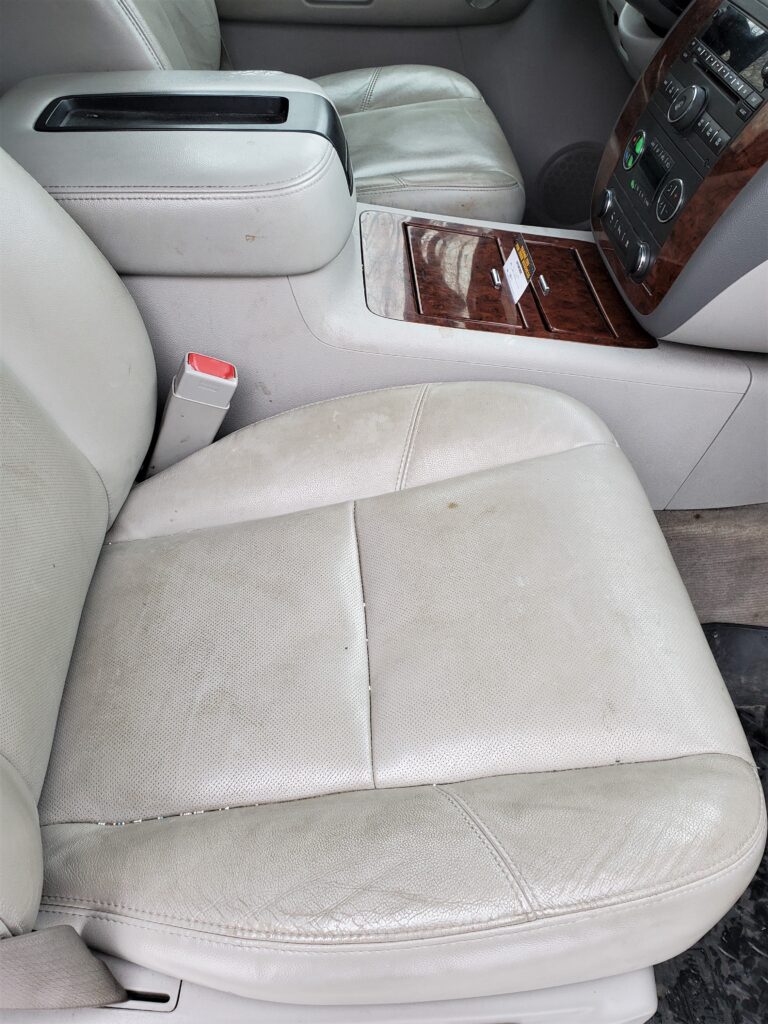
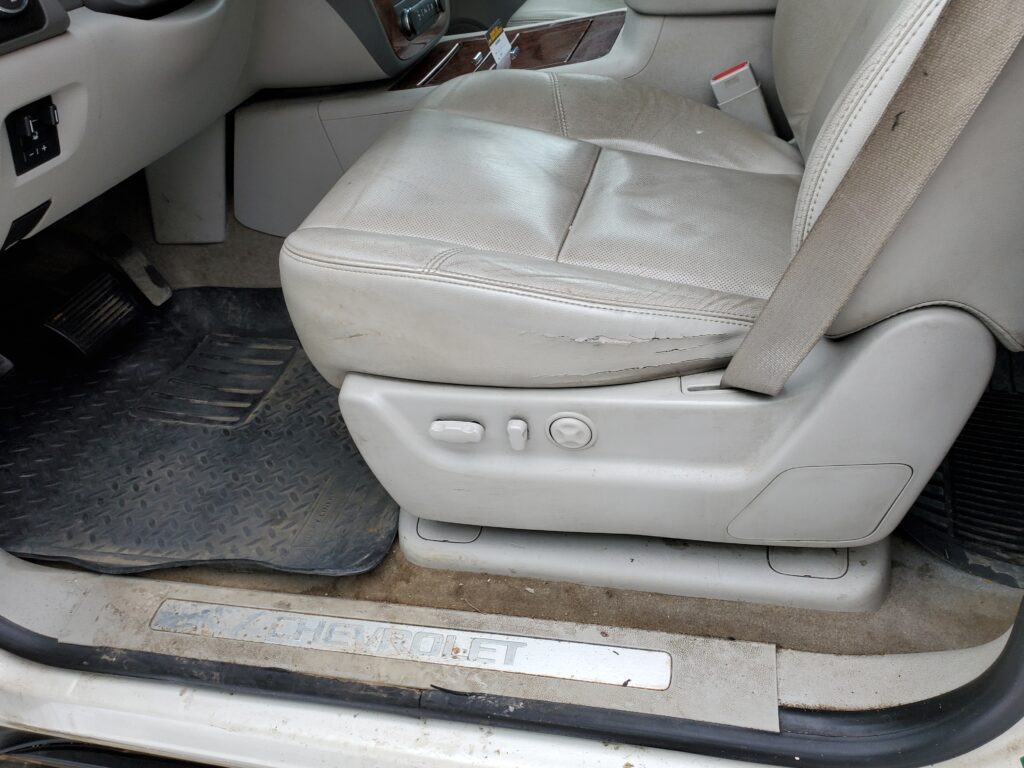
Light grey leather seats. Dirty but still in good condition. These are heated and cooled ! The driver’s seat is the one that takes a lickin… And there is some cracks on the side, but not on the seat. They are comfy too.
You can see the cracks… but they are not bad. These seats are 8 way power..both sides.
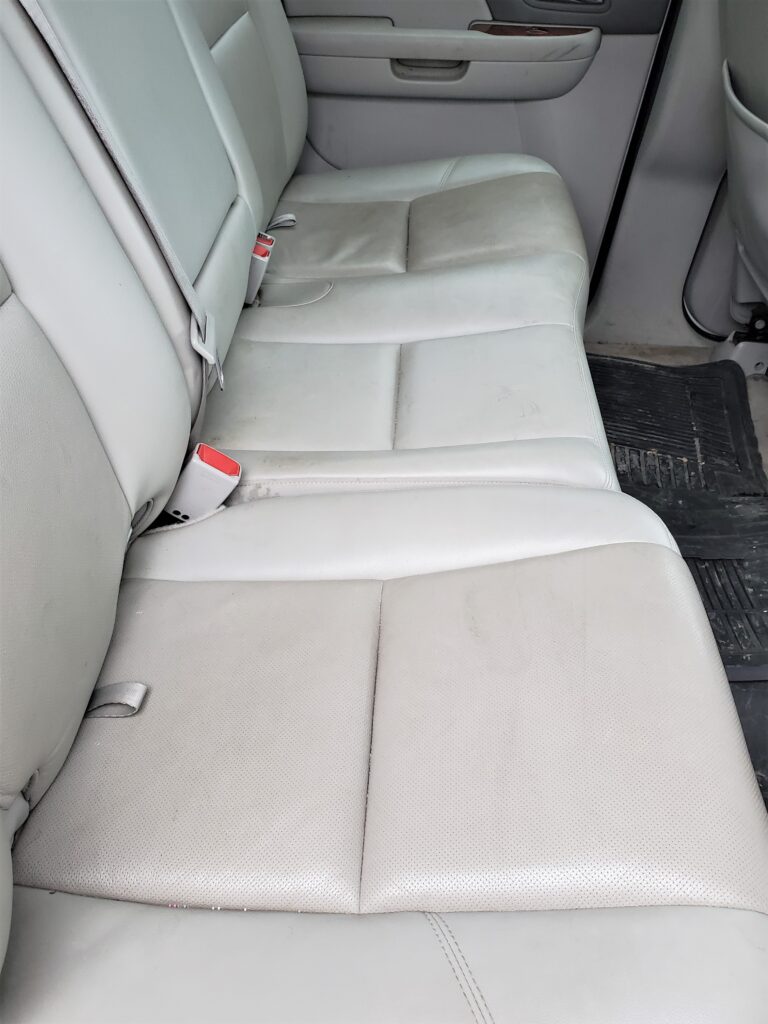
The rear seats have probably seen some kid activity, but survived nicely. I tumbled the seats and opened the mid-gate, it’s all good. The Avalanche has a date with the auto detail shop this week.. Should see a big difference. I’m going to interrupt here and say that this Avalanche drives very nice. Brakes are great …lots of power and good on gas too. It was a two hour drive back from Calgary yesterday and cruising at 106 kph I got 10.6 liters / 100 km. Not too bad! Plus it goes down the road straight. It’s a pleasure to drive. AND it has 285,000 km on the old odo. Alberta is like that.. everything has high kms.
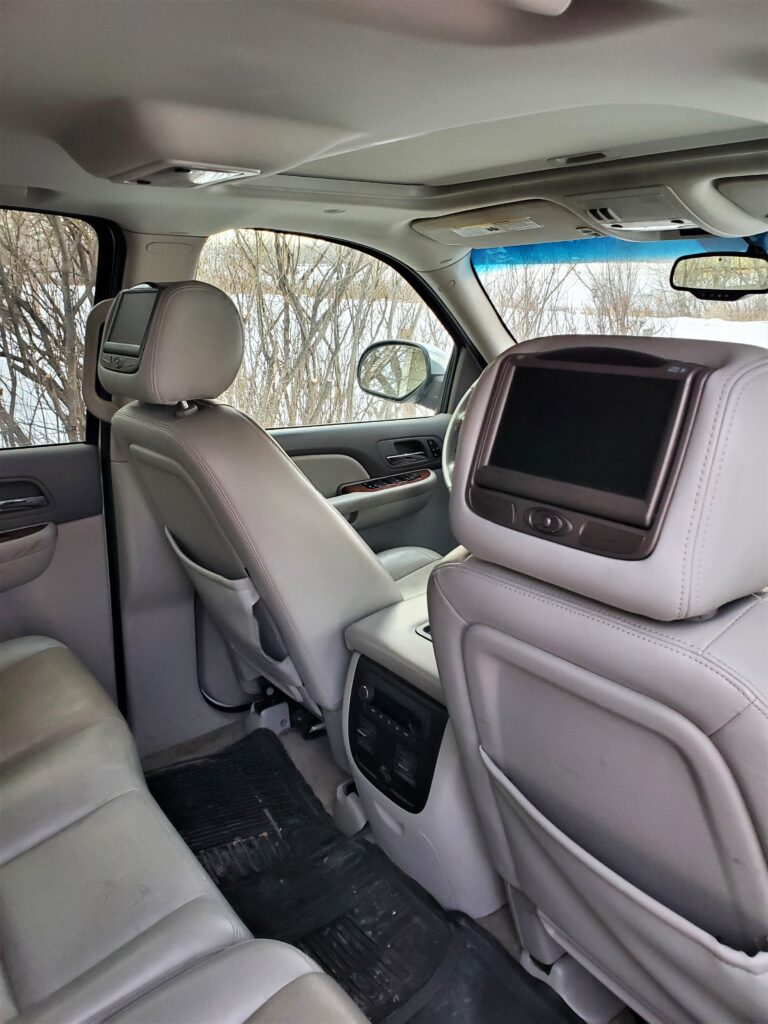
Yes two DVD players ! Crazy eh.. They will most likely never get used.
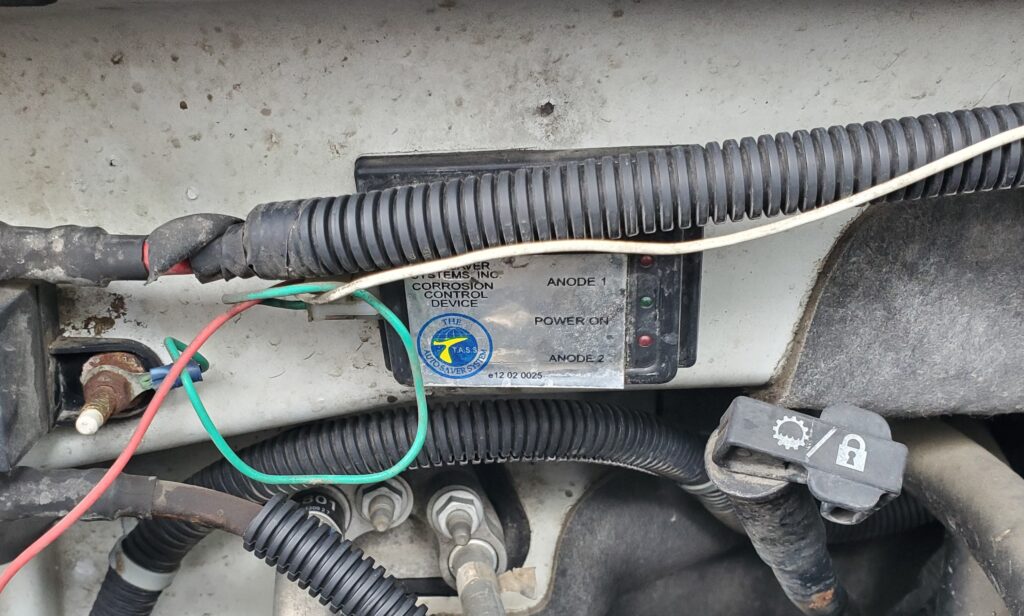
So lets talk about the elephant in the room…the reason I paid six grand for a Ten thousand dollar truck.. THE BODY ! yes That’s where the work will be. Oh and I want to say don’t waste your money on one of those electronic rust inhibitor’s. There’s one installed on this Avalanche from new I presume …I found it.
They don’t work and this truck proves it.. RUSTY you bet. Ya it’s Alberta and they use lots of salt on the roads…but if you wash it ..keep wax on it should last longer than 13 years.
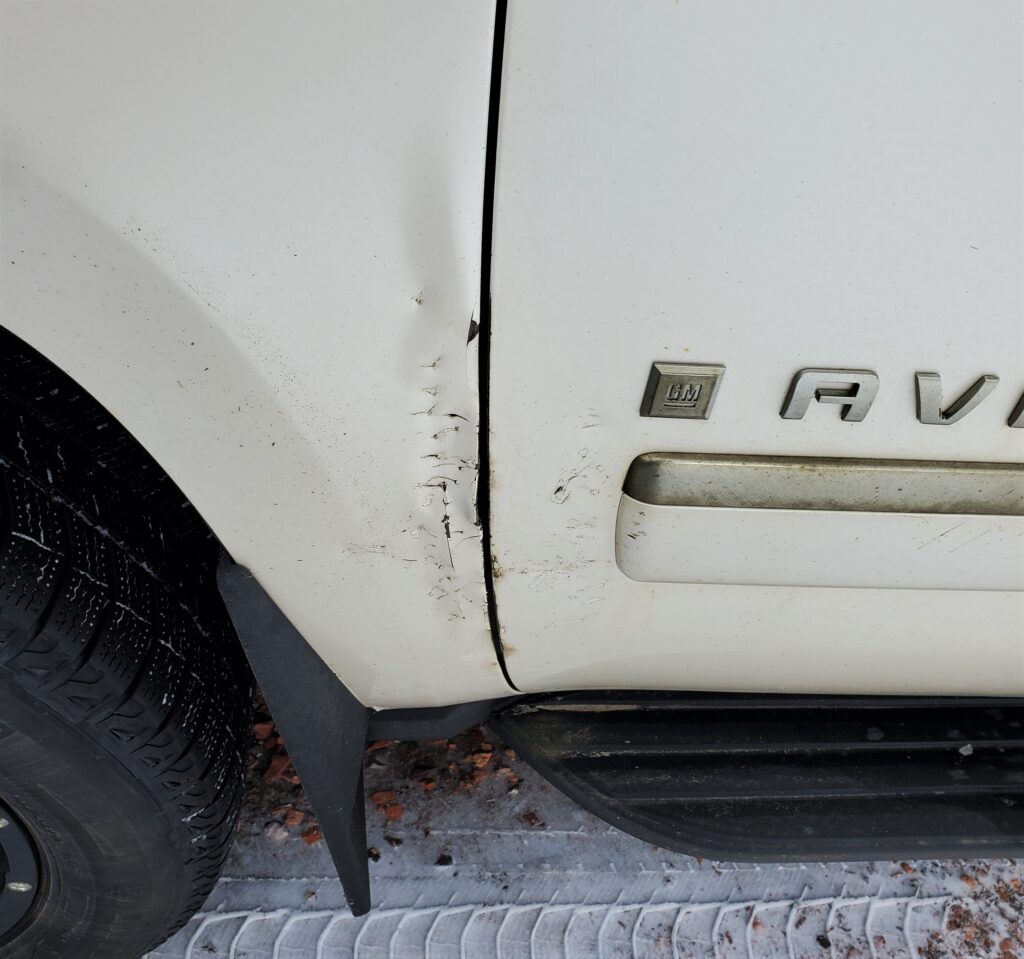
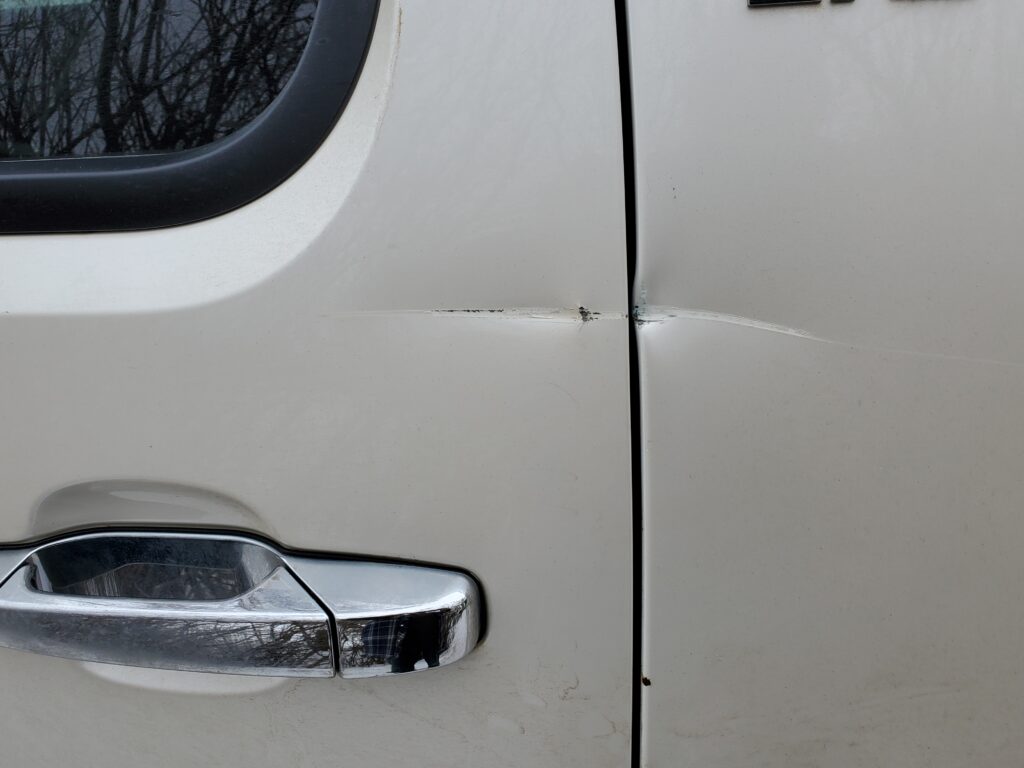
This is the drivers side rear fender. The other side is bad, and bottom of the doors and other places. So that’s a bit of work.. Then there’s other body stuff…
Like dents and scratches… Lots. So I’ll have to figure out what to do. The Avalanche is worth making nice. As far as the mechanical end of things all I’m aware of are the air ride system not working. And the two functions on the shift leaver are not working..They are: tow/haul mode and the manual shift button. Could be a bad wire. As for the air ride… After 13 years and 285,000 kms one should not expect that to work.. They were prone to failure. The fix is to change over to regular shocks and remove the compressor and install the delete kit on the wiring so the warning goes away. I’ll be surprised if there is other problem. Here’s a video.
Let’s start a new page called.. “Hunting & Gathering”
Got a new plastic welding kit I’m dying to try out. However the welder uses butane… lots of butane. So I’m not super impressed.. But I can use the mesh and the rods. I have a cheap soldering gun with a flat shoe …and that works great.
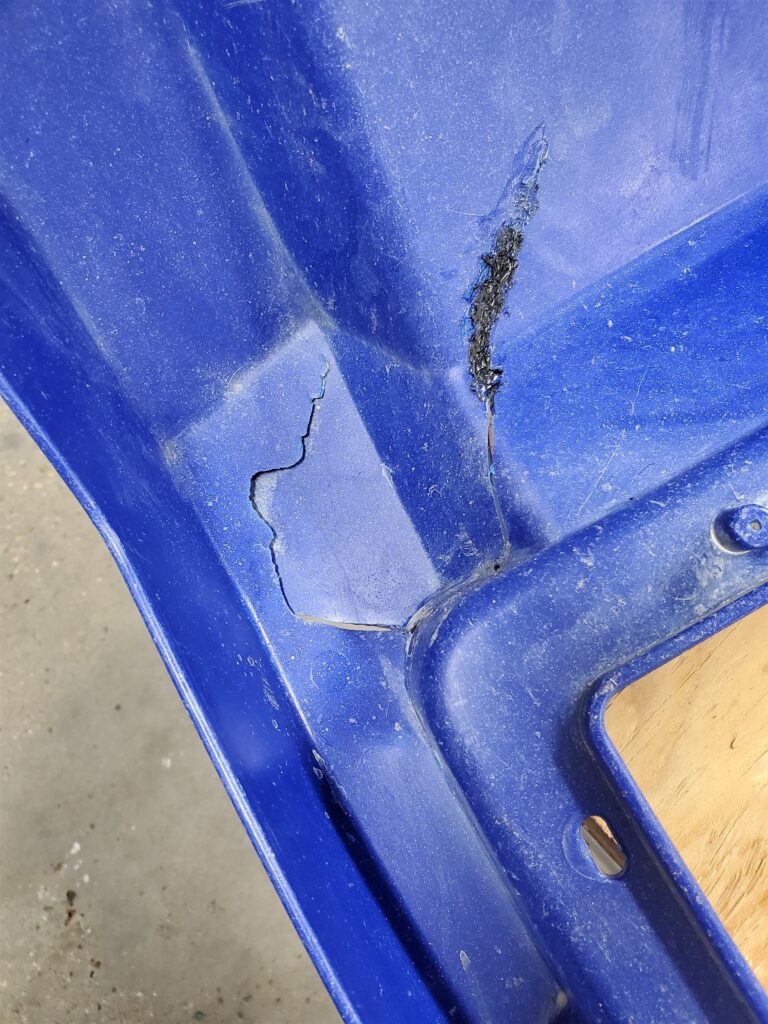
Here’s the worst crack. Front fender …left side. I use the heat gun to soften the plastic and re – align the crack. Then weld the backside to make it strong.
Then weld the good side.. but it never comes out perfect with colored plastic. But it’s repaired and strong . This process works very good with the black plastic parts. When melting the PE plastic some of it evaporates into the air.. So it’s necessary to ad more plastic . Hard to do when it’s a color.
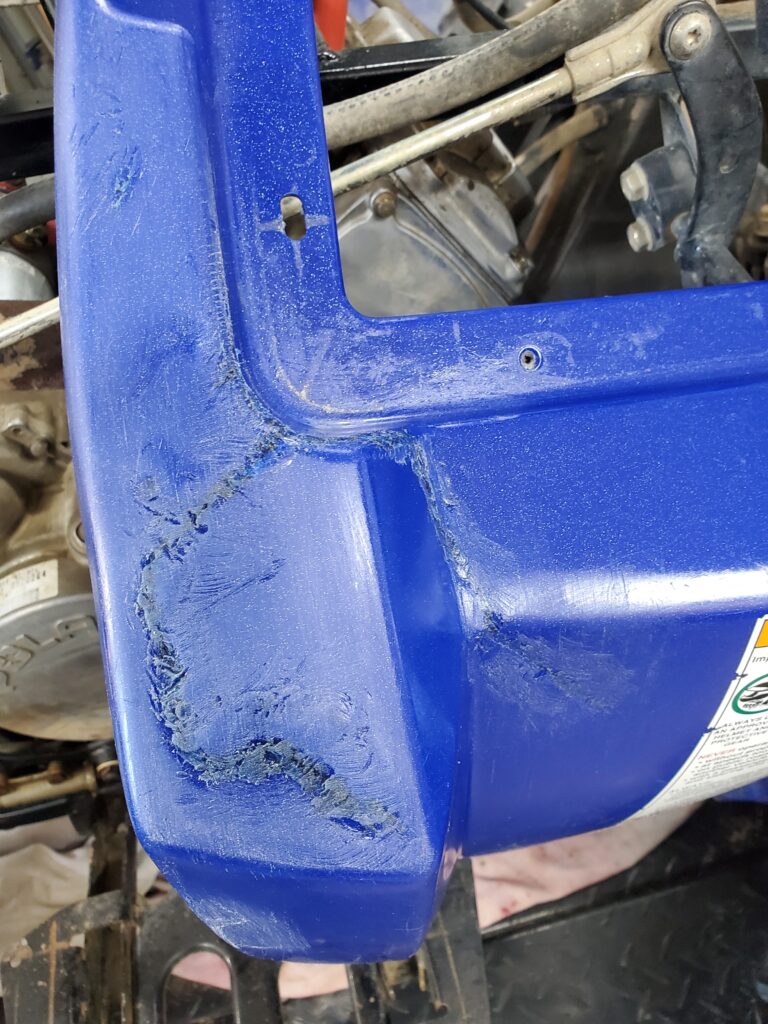
Here’s a bad one on the foot well. Same process but looks much better. The foot wells take a beating. Even if you are careful…
There is the same crack on the other foot well too. And a crack on the front bumper. All easy to fix. However lots of work needed on the rear fenders.
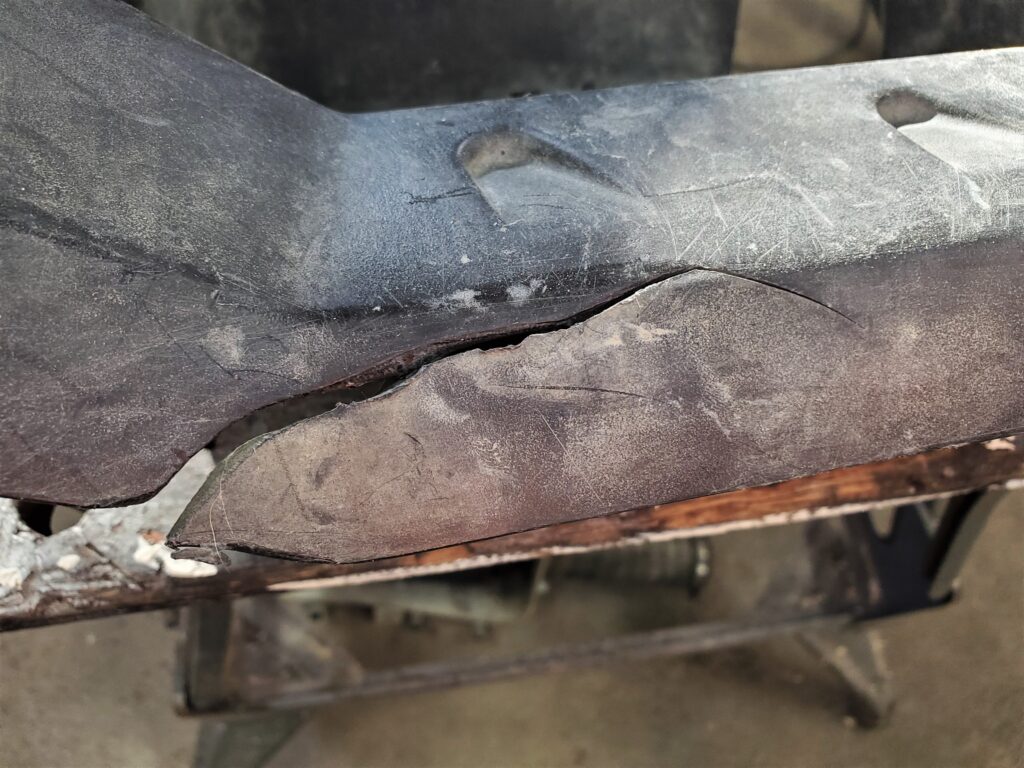
Two of the tabs under the seat were broken off. These are the front ones.. of the six along the upper frame. When these broke it allowed the plastic to get too close to the exhaust pipe and melted the broken parts.. I had to re construct some parts..
I use paper clips embedded in the plastic. It’s not pretty but works. And it is under the seat so no problem. That’s about it for repairing plastic parts. Finally I’m trying different ways of polishing out some of the scratches.
Here I tried wet sanding with very fine grit. works but leaves a dull finish. Power polishing with cut polish could bring the shine back. This is much the same as restoring headlights. One thing for sure it gets the years of grime off.
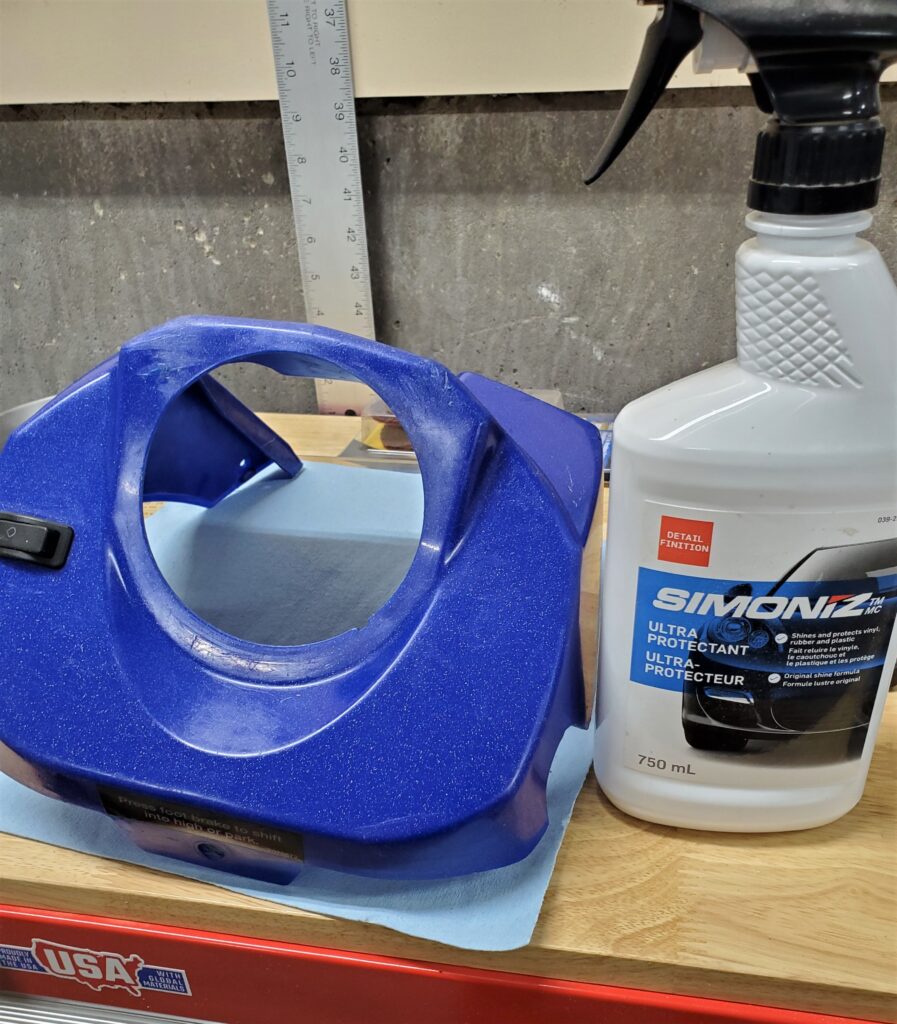
As a final step I use this ultra protectant. Looks new. But I haven’t dealt with the scratches on this yet.. So you know I’ll make the body parts nice again.. And I may just see about making my own side panels too. Some of the parts may take a while to come.. So I’m going to start a third page on the ATVs that I have had, fixed and rode. PAGE 3 My ATV history..
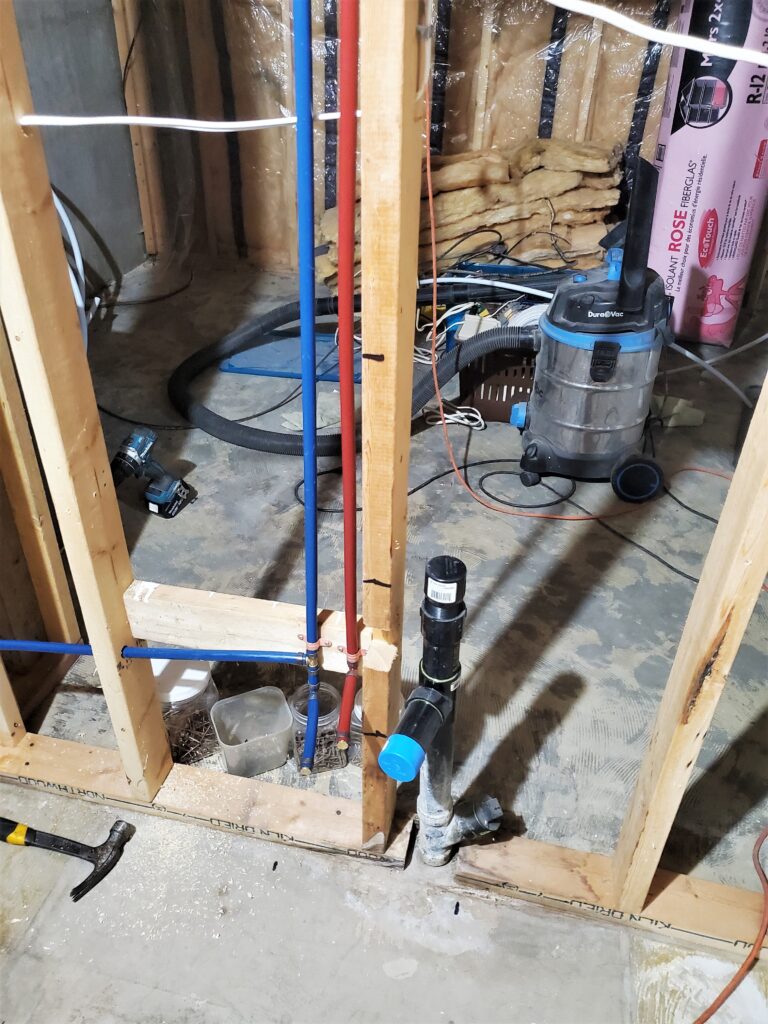
I’ve been working away since the finishing of the kitchen. Once the plumbing was all done and the last of the framing.. I was able to put up some drywall with the help from Brother Scott.
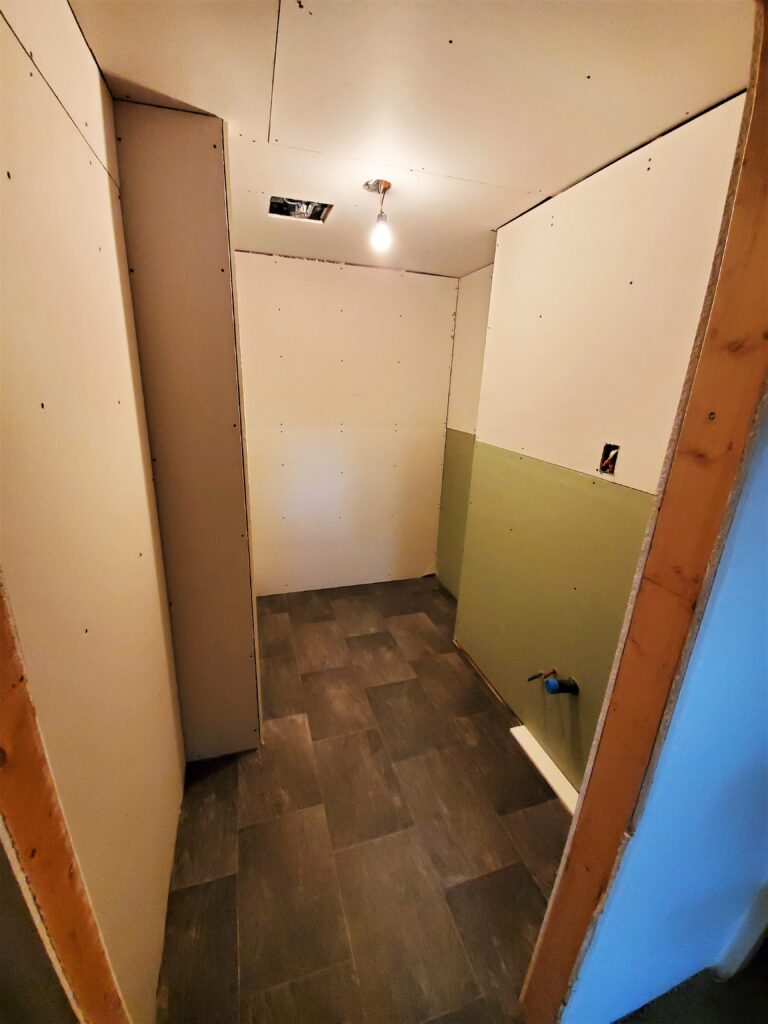
And this is where we are.. flooring is in . then the shower stall had to be installed.
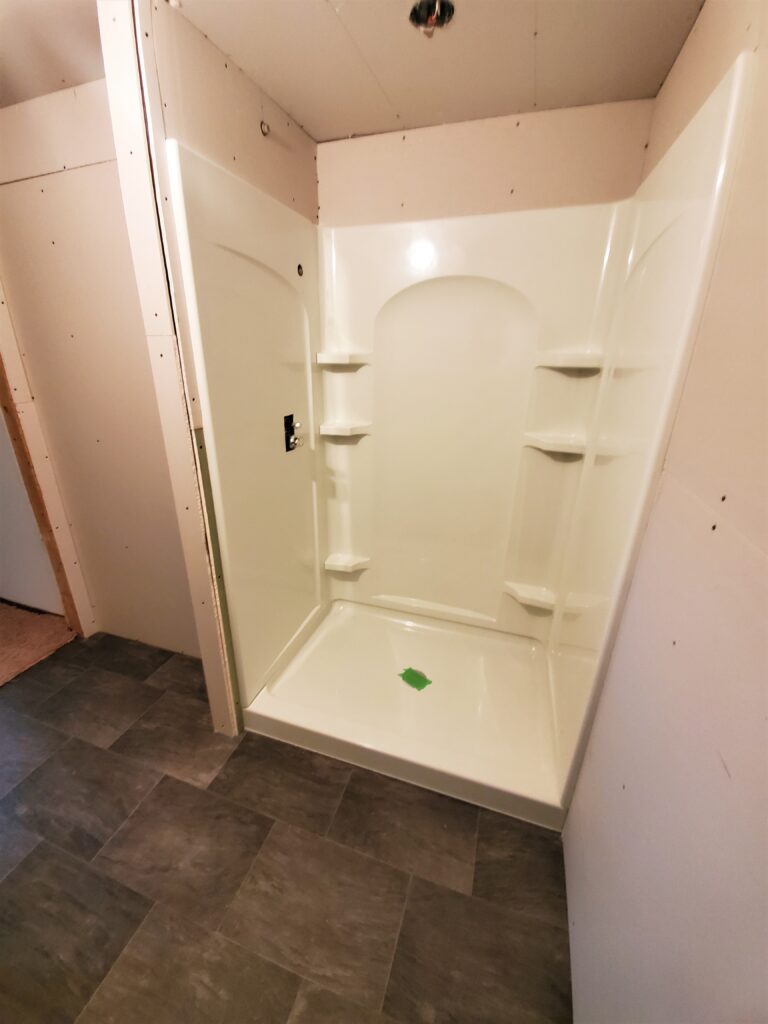
Done ! Took a whole day to do this part.. some tweaking needed. But it looks great. Then the drywall is finished.. that covers the attachment flanges. We are ready for the taping now. The flooring was done before the shower because I wanted the flooring to go under the shower base. The floor is a new product. No glue vinyl sheeting.. Thick and water proof.. just like vinyl planks but no seams. Notice the upstairs toilet drain is gone from this picture. The modification done by the plumbers worked out perfect.
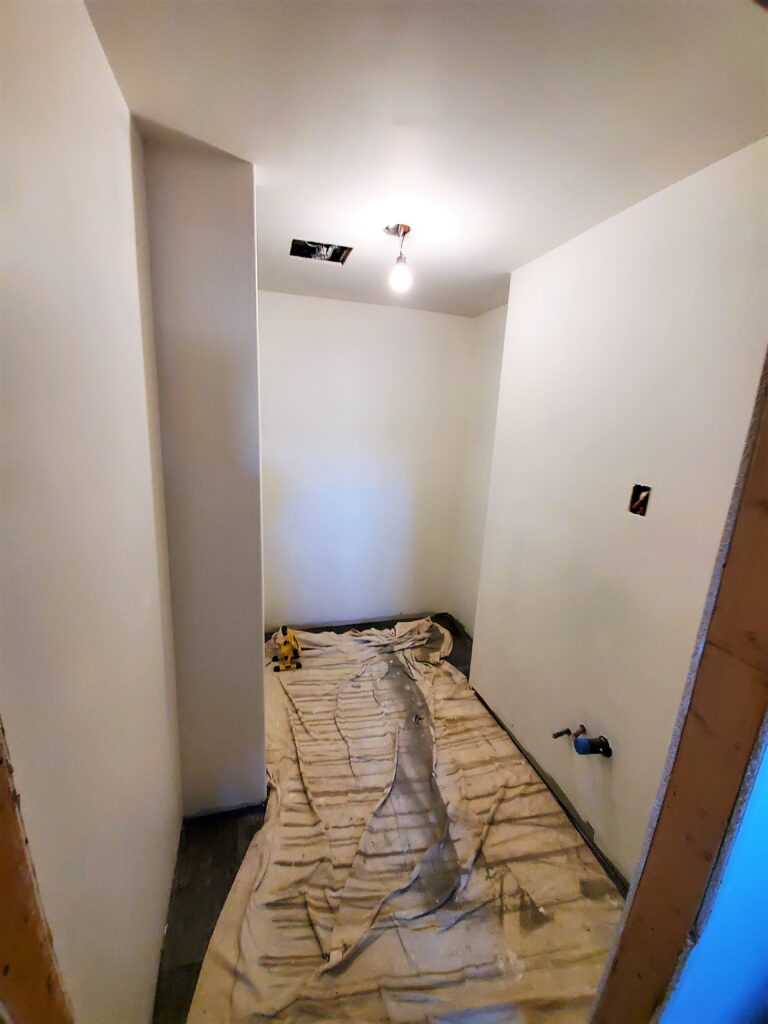
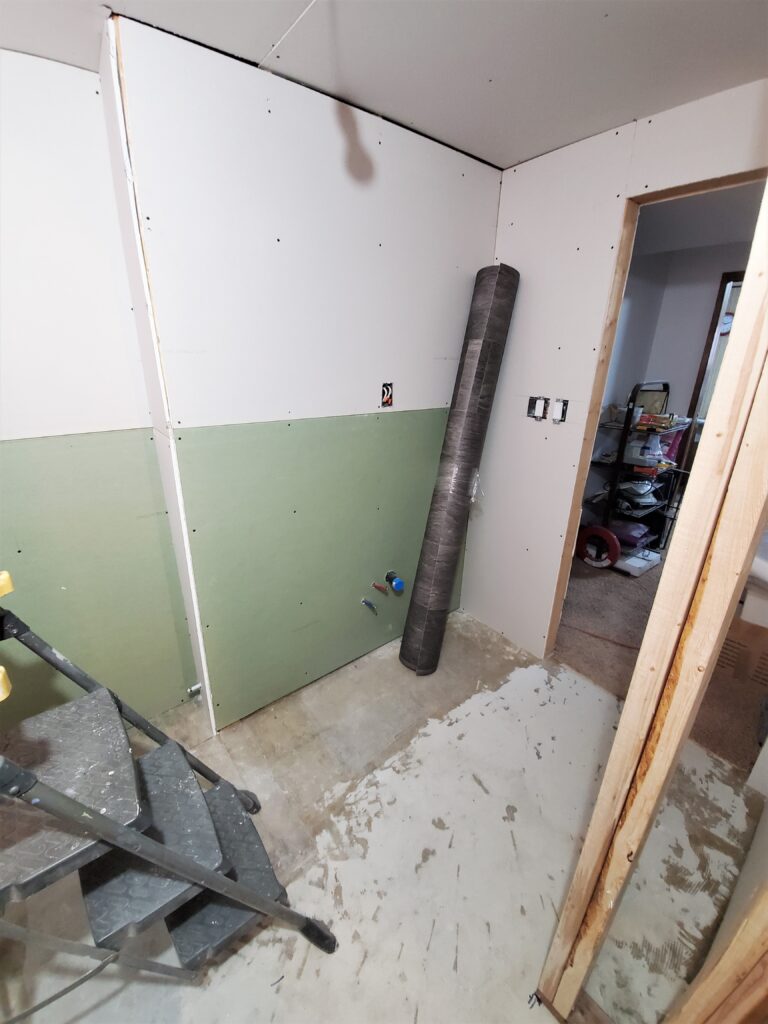
My Son has Come and taped and filled all the drywall. And today I sanded cleaned and primed the room.
Two more days and the painting will be done. And there’s more work after that.
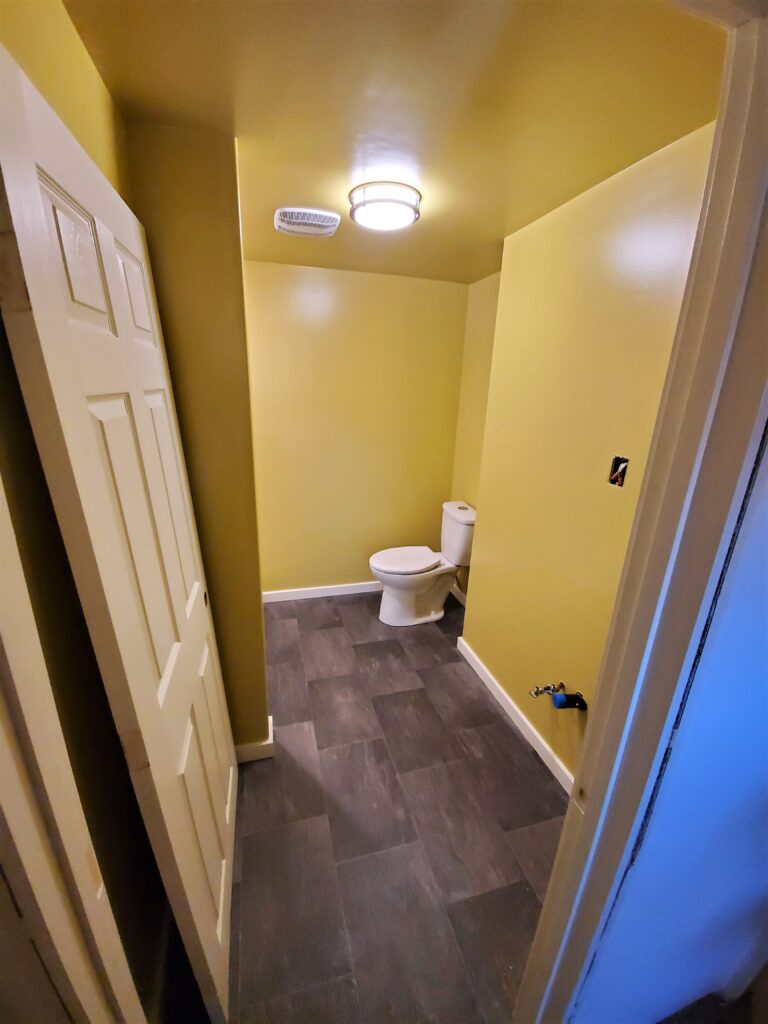
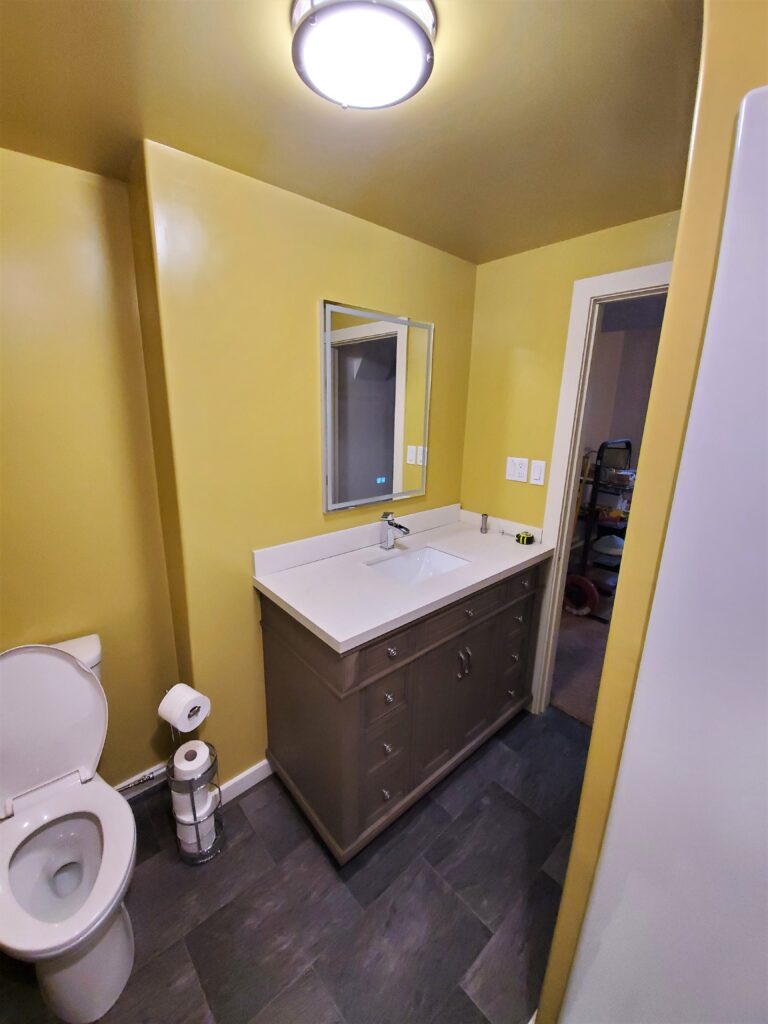
Painting done ! and the trim is in too. Lights and the vent cover done ! And today I put the toilet back.
Vanity next… then maybe the door..
All DONE !
Skipped taking photos.. Sorry… But the important thing is … I’m finished. And we are having showers and using the bathroom.
This project turned out great. Careful planning and quality components makes the difference.. We love the shower. The vanity has lots of storage and counter room. The powered mirror is just cool.
Thoughtful things like LED lights (shower too) and coat hooks for the towels. I made a short video to point out the changes from the old bathroom..
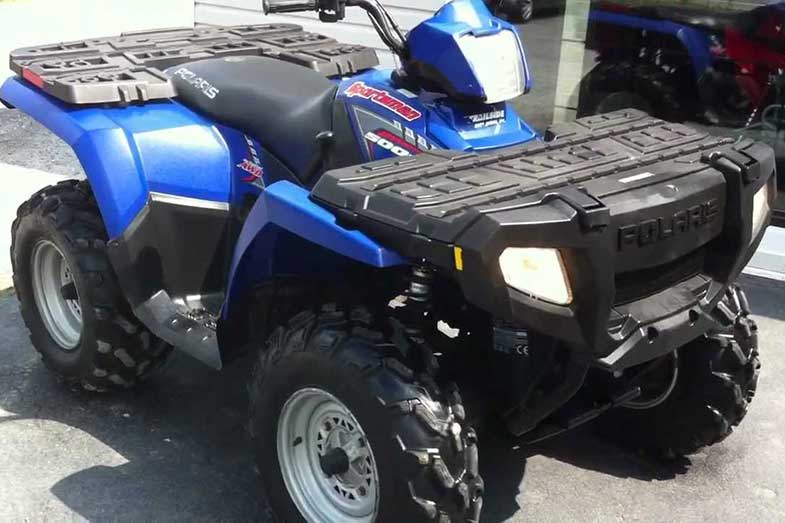
And that concludes this project.. Taking the winter off renovations. I will be out in the garage fixing up my new Polaris quad. Check in on that HERE. Polaris 500.
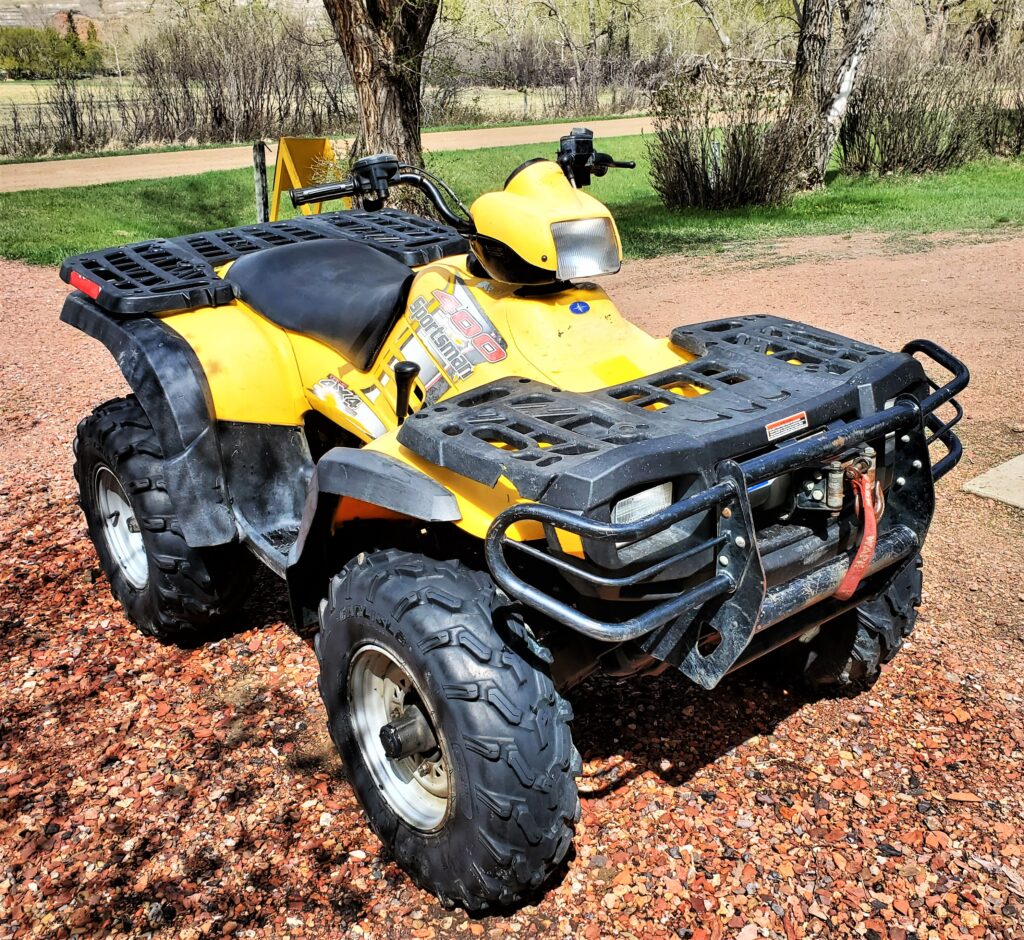
But the photo is the exact same as the one I found .. the front plastics are off mine, but I have them. Soon the reno’s to the house that need doing will be finished. And in the yard there’s nothing to do but clean snow.. ( if it snows). The garage is keeping a nice temperature.. so ya I can work out there. This popped up for sale and I jumped on it. $600. for a fixer quad that is my favorite model and my favorite color ! Dam right. This one was listed as a 2004… but clearly not.. Right above the Vin it says a manufacture date of 02/04/2005. Even the key tag says 2005. Bought in Red Deer. A bit of research tells me that this is an early release of the new Sportsman models. A body style that went right through to 2011. I believe it’s the first years that you will see EFI as an option. Plus the new shape for the head lights, and a trunk under the front rack. If it says HO it’s still got a carburetor, like this one.
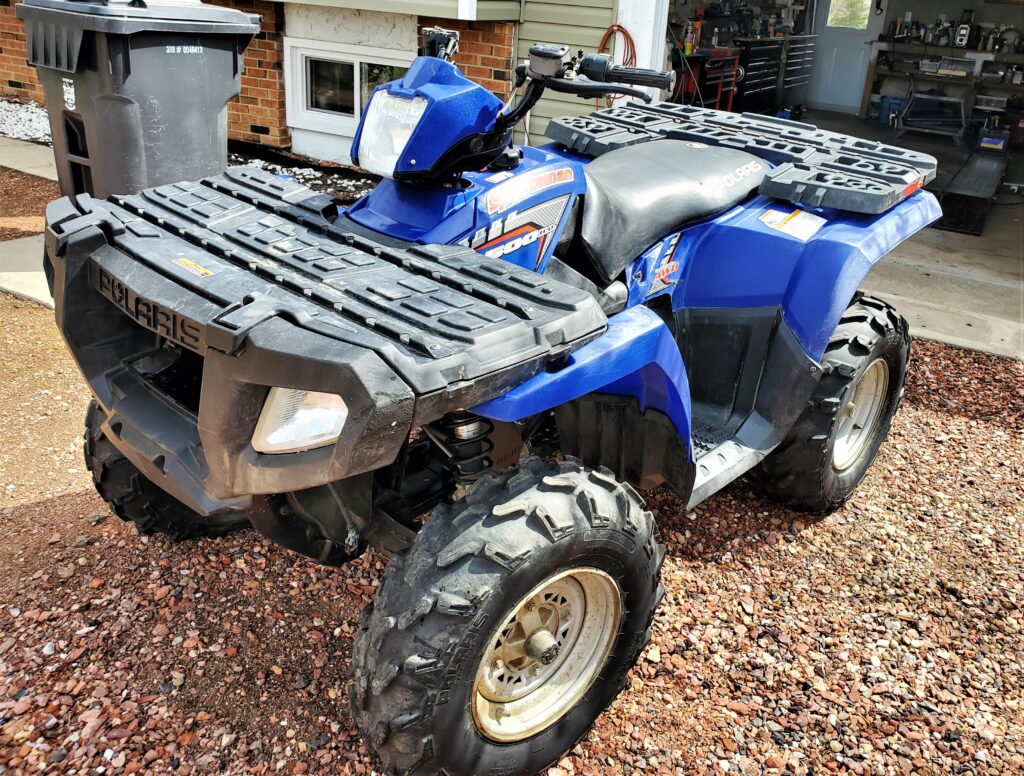
Not as pretty as the top picture.. But that will change.
Here’s what I know:
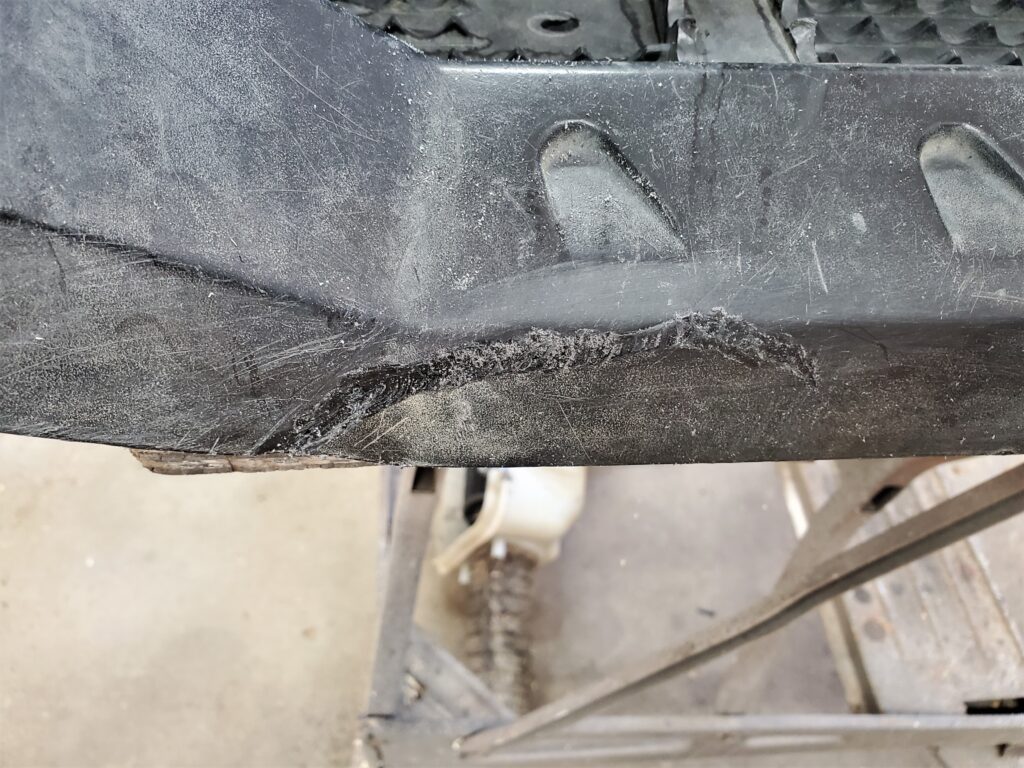
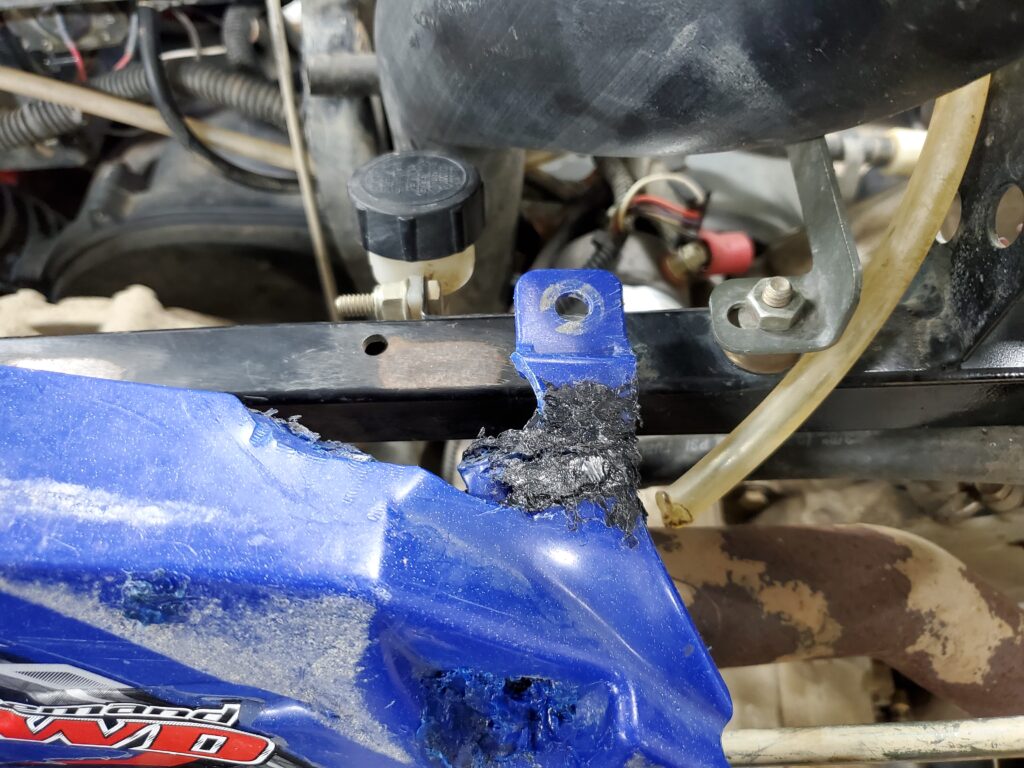
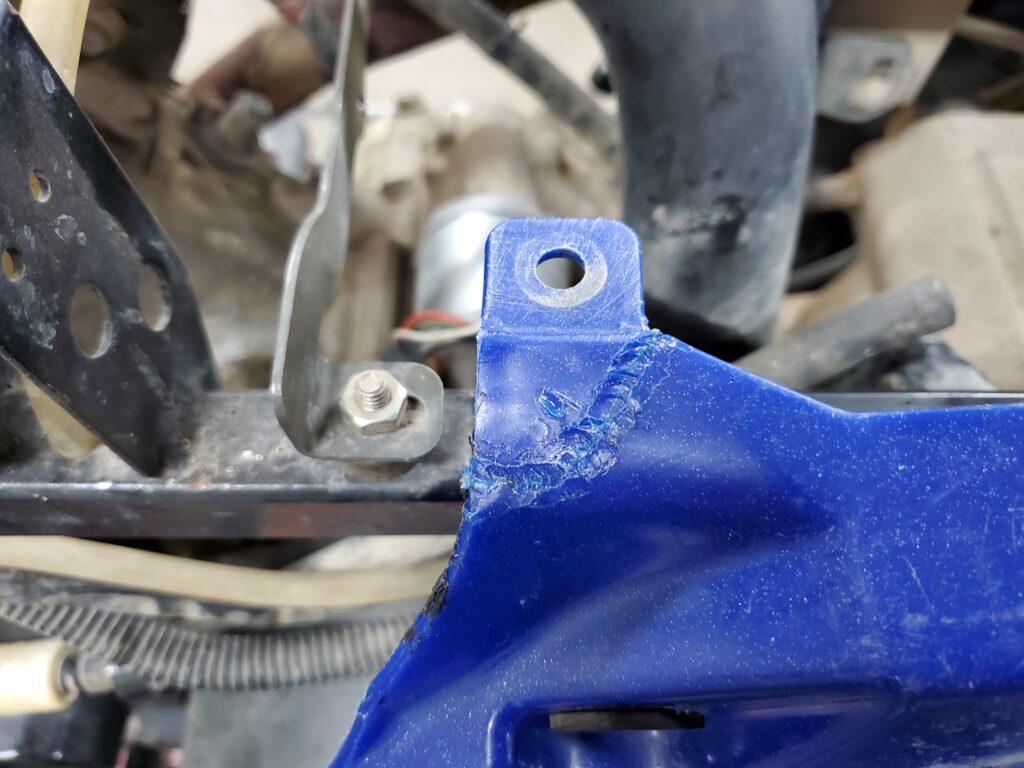
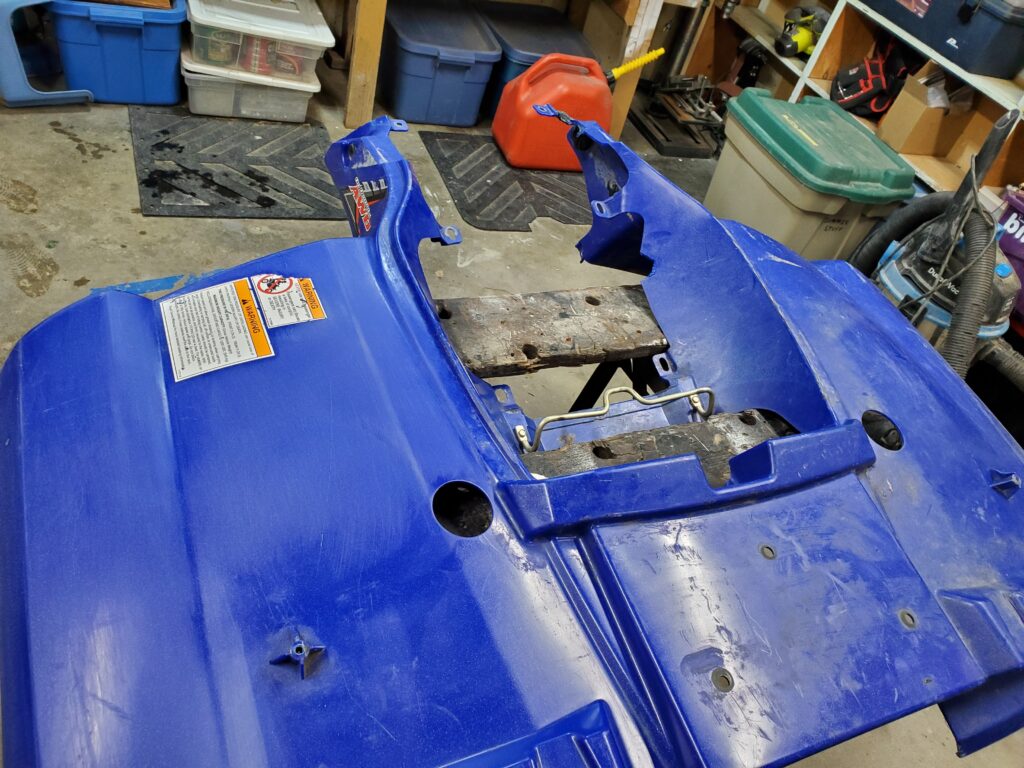
It wasn’t crashed…nothing is bent or damaged to suggest it was. The motor and drive line is fine. I can’t start it because the problems are electrical. But the motor turns over nicely. There’s oil in the motor and coolant in the rad.. can’t see any leaks. The plastics have a few cracks in the typical places. Nothing that I can’t fix. However we are missing the two side covers.
The tires are factory Polaris and not cracked and still holding air! Wow. Even the rims aren’t bent. I’m certain there will be things like bearings and brakes / bushings that will need attention, but not worried. what is needed is repairs to the wiring harness. That will solve the problems that I will explain later. For now I’m giving it a bath and storing it until I clean up the garage and finish in the house.
It’s full on December now. The work in the house is done and Winter is here …maybe not officially, but it’s snowy and cold. I’m making room in the garage for the Polaris. I have one of the missing parts , the CDI. The surepower ECM is on order and who knows when that will show up. Those two things will get the electrical system up and running.
Here it is ! In the shop and on the table. Still waiting for the ECM.. but I’ll remove the rear plastics. Makes it easy to get at things.. And they need cleaning and repairing too.
Wow…no damage to the frame. Everything is straight. I have found one broken wire and the left front brake caliper is hanging from a wire !! It looks to be ok just missing the bolts to hold it on.. Fairly sure that this quad was stored outside..cause it’s dirty. But there’s other things needed… Here’s a list …and this could grow.
New CDI : I’ve got it now
New ECM On Order
New carburetor, Got a new one cause I can’t get the float bowl off and they are cheap..
New rear brake Master, old one looks like it leaked.
New choke cable, Old one broken
Battery, later when everything works
New Fuel pump. On Order, Again cheap so why not.
All three filters needing changed, need to order them
As well.. I’m going to replace all four wheel bearings. Change the oil. While I wait for parts.. I’m going to clean and repair the plastic body parts. So we have some Plastic Welding to do…
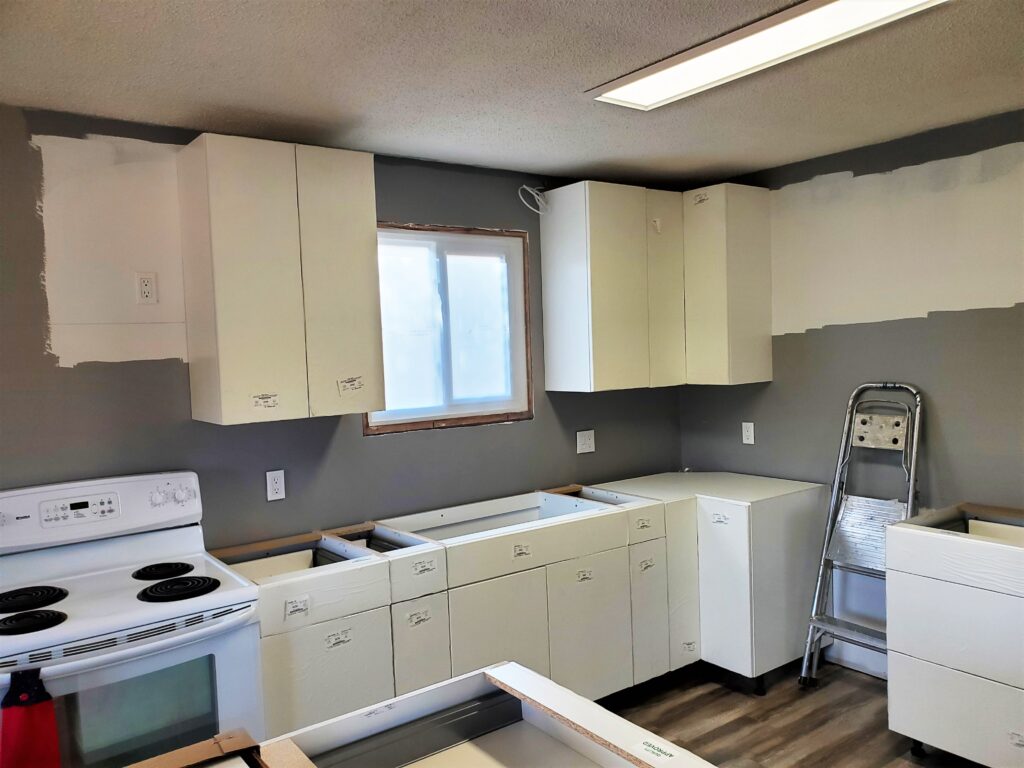
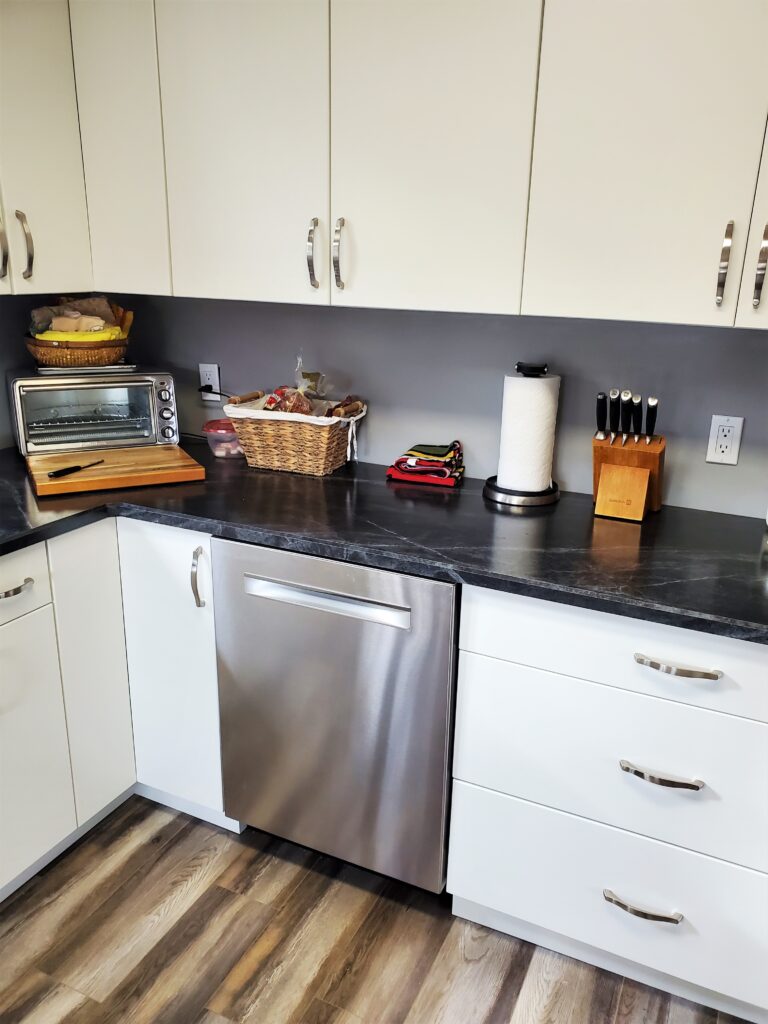
We’ve been waiting for months for the cabinets to be delivered.
And that time has come!
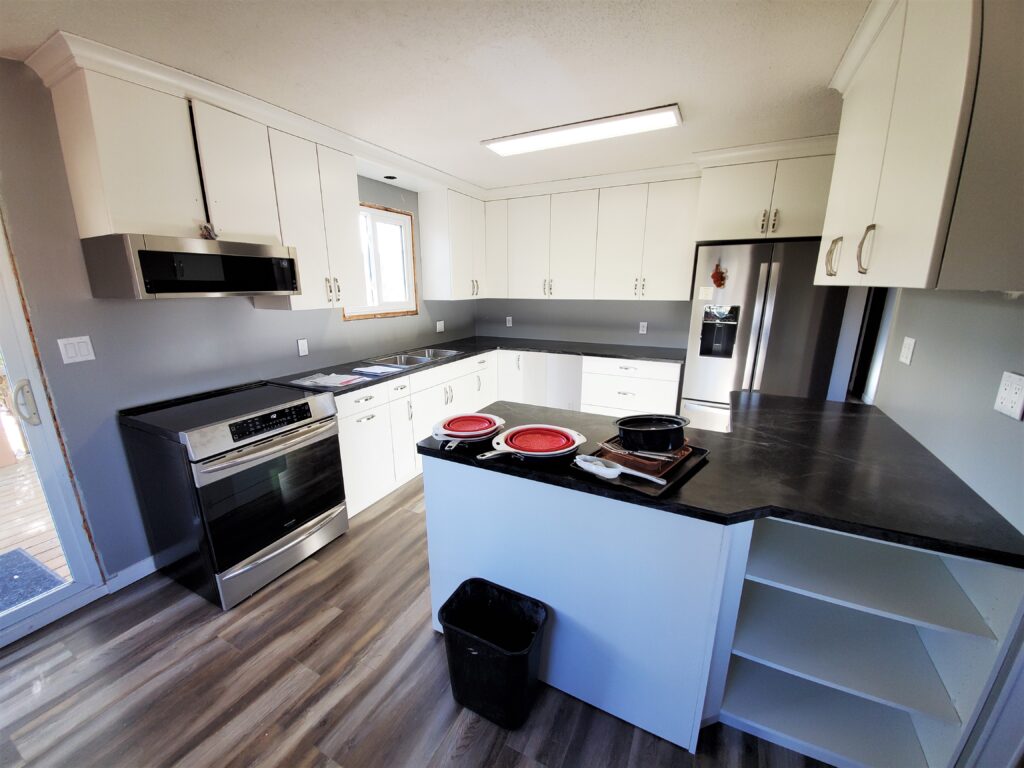
We knew it would be sometime in October. Got the call “get the kitchen ready” Everything else gets put aside … Cause there’s work to be done and it’s a bummer not having a place to cook. So the quicker the better. The photo above was taken a week after moving in.. Therefore this is what we call a “base line”. Almost immediately we moved the island from the middle of the kitchen to the place you see here. This worked better, and made sense to us.. So you will see that the new kitchen design has this configuration. Here’s a video explaining some things..
As the story goes we really never intended to replace the whole kitchen. But when we looked closer there was just too many things wrong. We thought that just getting new counter tops would be great.. Now that grew into spending three times as much and just make it right! Worth it Right!
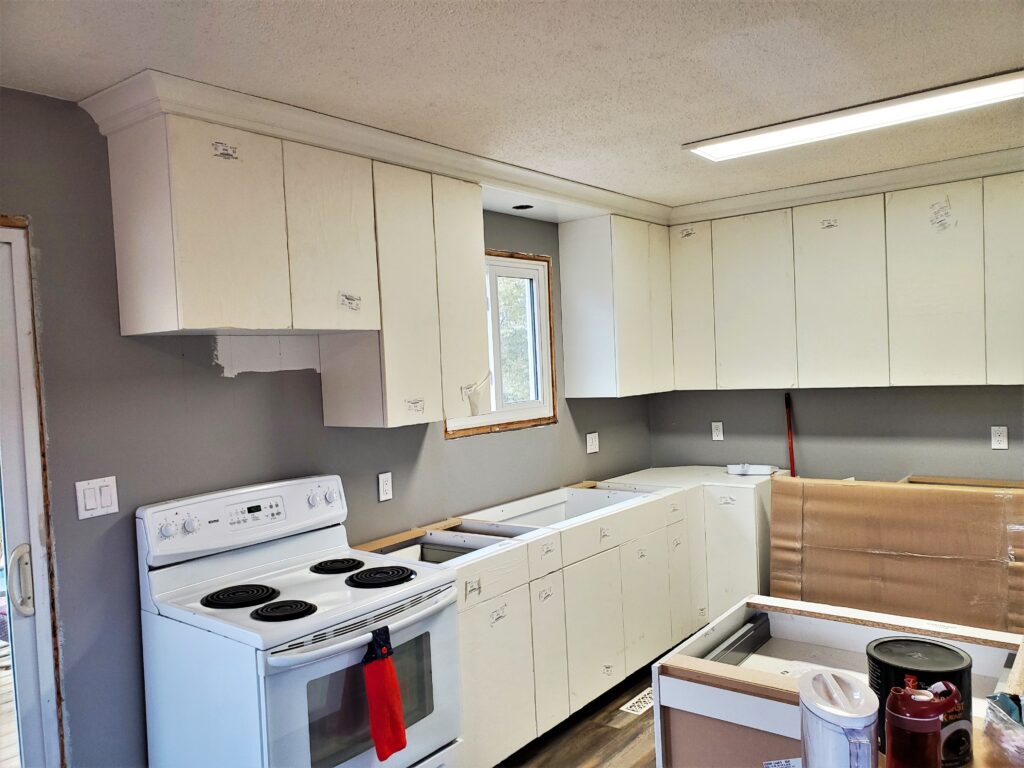
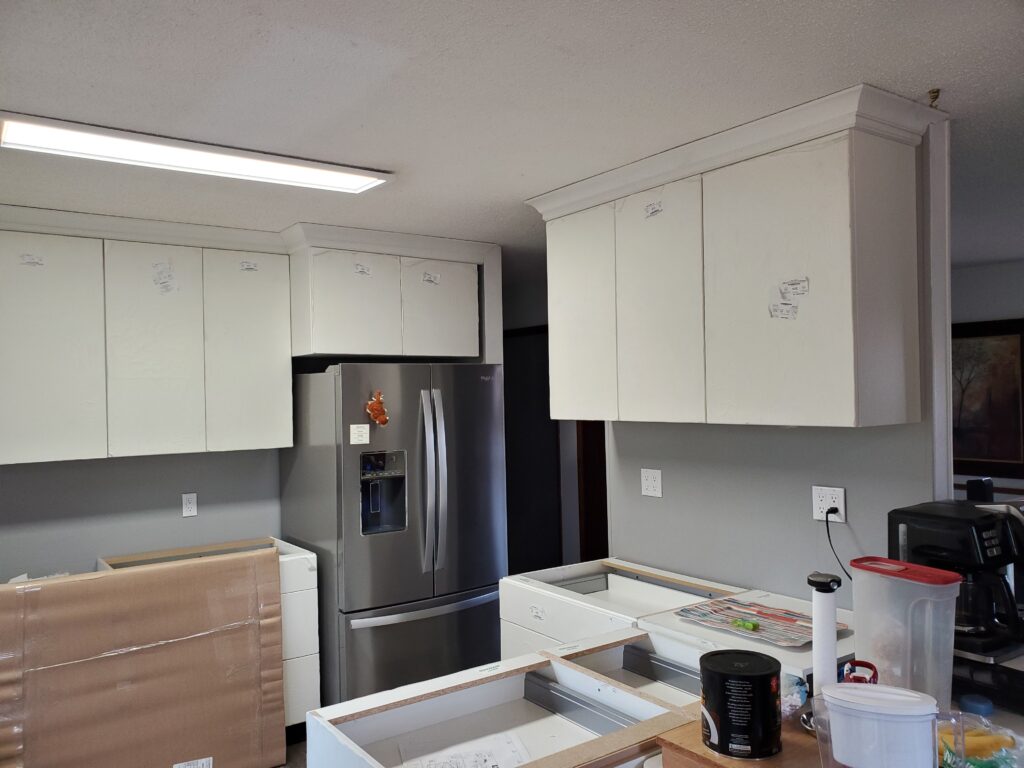
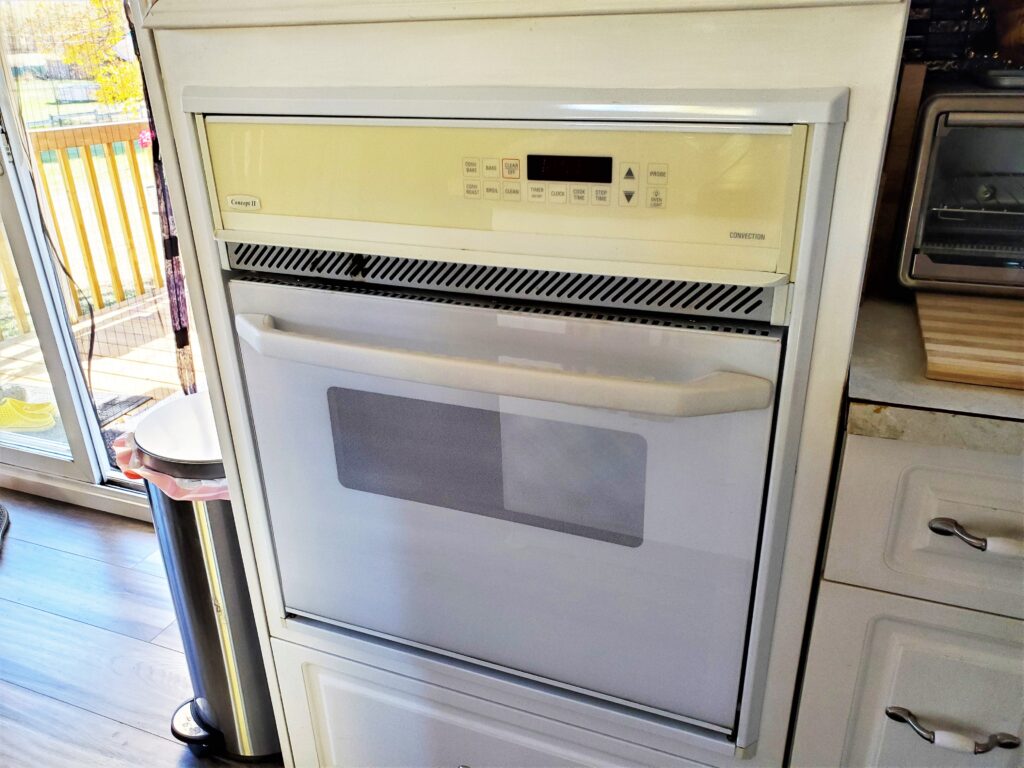
The first cabinet to go was the tall one with the wall oven and the microwave. The microwave was plugged in behind the wall oven, and that was hard wired in behind the cabinet. Nope not surprised. I’m re-purposing this cabinet out in the garage. Only a few cabinets were junked, the rest will find a home either in the garage or the basement.
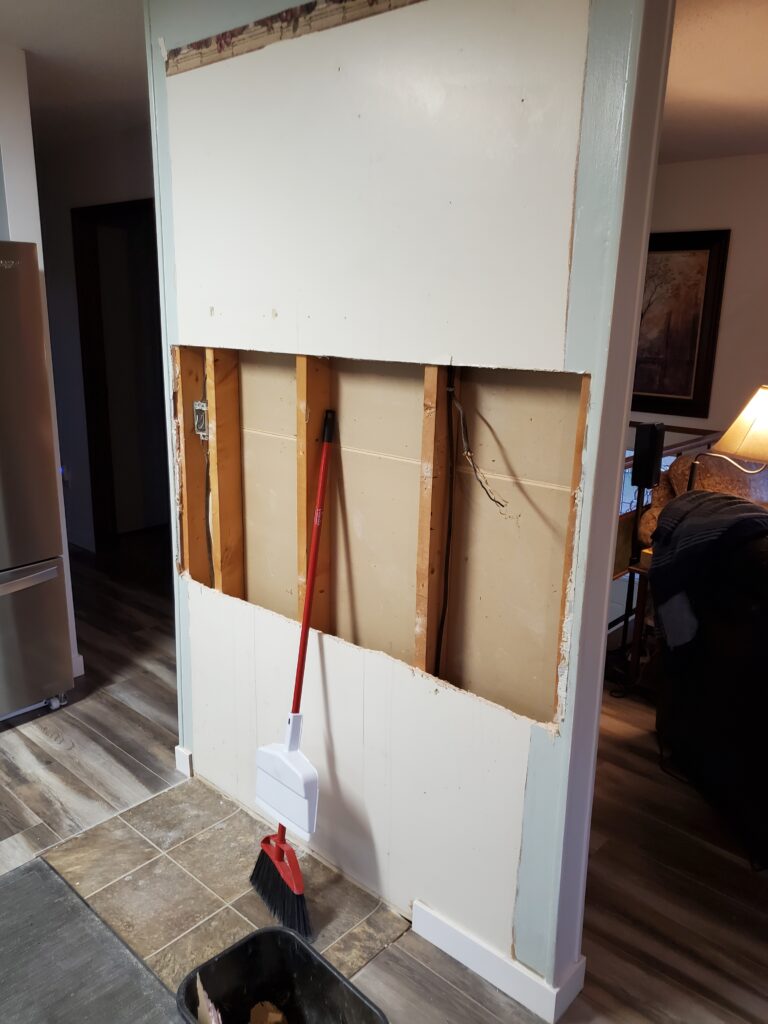
This is the wall that a lot of folks remove for an open floor plan. That’s not going to work for us.. It’s needed for more cabinets and more electrical. I had to remove the band of drywall that had the tiles glued to it. That allows for fixing the wiring, and new surface for new tiles.
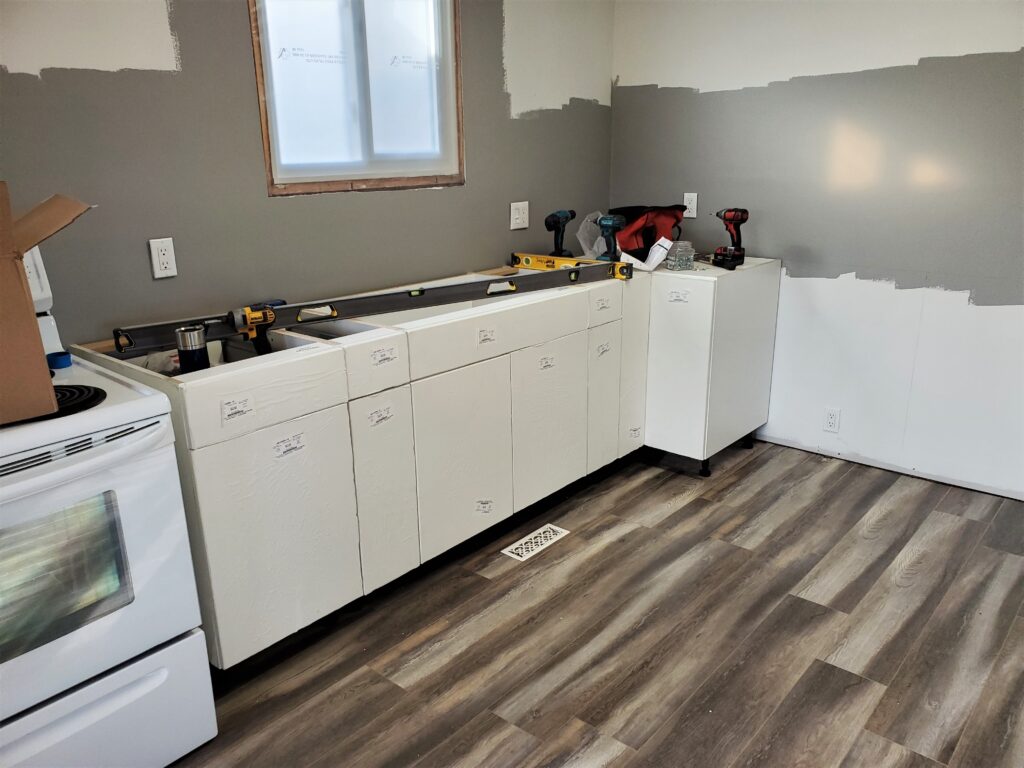
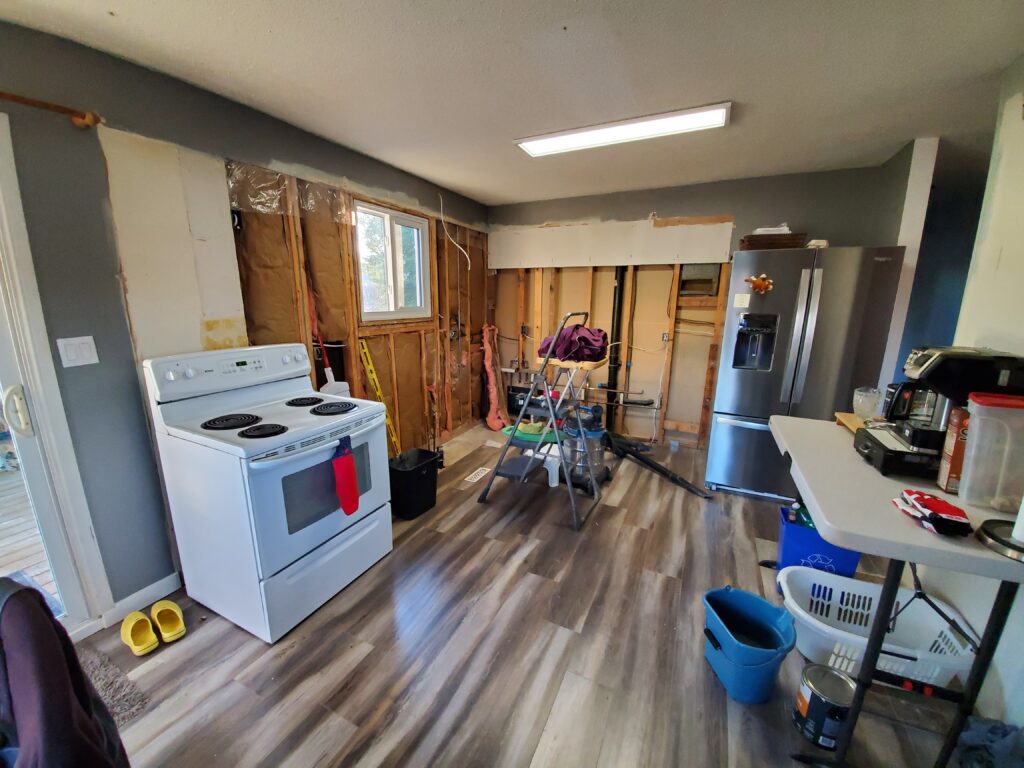
With all the old cabinets gone , I’m working my way around the walls removing only what’s necessary. Those access holes were already there.
There! all the drywall removed and a few surprises. I moved the stove over to it’s new home so we could still cook.
So let’s talk about those surprises shall we !
Nothing wrong with the window wall. But the one between the bathroom and the kitchen… I was really wanting to see more of that. First off there was a stove vent.. I believe it went up to the roof. Cause the roofers found a vent cover that seemed to go no where. So they patched the wood and carried on.
There it is beside the fridge. Whomever did the back splash tile just tiled over it.. Okay that works.. But the wire for power to the hood was just taped up and left in the wall. You can see it by the red broom. NOT good ! There also was a set of three switches that worked the hokey lights over the upper cabinets, and the one over the sink. And the heat lamp under the cabinets ? Not sure what that was for. Both these wires got pulled back into the basement and removed from the utility room light box …. where a zillion other wires were connected.
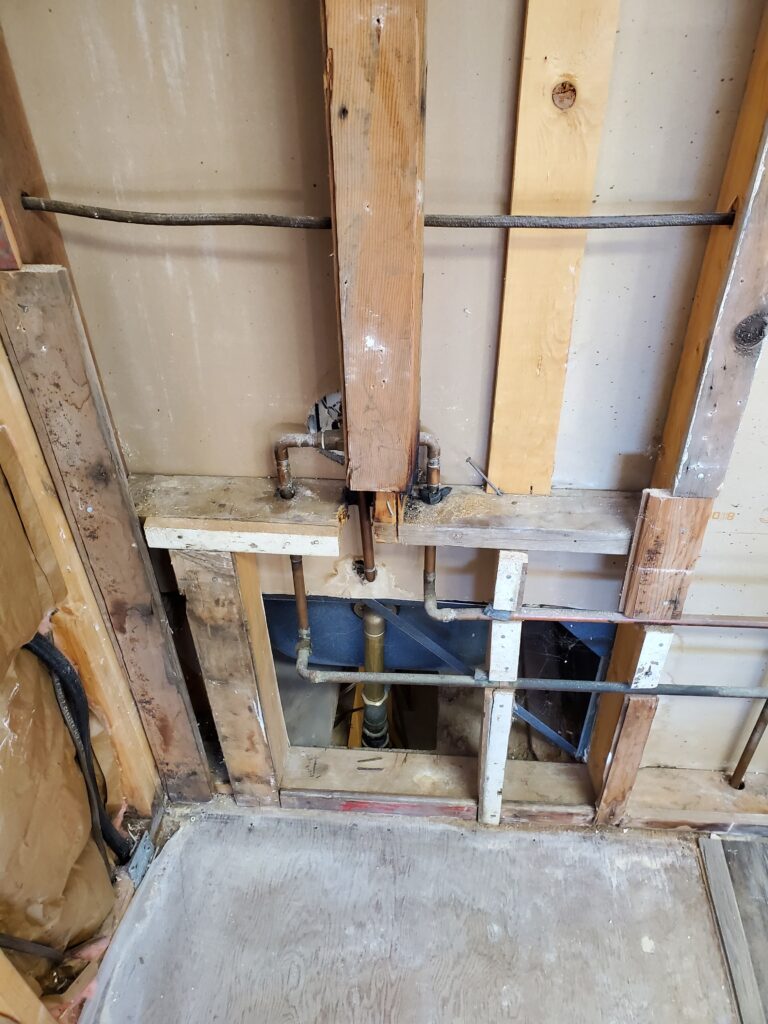
And here’s the bath tubs business end of things. Some pretty fancy framing there.. I was thinking of changing out the tub faucet … but there is nothing wrong with it. The pipes are good too. So leave it alone. The one mystery that needed solved… Was the creaking sound coming from in the wall when hot water was run in the bathroom sink. Watch this video…
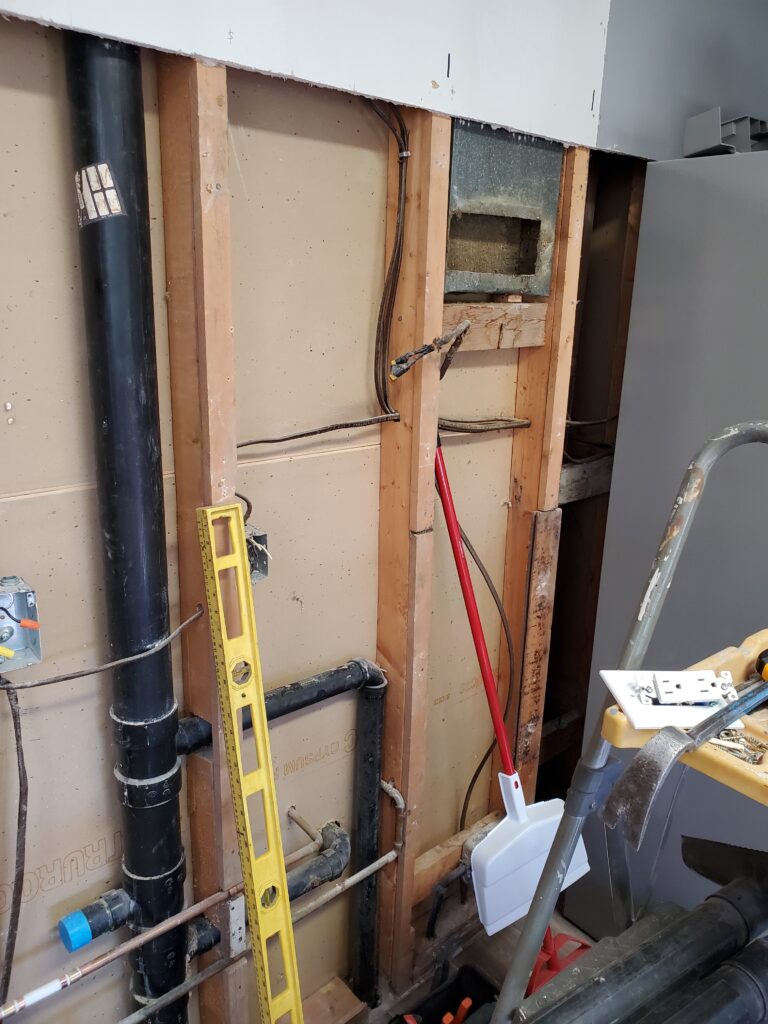
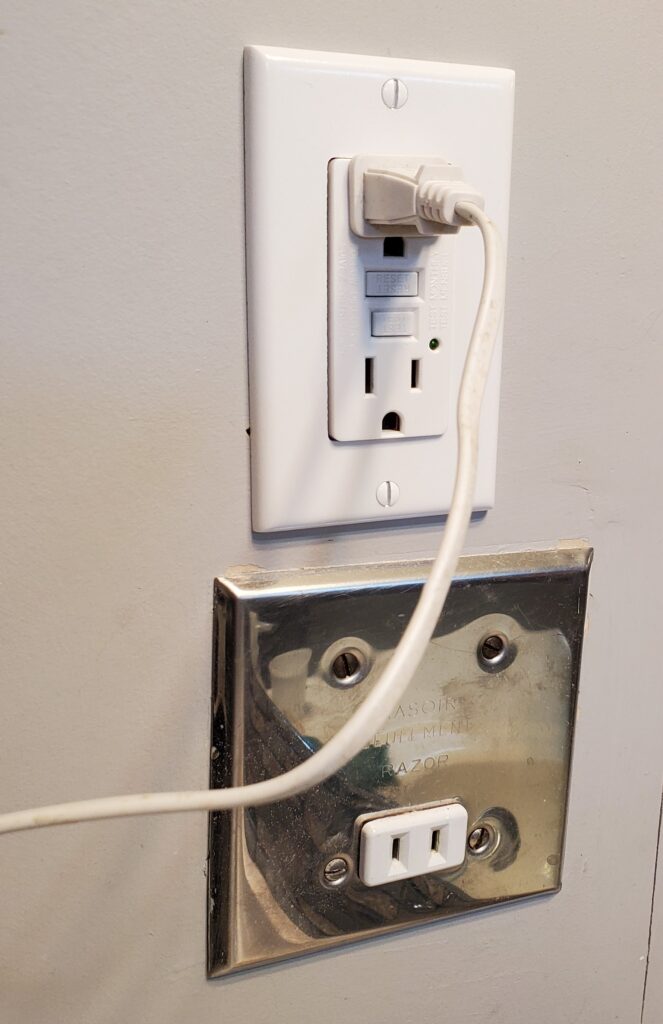
Again not too surprised .. The house has been full of DIY gone wrong. The fridge needed it’s own circuit and we needed a proper ground fault plug in the bathroom..
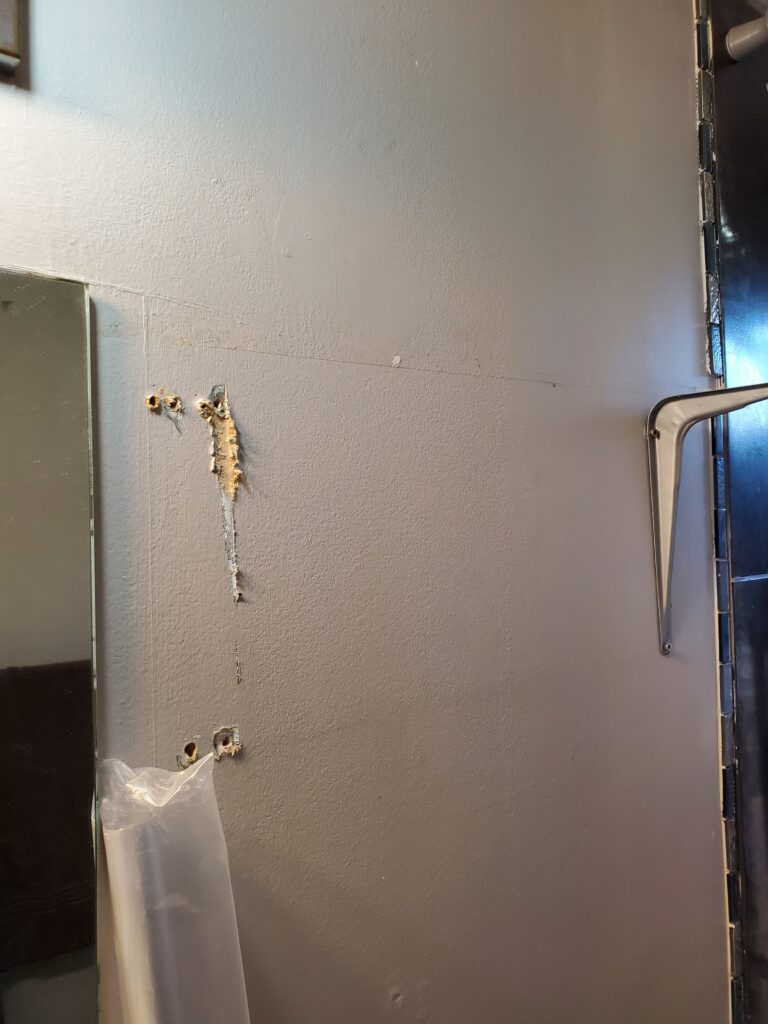
Done! Easy when you have this kind of access. And the mystery pipe noise from in the wall.. Solved ! Someone mounted a shelf bracket into the drain vent, pinning it against the dry wall.
So after several attempts to find something solid they did ! the vent pipe … Why not.. but to their credit there was no way to know unless you have a stud sensor. Stuff happens.
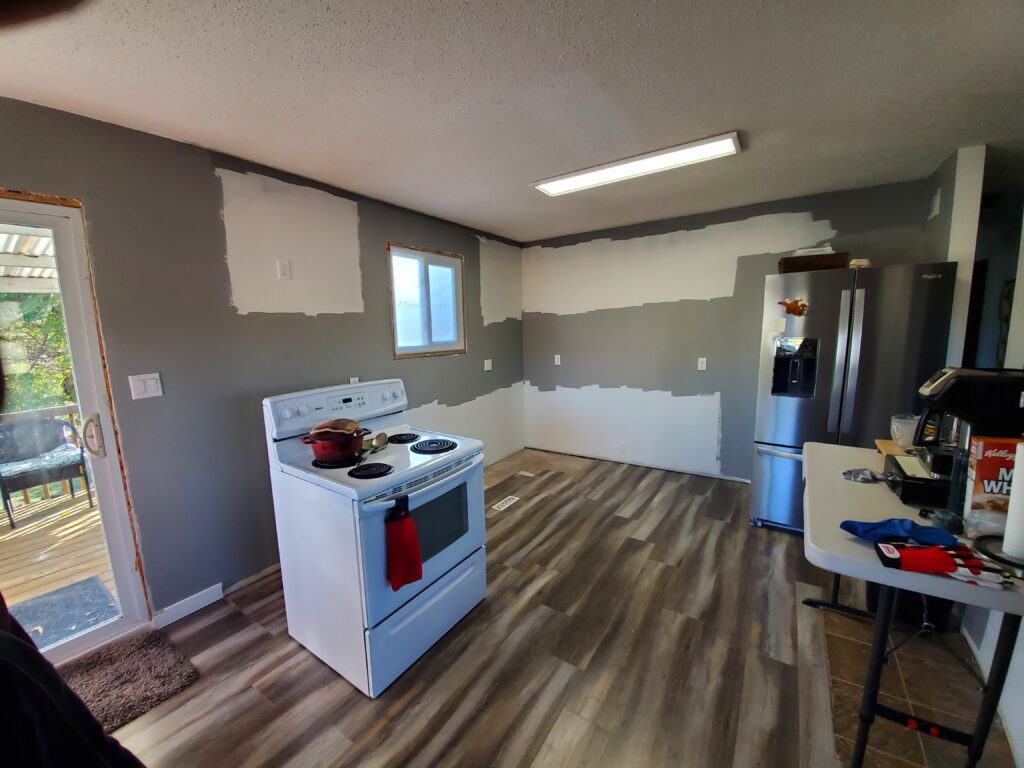
Speaking of things happening… The dry wall is done and the first coat of tape and filler. It feels good to be putting things back together rather than fixing stuff. One more coat of filler , then primer and paint..And DONE !
There… ready for the cabinets. They are coming tomorrow. I only painted the grey where needed.. So lets start a page 2.
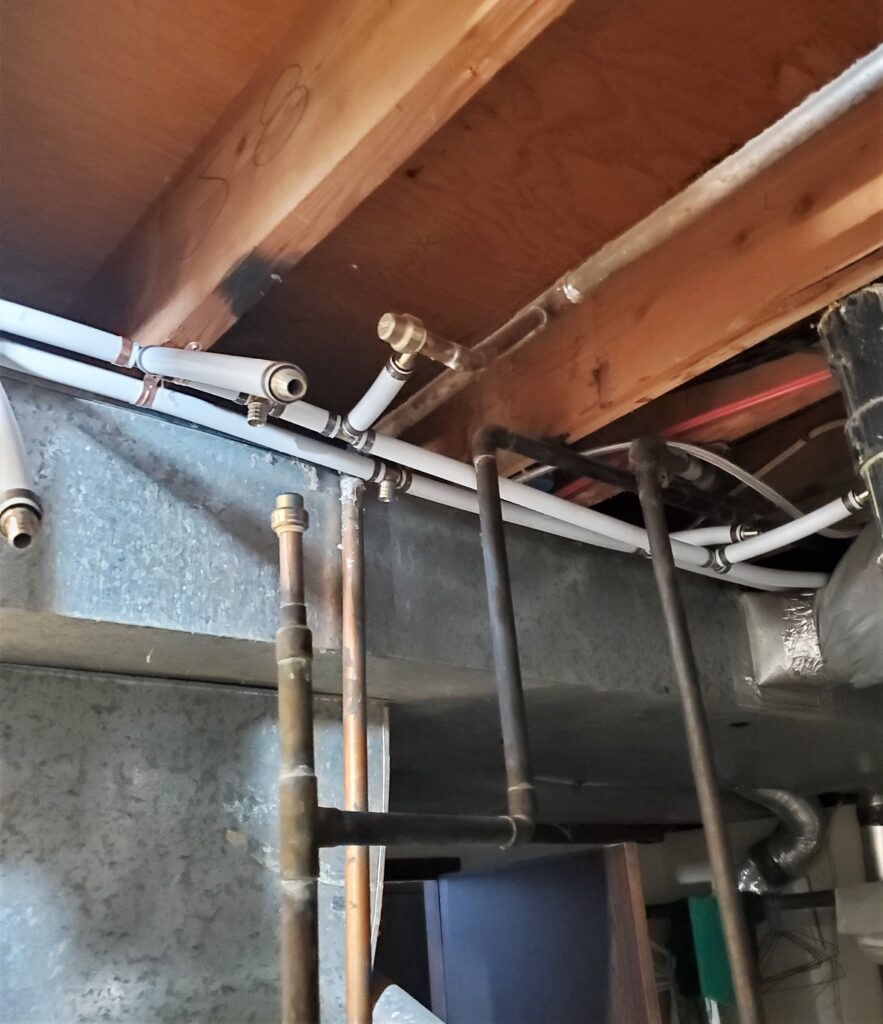
I already did the bathroom drains, and the plan from the start would be to replace the pipe nightmare with new PEX . And I can do the whole house… because the kitchen is getting it’s overhaul in October. That will involve taking down the drywall behind the sink and the wall backing the upstairs bathroom. All the back splash needs to go. Some wiring needs work in those walls too. So much of the water piping is a bloody mess. No saving it.. And there’s some bad things ..like the main water feed going along the outside concrete wall. YA it could freeze if it gets cold enough. Guess that’s why there is pipe wrap on it.
In this photo you can see that pipe running under the window ? It does not need to. And what’s up with that drain pipe? Fairly sure it was hooked up to the kitchen sink drain (red arrow). I’m thinking that will go back there instead of cutting across the room. In the future this laundry room will also get a much needed makeover.
These two pipes (one hot one cold) Go up into the wall between the kitchen and bath. I’ll temporally hook up to them …till the kitchen work happens.
So the plan is to build the new plumbing system along side the old. Then hook it all up at one time so there is less down time. And what are those mystery pipes.. just rattling around in the wall.. I think there was a bar sink in the rec room other side of this wall. AND did you know …you can’t buy the old style laundry sink faucets any more.. had to make my own. Down the road when this room gets it’s make over All this will be inside the wall and proper faucet.
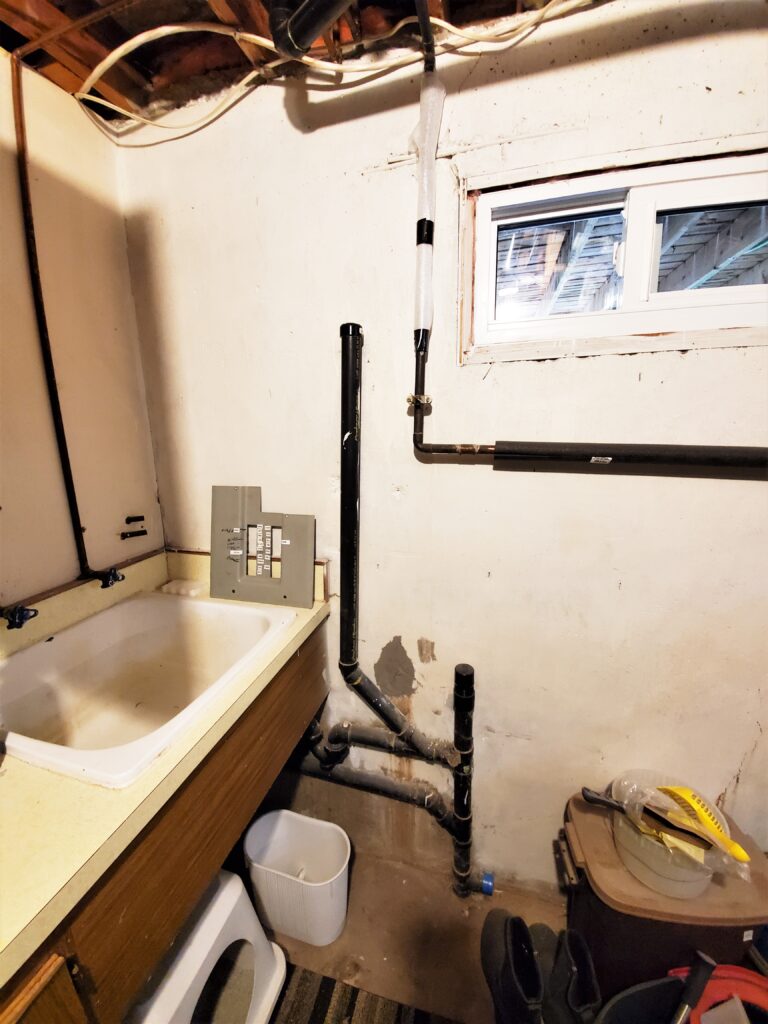
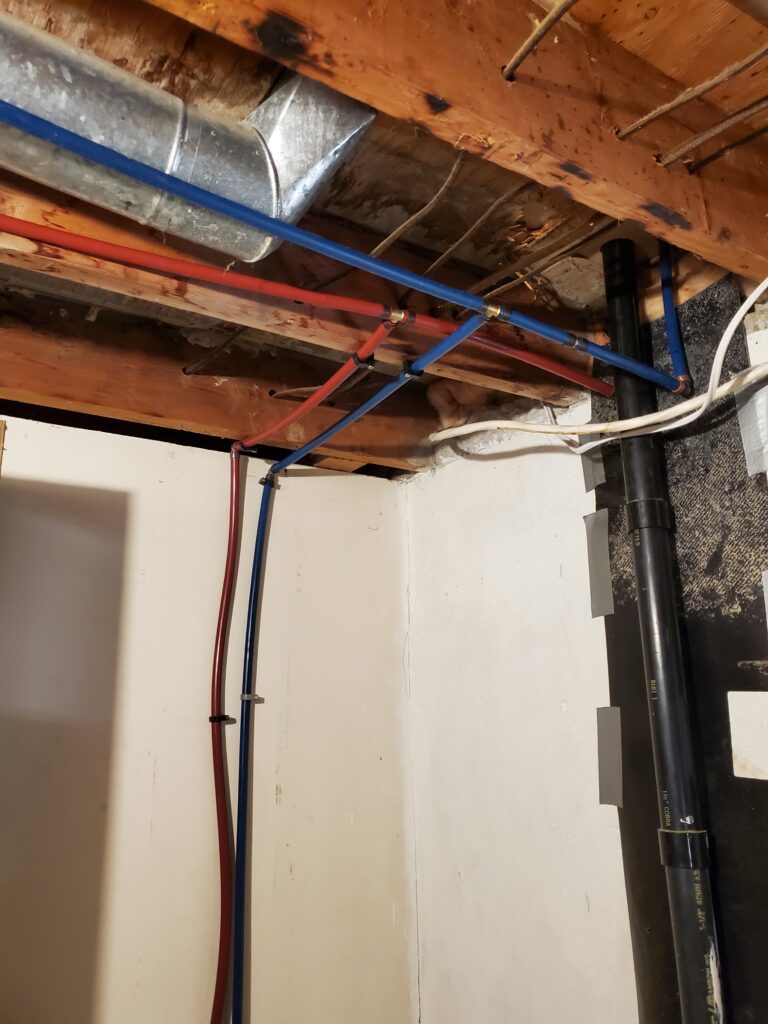
Here’s the new plumbing all done in the basement bathroom. No mistaking hot from cold.. And yes the cold is on the wrong side.. but these pipes cross the utility room parallel to each other and I did not want to cross them over.. On the other side they are correct. You will see later.
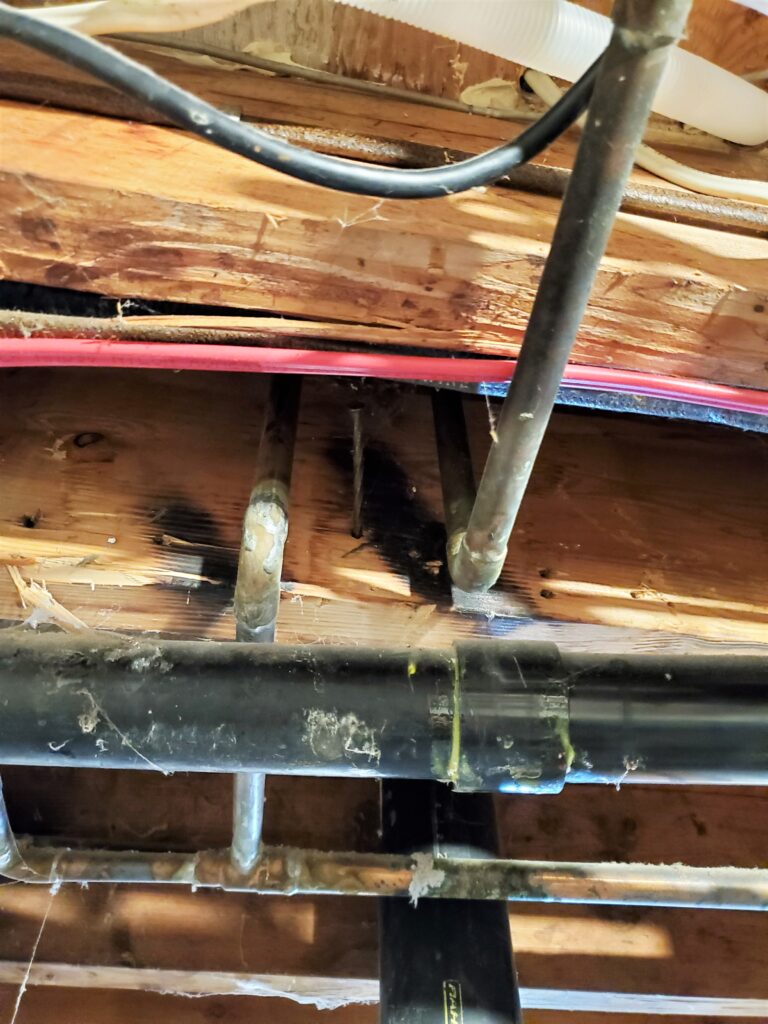
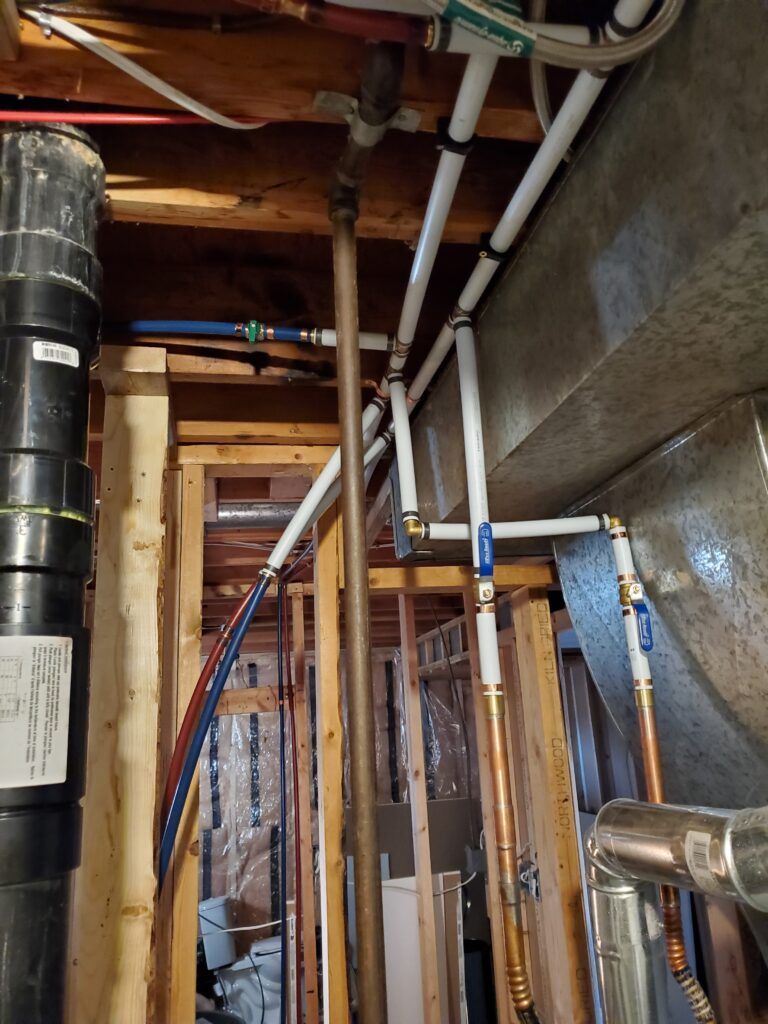
Here they are 3/4 ” PEX and are (loosely ) in place.. I’ll firm them up after the copper is gone and out of the way. This is were they cross over the hot water tank on their way to the other side of the utility room. Where they go back to 1/2″ PEX and feed the laundry , kitchen and utility sink. And that’s where things were left… There’s a part of me that wants the plumber to do the switch over.. I had to do some outside stuff ..getting ready for winter… and the Kitchen has to be started on soon.. See that post HERE.
Well After dealing with the kitchen… I did get the plumbers to finish up the conversion to PEX. All done .
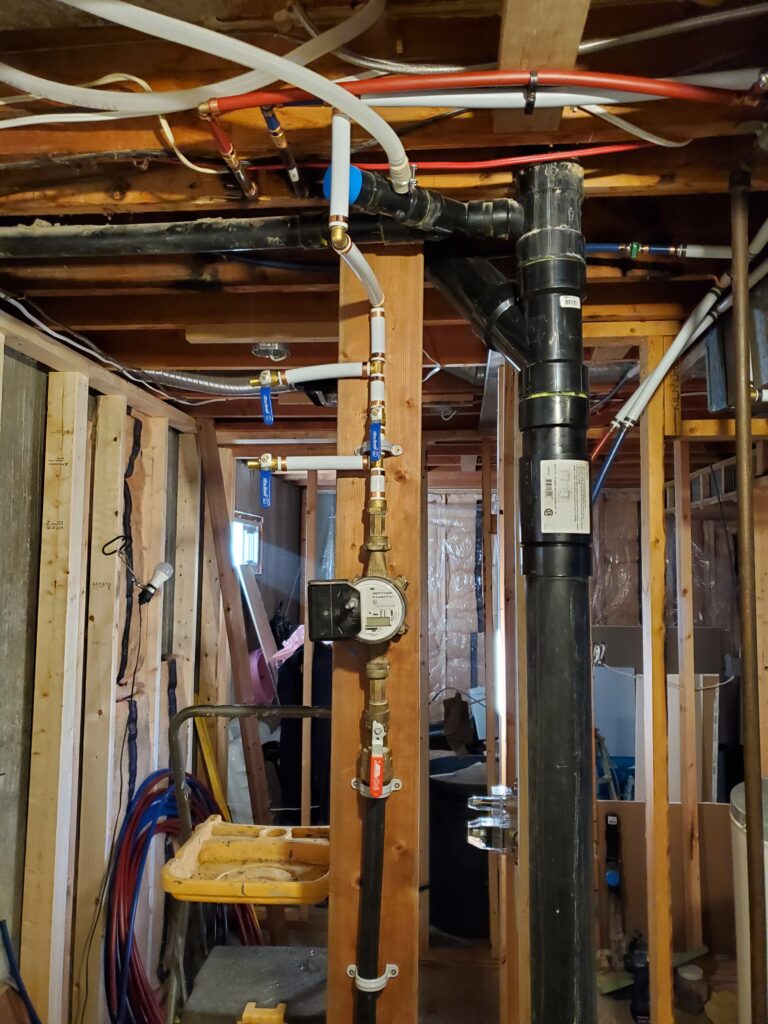
Here the part over the hot water tank. Tons of copper taken away. I all so got them to redo the upstairs toilet drain..
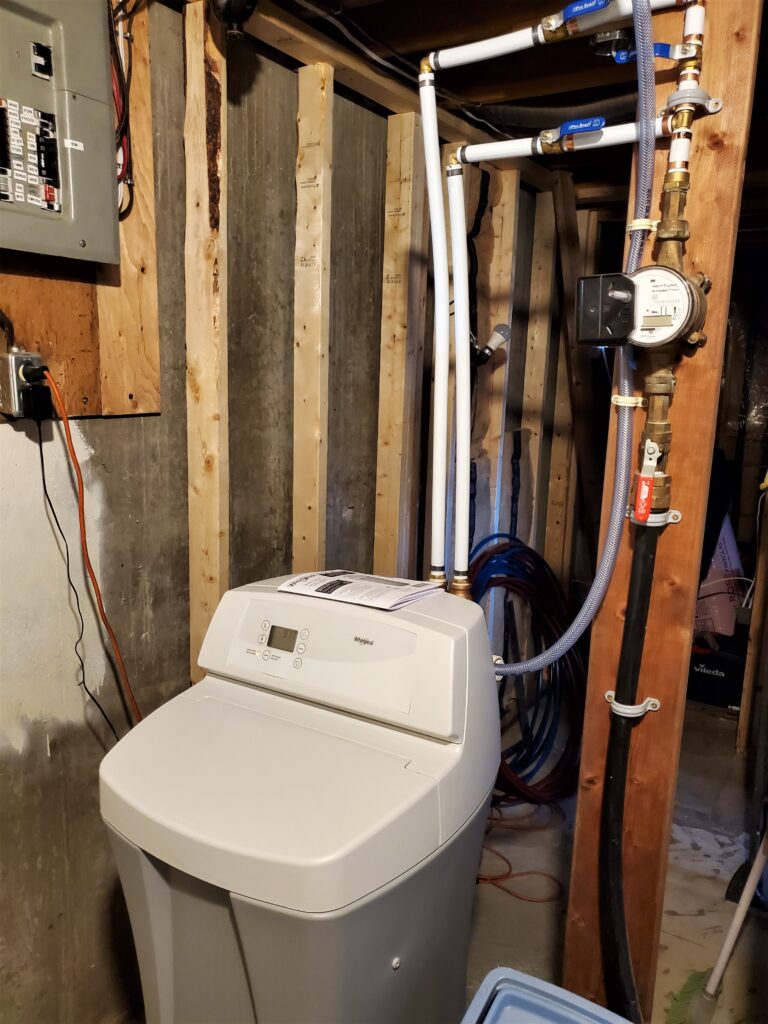
It’s now tucked up and out of the way.. The city water feed / meter is up and ready for the water softener to be hooked up. Now I can resume work on the bathroom… as soon as the back splash in the kitchen is done..
The water conditioner is in and working great. What a difference! This should help save all our new appliances. No more water lines near the outside wall.
It’s great to get back to work on the bathroom. Got all the framing done and all the drywall that can be done before the shower stall is in stalled. Things should move along nicely.
I’m going to start a new page for the final finishing of the bathroom.