Author Archives: robsworkshop

White Yamaha Scooter (Fix-up) Now Blue

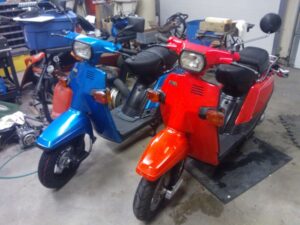
A Second Scooter for the shop.:
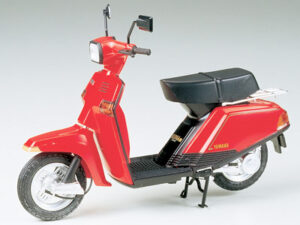
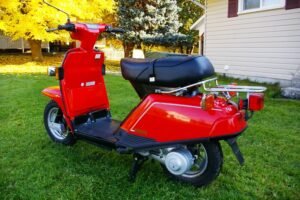
1982 Yamaha CV80
80 cc
5440 KMs

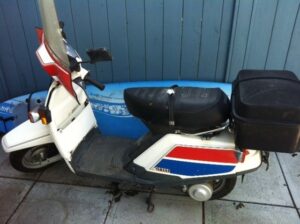
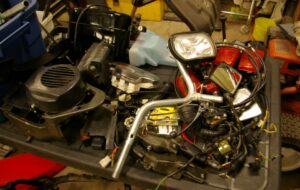
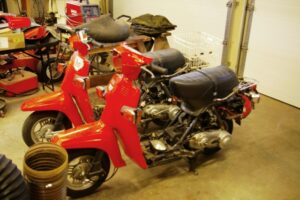
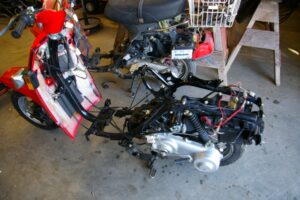
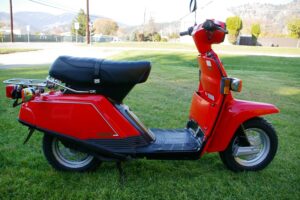
I’m not going to count the parts machine as a Scooter.. it’s just a bunch of parts…. which will be very handy for getting this new one on the road again. So this I will call the second scooter, and it came to me NOT running.. BUT this is a complete Scooter, with registration..and with a few extra goodies . Another front fairing with a windscreen, and a nice lockable trunk box for the back.  And upon a closer look .. almost perfect body parts..  I say “almost” cause it’s missing just a few trim pieces, and I found two small cracks.

And why was it not running ?

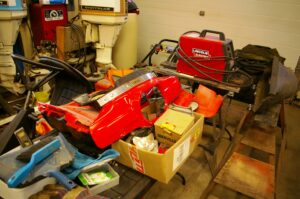
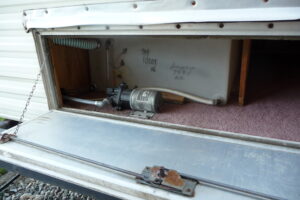
This is what I found…  A 12 volt battery was installed in the trunk ? not the proper place.. not the proper battery. The Scoot has a 6 volt system and fortunately the 12 volt battery did no harm except to have possibly  burnt out the start light.. So with the proper battery it turned over nicely ( but won’t start) and there is lots of spark.  Electrical stuff ruled out..

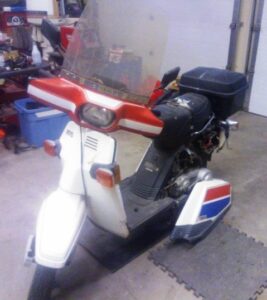
So I moved my attention to the fuel stuff.. the carburetor.  I suspected this first, but it’s easy to check the spark and rule that out.  After I removed all three covers and poked around a bit to see that the hoses are all hooked up proper ( I have studied the hose routing carefully) Yup it’s all there.. dirty but it’s all there.  So I pulled the fuel line off to see if the petcock is working.. yup there is lots of fuel to the carb. So a dirty / plugged carb is most likely the problem.  But that’s no problem for me.. ..The other day I rebuilt / cleaned the carb from the parts scooter.. and so I simply swapped the carbs.  And that did it ! fired right up.. ran great.  So I put more air in the tires and off down the road I went.. It’s raining so just a short trip.. plenty of power too.   WE HAVE A WINNER !

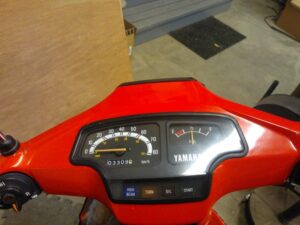
When I got back to the shop I tried all the lights and the horn.. they work fine.. It looks like the speedo and fuel gauge are working good too..

So I need a plan..

And here’s what I would like to do..  New tires, New drive belt, New battery,  New flasher relay, New paint…new Color ! and of coarse all this means a tear down and cleaning.  The complete “ROB” treatment.. I love this stuff.. now that I know it runs I want to get at it.. I have lots of spare parts to choose the best ones from.. I have a near perfect seat.. new looking brake shoes, good cables. So away we go…..

The Rebuild…

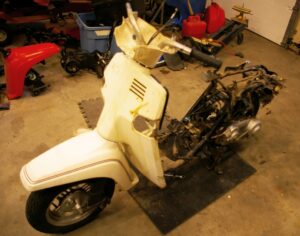
What can I say.. I’m a cleaning nut.. So I’m stripping down the scooter.. and tomorrow I’ll take the greasy parts to the solvent tank.  The body parts will get a bath with “Superclean” degreaser.  Same way I cleaned the red CV80.

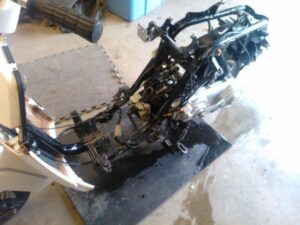
What’s left on the scoot will get a Degreaser bath as a whole.. before I remove the motor & drive.  I’ve removed the Gas & oil tanks , carb (it’s already clean) , muffler and cooling shrouds from the motor, air box and the electrical stuff from the rear… This evening I cleaned the dash gauges and replaced the burnt out bulb, tested the others. I cleaned the front flashers , and while I was in a cleaning mode I cleaned the carb that wasn’t working.. Found the float to be way out of adjustment. So it should still be good and used again.

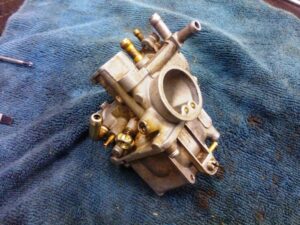
Stuff I’ve found so far:  The front brake cable is seized.. I have a good one.  The carb was in need of a bath & adjustment. Done.

For reasons unknown I could not log into my Blog and keep current… all is good now. so I’ll catch up … cause I got a lot done.

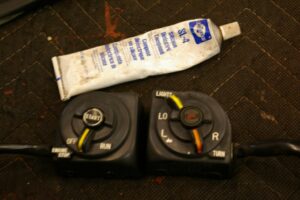
As I said I’ve been busy taking every part and cleaning them.. in the case of these switches ..improving them.. cleaning the contacts and applying my electrical grease.

Here’s a photo of the pile of parts & pieces that I’ve cleaned and made ready for re-assembly.  I ‘ve done painting all the pieces that are black .. I use a satin black paint that is for bumper’s & trim.. great product.

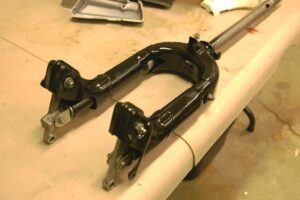
This is the fork after it’s rebuild.  Carefully greased and repainted.

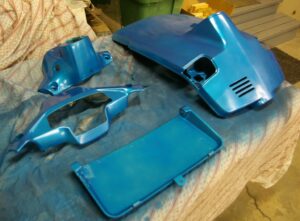
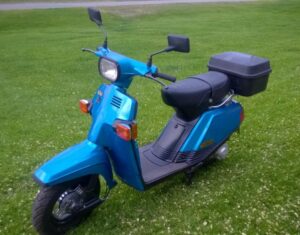
Well “Bahama” blue to be more precise.. I told you I would change the color !  No more white.  This color looks great with the satin black.

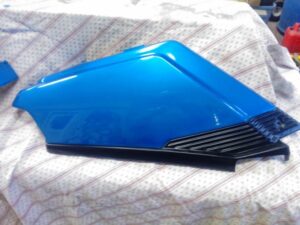
Shinny… Yes.. I love what the clear coat does for a paint job..  As soon as the parts are completely cured.. it’s time for putting things back together.  But not until we do a little extra with some pin striping..

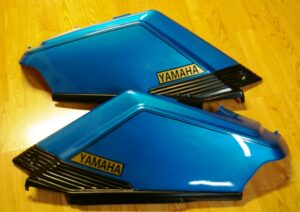
Check out the side panels ..and the decals I made.. plus black pin stripes… Looks “factory”

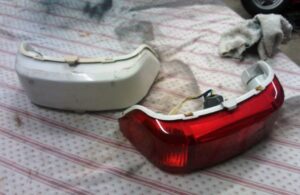
It arrived in the mail !

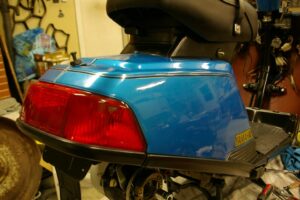
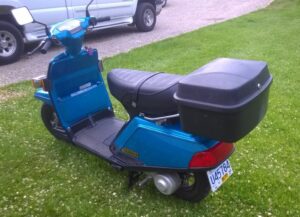
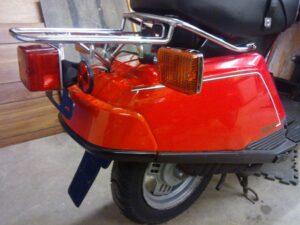
I’ve got the highly coveted European “Hercules”   tail light. Read more about this in the Red CV80’s Blog.  They never came with North American CV 80’s. now I can shave those ugly lights off of the rear rack. You can see in the photo the white piece that would be used instead.  Total Upgrade !

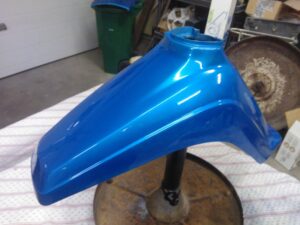
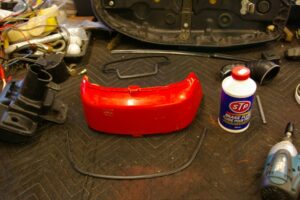
I had a problem with the paint on the fender.. my bad .. I tried to add satin black to the bottom.. and in the process ruined that paint.. So I had to sand off the bad and repaint the fender.. here it is all fixed up with the clear on.. nice !  Next step pin stripes..  Really close to putting things back together..

I’ve got the front all together now.. minus the wheel..  need new tires first.  Note: the front brake cable is no longer hanging on the outside of the fairing. Check the photo at the top of the post !

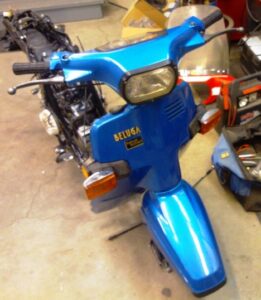
The “BELUGA” is now gold as per theme.. used to be chrome.  I sure hate those “after thought” turn lights.. they are a sloppy fit. To get the flush ones like they had in Japan would be awesome..  but they are hard to come by.   Robeye Restore.. you bet. I want to sticker my best work.

Sunday Nov. 24, 2013

Today I got quite a bit done.. It really isn’t hard to put things back together when it was only a week or so that you took it apart.  And I’ve done this before..

As you can see most of it is done..  I just put the sides on for the photo..  I’ve got to solve the problem of missing edge pieces for the front fairing.. Then I can put the front all together..  I tested the electrical all out and seams fine.

Need the rack on to make it more complete.

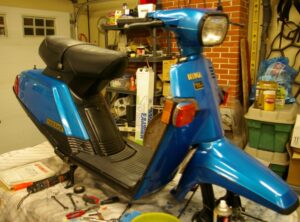
This scooter in looking “spiffy” The blue and the satin black look so nice together.  The turn lights work way better with the new electronic relay.  May still spring for those LED lights !  I got some black door edge trim  from the auto parts store and it works great to replace the missing trim on the front.

The blue scoot is all together now .. runs good.. so I ran the fuel out of the carb.. and moved it to the basement for safe storage till spring.  Only one thing that seamed not working good was the fuel gauge..(stuck on full)  so I’ll check that out in the spring. Most likely a simple fix… I plan on using the blue scooter next year..

Any updates to this posting will be on my new BLOG… HERE

1982 Yamaha CV80

New Project for the Shop

This is a Yamaha CV80.. also known as a Yamaha Beluga.. You can read more about them : http://www.motorscooterguide.net/Yamaha/Riva80Beluga/Riva80Beluga.html

And You will find out why at first I turned down the offer to buy two of them.  They don’t rate well compared to other Scoots.  But this time the guy who had them just wanted them gone.. and so I paid him for the tires, battery & other parts and took them home.  They are twins .. One has registration and the other is an ICBC write- off.  Most of the body plastic is either gone or broken, but it runs.  In other words a good parts machine.

The one closest in the photo is the good one.. hard to tell cause they are both in pieces.  The wiring harness in the good one was bad so he was in the process of changing it.. But before I tackle that …it’s bath time !  So I removed the rack, seat, gas tank , oil tank and the air box. That way I can clean better.

So here it is all stripped down and clean.  I wanted to get at some of the workings.. especially the vacuum lines that work the cold start.  The more I put back together the harder it is to access stuff..

One thing that I noticed ..is that the rear body piece of the scooter could have been a cool looking tail light. They used the same mold but molded with white plastic. In Europe it’s a tail light.  We have rules for how wide apart the turn lights have to be. So Yamaha used the conventional North American set up. Which does look nostalgic.. good for a 1982 scoot.

Everything is all back together..for now.. I’m still waiting for a battery so I can start it up.  I only have to glue one piece of the body , the rest is in great shape. In fact it’s still shiny as you can see. I polished up the rear rack and painted the licence holder.. looks like new..

Yeah ! Got the battery and put some gas in the tank ..and oil in the oil tank.. and she fired right up .. runs great. No adjustments needed.. so I took off down the street.. Plenty of get up and go for my liking.. Weeeeee   I forgot how fun they are.. So I put all the rest of the body panels on.. 100% like new.. EXCEPT the turn signals would not flash.. Hmm I’ll try them with the motor running.  And I’ll take some good photos too.

Here are those good photos:


Hey I did a good job of erasing 31 years…  It helps when something is well made.. The only rust I found was under the rubber floor mat.. and that came right off.  Winter is fast approaching so I think I’ll cover and store this Scoot till next spring.  But I will be tinkering with the parts machine.

The Parts Scooter:

Well aside from some missing parts.. there is some “hard to repair” damage to the parts Scoot… SOOO it’s never going on the road again. I’m taking it all apart. That will allow me to check which bits are good and which are worn out. I also got to have a good look at the carb.  It’s missing the throttle valve, but the rest is in good shape. I’m understanding how things work now.. I’ve read a E-book by a CV 80 enthusiast on rebuilding one… full of very good info and tips on how to keep it alive. Plus He delved into the history of the CV80. I’m also learning how to take the whole scoot apart and put things back together.  I have a better wiring diagram that came from the E-book author.  That and my service manual are giving me a good understanding of the electrical system. Now with all this vast knowledge I’m thinking about buying yet another CV80 and doing a complete rebuild this winter.. There is one for sale in Kamloops that I’m looking at. (photo below)

This one is white. Started a new post for working on this one HERE.   Owner says he used it lots.. has 5500 kms on it and now has starting issues.  I now know where to look to fix those. Also you may notice the front fairing and windscreen.  I have one as well.. came in the box of parts.

Also I’ve ordered a new flasher, and bought a European tail light.  I’m looking into LED lights as well.

The parts scoot is proving to be very useful.. both as a teaching tool and as a source  for good parts for the new scoot on the block.. I’ll get back to the Red scooter in the spring.. For now I moved it to the storage in the basement.

Work on the white scooter is coming along so nicely ..and I’m very fond of the new color .. I decided that I will keep the white (now blue) one and sell this one..

SOLD the red scooter… here’s a photo of the two before the red one went off to it’s new home.

Kubota BX1850

Finally the tractor of my dreams.. !  And there was a used one for sale that I could afford.  These are the best of the best sub-compact tractors. Diesel, 4×4 , fully automatic, power steering… power everything.  If there was something negative you could say it would be the limits of being small.. it will NOT pull your house off it’s foundation… but that’s the price of fitting through a 4 foot gate.  Most of these come with the front end loader and a baby back hoe.. but the one I bought has the loader and a 54 inch mower deck , a vacuum bagger system and a 5 foot snow blade.. As an added bonus I got an extra set of tires & wheels Plus the three point hitch pieces so I could hook up other tractor stuff.

Here’s a photo taken half way home from Vernon.. The spare rear tires are liquid filled and are heavy !  so I used the loader.. and I held down the snow blade with that weight too.  HA.  I can see that loader being handy for moving stuff.. In fact that snow blade was heavy.. so I put a chain on it and used the loader to move it to the Franknport.

When I got home the grass needed to be cut.. so without hesitation I flew at it.. I filled those three bags up four times.. that’s a big pile of grass !  The blower has big pipes and is driven from the rear PTO..so it “sucks” and won’t plug up. It’s much quieter than I thought it would be.. so was the deck.. I just needed to adjust the deck a bit for level.. and sharpen the blades..to get the cut perfect..and I’m thinking that I will remove the bagger for now and use it more in the spring and fall for yard clean-up. Also the loader comes off in minuets. Then I’ve got the best mower ever !

This is also going to be one handy machine this winter.. I’ll change to the calcium filled lug rear tires and the 5 foot snow blade will make short work of any snow that may fall here.

Look at how new the blade is.. I doubt it was ever used.. I’ll change that.. A few small bit & pieces are missing but nothing that can’t be found, just pins & stuff.

There is great visibility from the seat, and a ton of room for your feet too..  Hands down the most comfortable tractor I’ve ever tried.

I’ve now removed the blower, and I took the deck off.. (easy) and clean it good and sharpened the blades.  Also tweaked the level adjustments and now I have a perfect cut.. Wow is it ever nice to mow the lawn.  I’m getting the 3 point hitch on too and making a 2 inch receiver for trailer hitches..

The front end loader comes on and off in seconds.. so no need to pack it around.

Cool how the loader has it’s own stand and you can just drive into it and hook up the 4 hoses and two pins and your away. I’m getting faster at it.  Once the mount for the snow blade is on the front of the BX you can just drive into the blade and it locks in.. so cool ! I’m looking forward to some snow ! Just Kidding !

I got it made.. and it’s very useful indeed.  Now I can move the trailers around (by my self) without the truck. I can see the ball to line up.. and then the tractor lifts it up so no cranking.. I moved the travel trailer too ! But I shouldn’t really do that heavy a trailer..  It exceeds the trailer limit of 2000 lbs.

Pretty cool EH.. Plus since it’s a 2″ receiver I can plug other stuff in.

Several Weeks of fun with the BX 1850:

Well there is some work too.. Love the things this little tractor can do.. I take the loader off when it’s time to cut the grass.. And back on for work stuff like moving the garden shed.  Picked up one side and put some rollers under it and pulled with the BX.  Also moving the trailers around with the BX so I’m not driving my truck on the lawn.  Digging some holes ..filling some holes.. I had to drain the liquid from the lug tires because it was rotting the tubes.. so I had the tire shop remount them tubeless. And I’ve ordered the lug tires for the front too.. So this winter I’ll run on all four lug tires.

Here’s the 4 ft box blade /scraper .. probably the only attachment I’ll be buying for a while.. after a lot of thought this is the most useful attachment I could think of. It’s good weight for the back at 300 lbs .. and it’s a grader / leveler.. and if you lower the teeth it will till the ground like a plow.  a great tool for driveways and plowing snow..

Above is a new photo ..moving firewood from out back.. but it shows the new tires I have for the BX .. they are called bar tread tires standard from the factory.. All summer I ran on the turf tires that were on the tractor when I got it.  They are great for cutting grass..but not so good for digging.

Got the Kubota all ready for plowing snow now.. Bought an extra cylinder for the angling the blade and now I have full control of the blade ..

Had to fix the headlight switch.. and install the angle cylinder .. then it was back to the franknport for the winter.. in the mean time the cat thought it was a great thing to guard..  Those temple cat’s !  geez.. This winter while it was cold and I was plowing the snow .. the plastic rear fender got cracked , and one tail light too.. The fender is actually made from a cast resin.. quite thick.. but the cold makes it brittle.  And so in the spring it needs fixing..

Spring 2014:

Time for the yard work and raking the yards..  Done… and I piled up the compost.. mixed in the old chips & grass/ leafs..   Then it was time for some tractor love.. and fix the broken fender..  I used polyester resin & mat to repair and reinforce the cracks..  Then I added 3m gravel guard to the rear corners.. and changed the tail lights to LEDs .. Also moved the turn lights up higher on the roll bar.. better seen from there.

Kettle River Group Camping

Group Camping @ Kettle River Park

This is a new post that will be for info on our Summer Group Camping..

We scored big this coming summer.. getting the site for the August long weekend

This year … 2014 we have the Groupsite booked from:  Wednesday. July 30 th .. to .. Sunday August 10th.   The gate is open for us 1:00 pm on the 30th.. And we leave the Monday morning by 11:00 am.  That’s 12 whole days of fun , relaxation & visiting.. Come for as many days as you like..

Also this year we will be helping Jens & Diane celebrate their 50 th Anniversary  ….  Stay tuned for the plans..

Waiting for the gate 2013

Hopefully we all avoid this line up for this year.. We were all so anxious to get there for our short time that we kinda piled up at the gate.. They won’t let us in till 1:00 so no point in being early. 

July 16 th..  :

Well it’s getting close..  and it looks like there may still be a campfire ban in effect by the time we arrive at camp..  I will wait till the last minute to load any wood..  

Update: July 22..

We are looking at just over a week now..  Campfires are allowed AT THIS TIME…  so we will bring some wood.. The compessor is dead..so we will have to do with our own inflators..

I made an adapter to use on one of the 30 amp plugs.  It splits the 30 amp into two.  So we would have three 30 amps..  Dave repaired the cage compressor that we use to inflate stuff.. it was getting tired ..  we don’t use it here at home anymore.. But it should be good for the summer..

Last year in 2013.. we had to find other ways to camp because of only getting the four days.. A few of us went to the Arosa Ranch up on Anarchist Mountain  You can see the Facebook page.. Give them a call very nice place with full hook ups.

Spring is here !

And camping will come before you know it..   I was kindly donated three more River float tubes..  the good kind that we like.. so they will be added to the bin of floaties..  Just like the one in the photo below except yellow & black..  so no worries if anyone needs extras.

Jayco Trailer First Trip

June 9 th 2013:

It wasn’t far.. just 55 kms from home. But the purpose was to test out the trailer in the real world and see what we liked and needed to change.

Midway Community Campground :

That is where we went .. with our friends along with their trailer too.. We’ve been thinking of trying out the small riverfront campground for a while.. and this was the perfect time.. $20 a night with 15 amp power !  good deal. AND you are backed up to the river.. NICE.  It’s quiet.. like the rest of Midway.  Anyway it was all about testing the trailer out..  And we love it.. Everything worked as it should.. we have more cupboards then we need.. and we had to keep turning the temp down on the fridge so stuff wouldn’t freeze.  The trailer towed sooo nice on the highway.  It’s a keeper.. We love the bed.. love the kitchen..

In fact it’s so good that we want to use it more.. we want to come back to this campground just for the weekends a few times.  It’s very relaxing.. and only a 40 minuet drive.  We also want to check out some other places that are within a hours drive..  More camping…

24 ft Jayco Trailer

May 2013:

Here I go .. but not so crazy this time.. at least I think so..  As you may know.. I had a very good offer on the GMC motor home and we realized the lack of use it would get so ..take the offer.. and off the GMC went.  No RV but a whack of money in the bank…Good  Suited me fine, if the guys at work bought one I could borrow it.. But nether of them were really keen on that.. Oh well..  But I was always scanning the ads for ..well everything.. even RV’s and I saw this trailer for sale ..Christina Lake… hmm close enough to have a look.. Dave & I did just that.. And to my surprise it was the best trailer I could have ever hoped for.. So I threw out a low offer and they accepted !   Wow.. What a deal..  This is a 1990 Jayco J-Series 2450.  With the best floor plan I’ve seen.. better than what I saw at the RV show last fall…and those were new ones.. For 23 years old it’s as sturdy as the day it left the factory.. No signs of ever leaking.. and we know were to look..  Completely original inside & out.. No damage at all.. So home it came..

We used Dave’s Avy because I don’t have a brake controller yet.  We did have to stop at the bottom of Fife Road hill just to make sure the bearings were ok and give the tail light bulbs a twist to get the connection better.. This trailer has not been towed for a few years.. but used as a extra home.. I was worried about the tires making the short trip..  They are rough.. and the spare is used on one side.  But it all went ok .. in fact even without a proper equalizer hitch it towed great.. Wow very positive.. I believe this to be a good size trailer for our Avalanche’s to handle without worries.

Now it’s home have a good look test some things out .. make a list….

It’s not without issues… mostly outside.. that is where the weather has worked it’s magic over the years.  The obvious things are:

The Tires: Bad enough that four new ones have been bought and the spare will return to it’s holder on the back..with a new cover. This gives piece of mind when traveling.. most likely the last tires I’ll buy..

The Awning:  We could see cracks in the fabric.. and sure-nuf it’s dirty, wet and there is wasp nests up there..and they damaged one part.. you can see in the photo.  too bad because it’s a nice one..or was.  it’s a 14ft one..the plan is too install the 18 ft one from Dave’s old Award trailer.. it’s still good and that will give us one that covers the whole lenth of the trailer..

The Fridge Vent Cover:  It was toast !  Cracked and on the verge of being a leak..  We’ve replaced it with the one from the Award.

Note Here.. that we are wrecking out Dave’s old Award trailer.. it has already donated parts and pieces to other’s including the fridge that went into the GMC..  Going to be handy for a few more goodies..

The 30 amp connection box door:  It’s cracked and won’t close anymore.. See above photo..  I’ll have to buy a new one.

The Range Hood Vent:  It was / is missing the flap that keeps the critters out.. The Award had a good one..

The Bathroom Door Latch:  The only thing (for now)  in need of replacing inside..  The Award has a good one..

The Not Bad Stuff !

The pump and the water tank are under the bed and accessed by this door on the rear of the trailer.. Handy for repairs and winterizing !  Just remember to turn it off at night !  Check out the carpet color.. yup same as our Award trailer.. Dusty Rose.

This is the most desirable feature of the trailer.. a walk-around bed.. no more crawling over each other..  There’s a 60″ wide mattress there now but a bigger one will fit..  Opening windows on three sides ..Sooo good cause we like fresh air.. And I’d like to point out that those windows are my favorite louvered ones.. when they are open the rain can’t come in.. Why don’t they still use them ??

A kitchen with everything you’d expect. Double sink, 4 burner stove with oven, two door fridge.. lots of storage, and the all important counter space for the coffee maker.  all the upholstery and window dressings is in perfect condition. Every light works ! And yes the clock too.. One of the first things we did was to plug the power in.. The A/C works great.. The fridge got cold ! The info panel works ! A quick clean and we are moving in..

Ahh the Bathroom.. There’s a tub /shower that I could actually use !  And you can brush your teeth and crap with the door closed ! It’s a bit bigger than what we had in the Award.  It will work just fine.

Now We need to test the plumbing:

NO leaks ! I put some water in the tank and the pump fired up and flushed the left over anti-freeze out of the lines… But the pump would not shut down after the pressure was up.. We put our pressure gauge tester on the pump and it would go to the 32 psi like it should.. so Dave lubed the sensor up and adjusted it and boom worked as it should.. So then I hooked up the city water and that was good too.. NO Leaks !  Not even the faucets..  WE HAVE WATER..

Let’s Check the Propane !

The trailer came with two 20 lb tanks.. they don’t look old but one is out dated .As well one was empty the other feels like it was half full.  It’s a simple and typical trailer system.. The stove lit up perfectly and the furnace fired up and the heat was coming out..  no problems .. The hot water tank was a little more work though.. The main burner worked but the pilot would not light.. Due to some critter making a home in there .. the air hose evicted the little guy.. Now the heater works perfectly.. So all is good with the propane.. will need at least one new tank though.

The Shopping trip !

During our trip to Calgary and Edmonton I stopped at several RV parts stores and bought all the necessary bits & pieces. Including: two Max Air vent covers.(we like to leave the roof vents open).  Spare Tire cover. ( cause I’m a neat freak). New sewer hose & fittings. New Electrical cord door.  New Water tank fill door. (old one looks gross). New Tail Lights.. ( just like old ones but not broken) . Some RV caulking / sealant..  And a few other bits.

Time To get Started :

The first thing I got done was to change out the tail lights. Easy when you use the same but newer..I then sealed them with the new stuff.   Next I need to get up on the roof and clean up the old sealant.. But it started to rain. So… I’ll talk about some of the things I plan to do..

Cleaning the Exterior :

So in these two photos you can see what Mother Nature has done to the caulking.. Yup things are growing.. in the top photo I went to town on a part.. a little too much.. started to remove the paint Yikes !  I’ll have to be more careful.  But it’s how this trailer will be after a good bath..Then I’ll use the new clear sealant and cleaning will be easier. But first I’ll need to fix up the roof..

The Batteries :

The way they had it was with the extra battery in under the dinette seat.. I’m not fond of having batteries inside.. The battery tray you see in the photo will only hold one battery.. So the plan here is to remove the rear cross piece and weld four of them back to the trailer frame so the two can sit side by side.. That works better.  These are large batteries which makes camping without plug-in power for a week possible. Of the two batteries that came with the trailer .. only one was good..

The Bath :

The weather kinda turned for the worst here.. So I decided to use the shop at work to do the roof and the cleaning.. so tonight I towed the Jayco over there and gave it a bath.. I used degreaser on the harsh spots.. Rust jelly on the rust.. and the whole trailer got a wash with “Super Clean” my favorite RV cleaner.. It is of coarse diluted half & half.. Brings the shine back to the siding..


 Fixin.. the Roof:

Well I got the whole roof all re-caulked.. The sun had curled some of the roof coating.. See photo below..

Although it had not leaked yet it would if left this way.. I also got to reattach the fridge vent cover.. in a better way.. While I was working on the roof Maureen was inside giving the Jayco a wipe down and vacuum.

Some New Parts :

While in the shop I replaced the power cord door and the stove hood vent.

Now doesn’t that look better.. works better too..

Also while in the shop I did a very thorough cleaning of the windows.. The louvered windows are great but they are tricky to clean and the opening mechanism needs some lube now and then..  Then I brought it back home..

In this photo that brown spare is still on the rear of the trailer..  The proper white spoke is back now and I’ve since painted the spare RV white…

 Cleaning The Awning:

The Norseman Awning has some good features.. So maybe thinking of keeping it.. I’ll see if it can be repaired. So I gave the awning a MUCH needed bath..  Looks way better but those tears bug me..  Mostly (We Hope) the awning is needed for shade not rain.. So I’m thinking just use it this year.

 Wheels & Brakes:

Finally got the trailer over to Peter’s to change over the tires and do the service on the bearings and brakes.  Everything looked in good order.. except the wiring connection to the brakes on the rear wheels was corroded, and needed to be repaired. No wonder it seemed like there were no brakes…only half were working.   We installed new grease seals and repacked the bearings. And of coarse mounted the four new tires. The spare was still good and two of the old tires are worth keeping.

Fixing The small Things:

There were a few things that needed fixing inside.. The fridge light (fixed) , The bed room door was of it’s track  (fixed) I installed a new (closable) heat vent in the kitchen.. they had taped a piece of cardboard over it !

I have also changed out three of the lights for LED ones that I had.  Just the ones we think would get left on to see in the dark.. The hall light, and the two over the head of the bed. I have more should we decide they are better. They certainly use less power when your running on battery alone.

The messes are done.. including cleaning the two roof vents.. and they now have the covers installed on them so they can be left open.  Time to move in..  Now that all these things are in good order.. the Jayco looks much newer that it is. It truly does not seem like a 23 year old trailer. It’s clean and everything works as it should.

I’m just putting the finishing touches on some of the exterior now.. Painted the hot water & furnace covers, they were grey and looked out of place.. they are now RV white and look like they belong..

I’ve also welded the spare tire carrier to the bumper.. it was clamped and had a mechanism for folding it down ?? I could maybe see the need for that if it was in front of the access door but it’s not…so it’s much stronger now.. And the bumper got a new Brown paint job. This was the factory color for the frame. I also repainted the step and I’m in the process of painting the Hitch end too.

I’ve now finished the trays for the two batteries. And everything got a new coat of brown paint.. Just need to put things back and we are done.. Time for a “Shake Down” run..

The Jayco spent some time in the Franknport but mostly it’s been in the driveway and being used as a spare room.. It’s been hot and when we used the AC it worked great.  And I’ve been running the fridge for weeks now and that’s working great too..  We are looking forward to spending the first week in August in the Jayco.. That will be it’s second trip.

 2015  Many Trips:

in the Jayco now.. three years to the family camp..  Now has new awing Fabric installed on the frame. We got a foam topper on the bed so it’s a bit more comfy… This spring while testing things after winter storage.. the fridge decided to give up it’s duties.  A newer one was found and we are good, everything works as it should..

Sadly though a Fifth wheel 31 ft Challenger has come to live with us.. and it’s time to move up.  bigger newer and Deluxe!  So the fate of the Jayco is unknown for now.

Update :  We did sell the trailer and I delivered it to a new home not far away.

Kayaks

Sept 2006:

“ What the bicycle is to the road…the Kayak is to the water”  A  quote ?  yeah from me .  What I was trying to say is these are ..or can be inexpensive human powered ways to enjoy the great outdoors.  “GREEN” if your into the politically correct things.  And I like that.  Since I was pre-pubescent  I was into the water thing.  lots of boats, anything that floated I thought was cool.  But in the seventies you didn’t see very many kayaks, unless they were home built.  Now they are everywhere..  And knowing me I can’t resist finding out what it’s all about.  So a little research was started…  Some surfing on the NET , a little browsing in an outfitter store in Edmonton..and I was hooked.   I focused in on the 12 ft recreational boats. They seamed the most reasonable for my needs.
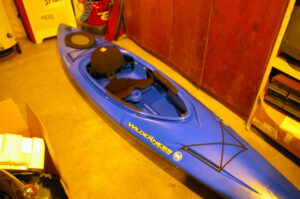
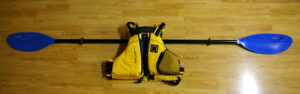
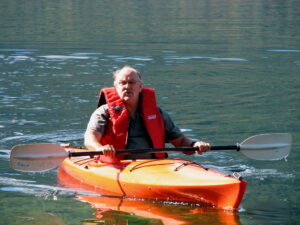
  After a few visits to our local kayak shop, I wanted to try two boats , the Dagger Blackwater. Which came with very high recommendations from the shop owner ( his personal favorite)….. Pictured above…. And my favorite the Pamlico by Wilderness Systems.  Because it got the highest ratings in user reviews.  So first I rented the Blackwater on the weekend that we camped out at Christina Lake.   Well I liked the quality of the boat.  The seat had lots of adjustments on it.  In fact it was real comfy too, but the cockpit opening was on the small side.  Just 34” long, which was a squeeze to pull the other leg inside.  My other concern was the twitchiness (tippyness) of the boat. Just reaching down to adjust the foot braces sent the boat into a spasm.  However once you relax and start to move the boat is great… So my friend Dave and I spent a good four hours paddling around with one of us in hot pursuit in the row boat.  It was a fairly good first experience .  But I really needed to try a PAM .   So three days latter I’m booking off work early.  Unfortunately the only Pamlico 12 ft the shop had left was the olive green anglers boat… the same boat just ugly.So off to the lake …now this boat was less money than the Dagger..and mostly because there is no drop-down skeg to help in the tracking.  And the outfitting (seat & stuff) was not as fancy.  But it was every bit as comfy too me.  And the quality was just as good too.  The real big difference was two fold…first the cockpit was a whole ten inches longer…that made getting in and out easier.  Second this boat was more stable .. you could move around without any concern for getting wet.  I spent a good hour on the lake, and made sure I hit some waves. Both head on and sideways.  No problem.  It might have taken a little more effort to keep the boat tracking straight, but it turned better .   And I can live with that.  So back to the shop only to find out that he had none of the PAM’s left. But I could order one for next year…any color! So  we talked about paddles & PFD’s  and I tried on a few. Boy way better than my Coleman life jacket.  And found out just how important the length of paddle is.  A 230 cm is good for big guys like me.
 Half the money down..and wait till spring for the boat…you bet.  The shop did good on a package deal …boat, paddle & PFD.  So I ordered a BLUE boat.Ok that ‘s a good story …but wait there’s more.  While I was checking out E-Bay .I found a Dagger kayak for sale inAbbottsford,BC.   Pick up Only..the auction said.. no kidding it’s pretty hard to ship a kayak.  Hmm . This was a 15 ft Edisto  model that has been discontinued from the Dagger line.  It came with a rudder, paddle and neoprene skirt.  After a few E-Mails back & forth, I decided to win the bidding on this boat.. And I did just that.  Still paid way less that a new boat . And the guys roommate was bringing it toKelowna…how cool.   No  regrets here.
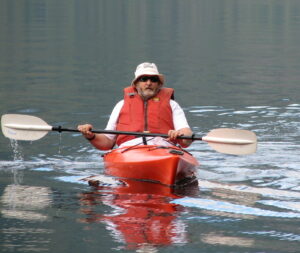
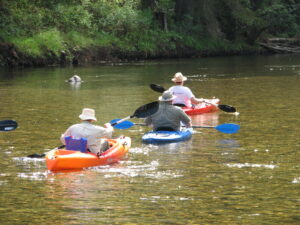
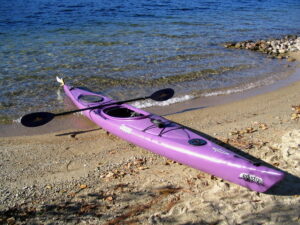
Yes it’s purple ! but that’s just a color..and it’s different .  Here it is the thanksgiving weekend and the lake is still very pleasantly warm. So off I go for a paddle … I was concerned for the small size of the cock pit, but I found it wasn’t too bad getting in and out.  This boat is very stable and with the rudder deployed it tracks were you want it . Rudders are cool!  If it’s wanting anything it’s a taller seat-back. After sitting in the other boats you really get to like the back support.  If I can fix that I will.  The paddle that he gave me with the boat is very much like the one I bought.. just purple.   There’s a cool little hatch in the bow for keeping small stuff dry.  And a large rear hatch too.   So with the new rack on my truck I’m good to go..  I’ve put in a few days of using the purple Dagger now, and it’s a great boat.  But its getting cool now so I have to put the toys away for the winter. Look forward to next season ….

The rack for Kayak’s on my Avy..

Any one who’s come to the family camping in the summer has seen this on my truck..  It holds 3 boats and cost me $40 to build.  I’m still using it five years later…

January 2007:

Well surprise  the kayak I ordered was delivered to the shop early.  And Wildways wanted me to pick it up so he’d have room for more that were coming.  So here it sits in my basement ..cause I didn’t make plans for it outside yet.   Oh well as soon as it warms up a little I make a place for it outside..  I’m sure glad I chose the blue color ,  it’s a very nice break from the yellow ones that were in the store.  It came with a little bonus of knee pads on the cockpit rim.  A cup holder and great seat.  Looking forward to using it this spring.   These are very user-friendly boats with a long cockpit opening.   I found another PDF on E-bay for thirty bucks . way less than the $120 in the store.   So we are set up good for the season.

September 2007:

Well we took our two kayaks with us on our yearly May camping.  The first stop was Okanagan Lake.  It was windy both days we were there so I only used the “Pam” for a little jaunt on the lake.  What a great boat.   Our next stop was our favorite Herald Park on Shuswap lake.  It was there that the boats got a workout.  I even got Maureen into the “pam” for some first time paddling.  She really did enjoy it, but found it hard to  keep the kayak going in a straight line.  One of my future projects will be to install a drop down skeg on the back end of the Pamilco.

The boats came with us again when we went to our annual family campout at Kettle River park.  I transported them 10 km up the river to Westbridge, and paddled the river back to camp.  This was so much fun..  we did it several times.  I will be doing that every year for sure.  Next year I’ll be sure to get some photos of the river runs..   And this coming spring I have some paddle holders to install on both boats.

Update..  2011 :

A few changes to the Kayak ‘s I have..  in 2009 I bought another Pamlico 12 because I loved the blue one so much.. This time it’s red, and it is the fishing model so it has a rod holder and paddle clips on the side.  Also that year I sold the purple Dagger for what I paid for it.  So I’m down to two boats.. Perfect.  These are the boats I enjoy the most.. and when my Brother comes to the camping he brings two as well, so we’ve enough for a good group paddle.

The paddle down the Kettle river during our summer camping is a high lite for me. It’s about a two hour run and easy enough for beginners.   And we have introduced a few new people to this for sure… Maybe more will bring boats ..it’s a great way to see the river..

Rob

A Sailing Adventure… not wished for..

This is a little story I wrote back in May 2002.  I was sailing the Weekender boat I’d built that winter.  It’s a read …enjoy

Oh ya I’ll never wish for wind again….cause I got it…

The first two times I took the boat out for my shake down there wasn’t even a hint of air movement. So on Monday it was blowing real good here so I headed for the lake hoping for the same… Yup a real nice breeze blowing north up the lake. Oh boy Rob’s going sailing this time. And this is where things started not going so smoothly… First off I have a choice of two boat ramps (both halfway up the lake). I have been using the further one because its not as busy and it has real nice docks on either side with nice bumpers. BUT I thought I’d check out the first one that’s right beside the marina. I was driving past it anyway… Well no one there so I give it a go…. First thing that went wrong… I set up the mast before I back up too close to the water. Then I look up and there’s a friggn power line 12 ft off the ground at the top of the ramp !!! Ok no problem down goes the mast and I back up past it to clear the line. Fine now the boats in the water tied to the wharf (Little with no bumpers). Now I must take the time to describe the launch area here. This is located at the narrowest part of the lake ( something I figger’d out later ) So the wind’s a little faster here. And then there’s the marina and all the docks sticking out in the lake on the south side of the ramp. On the north side (wind blowing against it) there is a LOG BOOM breakwater extending about a 100 ft out. I thought I would just sail on out to the open lake….WRONG the wind pushed me hard against the boom and I GROUND my way along it …so much for the nice red paint.. When I finally got past the end of the boom the Weekender took off like a bullet, but not before the line I have from the end of the boom to the gaff boom ( for flags ) caught the stupid light they had on the end of the log boom. Snap! Oh well you can sail without that…. But wait my steering cable decided to part company with the turnbuckle, and this all happened with in seconds….. So I’m in a good blow (whitecaps) leaning over the back of the boat holding the rudder with one hand and the main sheet in my other….and I can’t reach the other lines. And I’m crossing the lake ! This was not good… so about the halfway point I turned to the wind then headed back …. I let the main right out to try to slow down but the jib was working  way to good …. But I managed to steer for the launch and miss all those boats tied up at the marina. I don’t think anyone from the marina was looking outside, because if they had they might have freaked at the out-of-control sailboat blasting into they’re ramp…. sails flapping..   My halyards are cleated to the mast.. and I will change that so I can drop sails quickly…. And I thought I was smart using cable crimps for my steering lines… they will get tied now with good knots.

I think I sprained my hand in all the excitement…but I’ll live to sail again..

Rob

1959 Performer Boat Page 4

March 2014:   Back at it…

Don’t forget to read PAGE 1 first…  Spring is in the air.. and soon the snow will be all but a memory..  I do need to get the Bazoo 6×6 finished and out of the shop..  Set up the Costco garage again..  and get the boat done..

Delays Again:

Never got to move the boat out of the shed.. there was other things that were more pressing to do.. There’s always next year..  But I did get some prep done this fall..  The Sabercraft  boat that I got for free.. was kind enough to donate a few bits.. before getting cut up for the landfill.  First was the motor well ..This Motor Well is prefect… and I’ll make it work.   The other important stuff was the side trim..


It’s aluminum trim in the perfect shape I want for the side..   Also saved the bow light.. and a few other bits.

New Power :

As well this year I decided to pass the Chrysler 55 ‘s on to a new person.. and go with the 50 hp Merc I was given…  Supposedly it runs !  We’ll see.   I’m going to make it one of my winter projects this year.

Jan 2017:

It saddens me to think I’ll never get to see this boat finished..  But so many things keep me away..   The latest is the cost of finishing the boat.. I’m living on fumes here… yes by choice.. but I’m not able to do any projects that will cost money..   So I’m going to part with the boat.. and move on.. I’m also realizing that I have a lot of toys to play with and hard enough to use them all… one more is too much..  there would be litte time to even use the boat..   And my storage is filling up and since the Fifthwheel takes up so much room the boat got kicked out of the nice cozy place it’s been for a few years now..

So it’s up for sale..

Sold to a guy who will love it to…

1959 Performer Boat Page3

March 2013..

This is the new post for the restoration of the Performer.. And this is page 1 dedicated to the work done in 2013. Page 4 is for work in 2014  I decided to start this new post and the pages cause I thought the old post would grow too big.. A fresh start..and..so  I had been determined to complete the boat by the summer of 2013.. but that did not happen.. But look at what I did get done..

She’s a good looking boat !  And I’m naming her after our much loved and sadly departed Kitty “Bessy”  We had Bess in the family for a long time… Boats should have names and this seems fitting.

Today I made some support blocks up and dropped the boat onto them.. It’s easier to work on the boat when it’s low and not tipsy.  This weekend I’ll set up the garage over her.. and put some lighting in there.

Look I can just step over the stern to access the boat..cool. When I went to Kelowna to get the garage I also picked up some fiberglass supplies ..including white Gel-coat for the hull.  I’m getting a price on solid teak hardwood flooring too. And I decided to completely strip the boat’s inside down to the fiberglass.  Yes that means new cabin walls and rebuilding the berths too. There’s just too many holes in stuff..  And the rear bulkhead for the motor well will be raised higher and moved back a bit for more room.

Just once more I thought I’d show the plans for the boat.. I haven’t changed anything except give myself a bit more room at the stern..

This photo is my inspiration for the color scheme I like.. it’s a 50’s car color and the boat is also 50’s so it just works for me. It’s going to look great with the teak interior too.  We’ll see if this all comes together.

You can see in this photo that the floor under the cabin is in bad shape.. at least the part you can see.. The 1/2″ ply bulkhead walls are in good condition..  But they need to be firmly attached to the floor.. so maybe instead of removing them I’ll cut them up an inch or so and then add a piece back on the bottom after the floor is in.

The roof of the cabin will get some Finnish as well. To make it look nice and to hide some wires.  The wood beams are in perfect condition so I will probably just paint them..

Day 1

Got the garage up today.. so the boat is safe & dry. Dave & I removed all the windows ,fittings… and stuff from the boat.

I Bought my own oscillating multi tool today and gave it a try.. going to make short work out of removing all the wood. It flush cuts very nice.

The plan is to clean out most of the interior of it’s wood parts.  Then rebuild the stringers , ribs and the floor.  Also replace the rear bulkhead and some of the transom.  Everything will be glued and fiber glassed into place.  This puts the strength back into the boat.  Then I plan to roll the boat 45 degrees to one side and re-gel-coat that side of the bottom..  Then do the other side. After that the top of the boat will get its fresh blue paint.  And then it’s time to start putting things back together.. and finishing the interior.. Wow all before July.

I Had Help for the day… it takes two to undo the bolts holding things on.  Now it’s stripped down.

Here’s the pile of parts. They will need cleaning up..

In two days I’ve got a lot done.. All the floor right to the front is gone..  I’m not touching that chamber in the bow.. there’s no floor there, there’s no ribs or stringers .. The bow doesn’t need support.  You can see I cut the cabin walls about a half an inch above the floor. There’s no rot on them.. but there was lots under the floor in the cabin.. bad !  All that’s left is to grind it all flat. And I need to remove the inside layer of the transom..

Today I scrubbed in inside of the boat.. You can see a stick I’ll use to locate the floor level.  I also cut out a new transom piece from 3/4 ply.

Here you can see one of the many ribs I removed ..  not much left.. and just bands of fiberglass holding them down..  I’ll do better..

Here’s the new 3/4 inch inner transom.. Glued..screwed.. and clamped.  This has hopefully taken the bow out of the transom too. I don’t want to remove the clamps for 24 hrs.  I’m using Polyester construction sub floor adhesive..  Waterproof and strong..  I’m gluing the four stringers into place with it as well.. using big concrete blocks for weight.

So far so good.. The glue is holding good.  The resin and mat with be the real strength in the end.  The bottom of the boat takes a real beating with the water & waves.  So the only thing that is strong enough will be multiple layers of fiberglass.  Here it’s all in.. ready for the mat & resin..  Using foam to fill gaps.  Today I got the resin & mat out and was determined to get that part done..  4 Litres of resin and a lot of mat.  Got it done.. after it’s all cured I’ll put a 1×4 down the middle for the floor to join on.. I’ll need to get the 1/2 ” ply for the floor..

The floor is now in and very solid. It turned out good..  I used lots of PL Premium glue and coated deck screws. Today I glassed in the outer edges to the hull.  I’m also taking the time to plan the cabinets and seats.. and so I’ve made a few adjustments to some measurements on the  plans.  Nothing to much just a tweak here and there..

Nice place for the tank & battery box.  The aluminum tank is 18 gallons.. lots for a long day. We tested the fuel gauge too. Works great.  Next is the inner wall for the motor well.

My Friend Dave had a great Idea !  Two braces are better than one .. So I made these up and fit them so the fuel tank fits nicely in there.. Glassed them in and now a much stronger transom..  I like.  And before I install the motor well wall I’m going to rebuild the berths & lockers in the cabin.  Much easier when you can just step over the stern.

But Summer is coming and other stuff to do …  so the Boat got put back on it’s trailer and moved to the franknport.. I’ll bring it back out in the spring and continue then. In the mean time I’ve added goodies from older campers to my pile of parts.. I have more stoves and sinks and pumps …. etc to choose from.

Continued on Page 2…