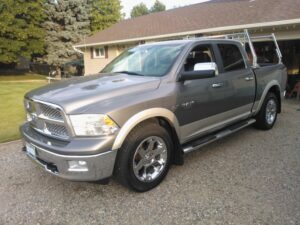
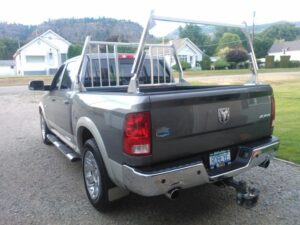
This was a good deal… and we felt it was time for a truck up grade.. The decision was made to advertize the Avalanche and see what happened.. it sold within a week.. so home came this LOADED.. Dodge. Just in time to go camping.. So I had to get some racks installed for the kayaks..
These quickly put together racks turned out to be great.. And this truck has 100 more hp than the Avalanche.. so the trailer is no problem.. Has trailer mirrors and factory built in controller. In fact it has every option possible for the year.. Nav, heated /cooled seats, back-up cam, remote start…. on and on.. Check out my new plate.. yup “robeye”. The Interior is very nice .
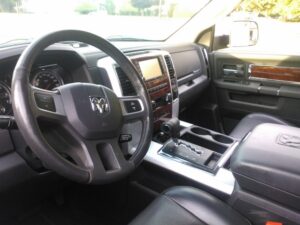
This photo was taken by me for the lot.. hence the price tag.. I’m a console type of guy.. so this suits me just fine.. And I’m very fussy about gauge placement, and Dodge got it right in 2010. I also don’t like cheapness in the trim. They got that right too. The knobs feel good to the touch. And everything is trimmed nicely. Even the top of the dash is stitched leather… nice.
Everyone was getting a quad.. I had a Sportsman 500 this winter… as a fixer upper project… but I found it to be complicated and just a tad too big to fit my Avalanche. They are great quads.. but I sure liked the profit that the sale brought me.. and it was time to move on to the Bazoo . Now with that done.. it’s again time to move on.. But I want to have some fun this summer.. Then this little guy kinda fell into my lap while advertising a trade with the Bazoo.. The price was low enough that I could just buy it and not trade. It’s in awesome shape.. not a fixer.. not a project.. Oh but I can always find something to fiddle with.. Also it fits in the back of the Avalanche ( if I wanted too). That’s how it came home. I would rather use the trailer, less scary when you’re backing up off of..
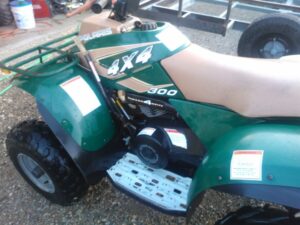
There was some questions as to what model this Polaris is.. a call to MainJet and with the vin # was able to clear things up.. it’s simply a 300 4×4. And it was purchased new in Deer Park, Wa. just south of here.. so it’s a US model.. I believe it was bought there and brought here.. so it’s a GF’er .. Cool.. The 288 cc motor is a 2 cycle with oil injection.. Plenty of power and still good on fuel. No liquid cooling on this one.. just a fan when needed.
I’m going to service it.. once I get a peak at the repair manual.. Then I’m going to ride it.. Oh it came with a snow blade.. That I don’t want, so I sold it.. Made the 300 4×4 even cheaper
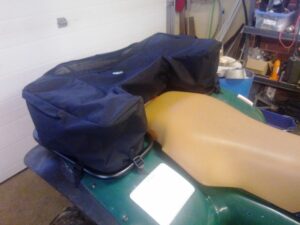
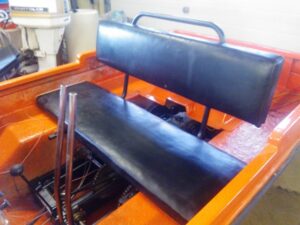
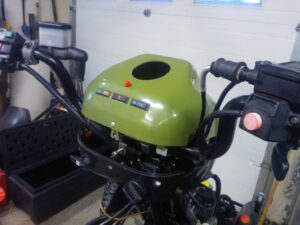
The Green & tan kinda grows on ya.. Look at the seat.. other than being dirty.. it’s in good condition for 20 years old.
June 10 2014:
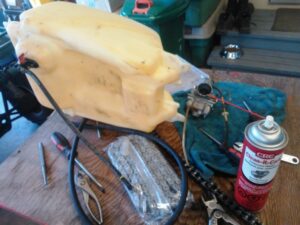
Now that we are back from our trip to Alberta I want to get caught up.. This Sunday I would like to use the Polaris so I’m giving it a go over. And that required the removal of some of the plastic.. First: … it runs good IF you remember to shut the fuel off. Seams the float in the Carb is not doing a good job and the fuel will flood the motor.. So I’ll need a carb kit to rebuild the carb.. Second: .. The front drive chain did not “just” come off.. It broke. Not a biggy.. it’s just standard motorcycle chain. Really… that’s only two things out of a possible many.. Oops I forgot the pull start rope could use another wrap around the pulley.. but it still works. Everything else is working good. Dave and I are marveling at how good shape the little Polaris is.. So I’m ordering a Carb kit, chain & air cleaner.. that’s it. For Now..
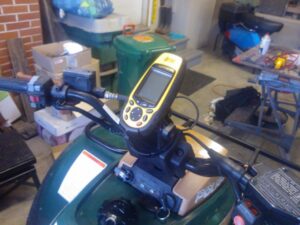
More like 5 wraps for the pull starter.. Over time the spring gets weak and won’t return the cord.. all fixed now. As I was putting the body parts back ..the head light bulb went pop.. and that was that .. These are a special bulb that you have to buy from Polaris.. I’ll have none of that.. so I’m adapting a regular Brake/ Taillight holder into the old bulb.. this way I can use a LED bulb I have.. If this ends up not working I can easily revert back. As for the Override switch issue …(the Guy that I got it from thought it normal to push the override button every time you use reverse) NO.. shouldn’t have to… I decided to disconnect the speed limiter circuit for now.. It stalls the motor .. So something is not working there.. I’ll have to be careful because this is a safety thing.. preventing you from going too fast in reverse. I also added a 12 volt power outlet.. newer quads have them.. and I’ll need that for my GPS. Let’s see how the ride goes this Sunday..
First Ride.. Fathers Day too.
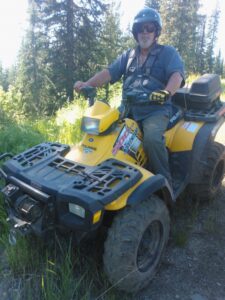
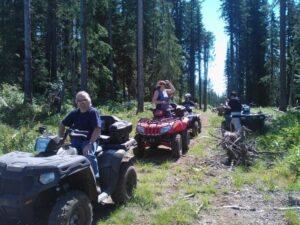
Don’t have to go far.. just a 5 min drive and you are on some great trails. Dave , me.. and my neighbor Brian.. And we choose to just go up behind Valley Heights. Just over 3 hrs of riding. Brian’s new Honda.. Dave’s trusty Yellow Polaris Sportsman 500 ..(the one I rode when I first went quading last summer.. see POST) and my little Polaris 300… The weather was threatening to rain.. .but it held off for the most part.. Great ride.. And the 300 purrrred like a 2 cycle kitten. Didn’t need 4×4 .. nope.. got along fine without. The only thing that may or may not be an issue is my front struts. They bag hard when you “top out” ( wheel off the ground) I’ll find out if I need something for that..
Anyway this was a familiar trail for me from my mountain biking days . The others had not been there before. So I lead the way.. If I’d had a map we could have made a loop trip instead of doubling back.. But we took a few side roads and checked out the pond that’s hiding up there. Hey it was fun.. and I wished the weather was better.. and we went longer..
Fixin a few things:
As mentioned at the start of this post there are a few little things to fix.. I got the parts this last weekend.. A new chain for the front drive, a carb kit to fix the flooding issue .. and a new air filter. One more thing that I found to be needing is a new fuel shutoff . The 20 year old one has a tiny leak… Can’t have that.. So that’s on order.
If you turn the fuel valve to off.. it leaks.. If you leave it on.. the carb filled up with fuel.. or did till I fixed that. Also of interest I found a vent hose in the overflow place and the overflow hose on a vent ? That would not help at all with that flooding !
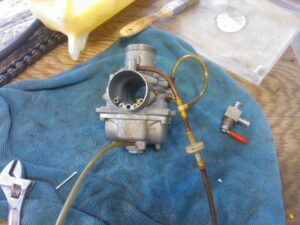
Here you see the carb all clean and rebuilt.. and the vent & overflow hoses in the right places. The two lines tee together and have a one-way valve. Their purpose is not explained any where.. I’m thinking of adding that extra shutoff and a new filter. The new shutoff will be under the seat.. I bought new 3/16 ” fuel line today.. as well. So all will be good… Just the way I like it..
I decided not to install the extra shut-off. Keep it simple. I re-assembled everything and put some gas in the tank to check for leaks.. none. Then I fired up the motor to make sure nothing went out of adjustment.. runs good. So I must have the float adjusted properly…
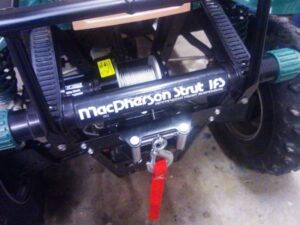
With the mechanical end of things in good order.. I decided to do a little “pimping”. I’m building the winch mount .. and I’ve repainted the racks.
The green paint was wearing off … and I like the look of the satin black.. it matches the frame. I also installed the new bag I bought for the rear rack..
But it works.. I’ll maybe get a couple of small tubs to put inside .. hold some tools & stuff..
The Winch:
This quad never had a winch.. So I had to start from scratch. There was lots of room up front.. so I built a holder. It’s just a small 1500 lb one.. but the quad is light.. and the winch was a price I could live with.. A nice little roller fairing in front.. and there you go. I always carry a tow strap as well and I’ll have a “snatch block” which doubles the pulling power.. if needed. I’m not one to go places I’ll get into trouble.. But one never knows ! Boy Scout rule applies here.. The other rule is don’t get lost… !
So my GPS is also there when I need it.. powered by the 12volt plug and I will mostly use the trip / speed feature. Would be nice to have a new one that had topo maps.
As the Summer goes on:
I’ve gotten out on a few great rides. Been to the top of a few local mountains.
Old lookout towers are on a few peaks, so there is a trail to the top. Like Mount Morrissey in the above photo. This is the highest peak between here and Christina Lake. We’ve explored a lot around the Phoenix area too. Lots of good trails up there.. And the last trip (with the ATV club) was to Renata on the Arrow Lakes. A long 120 km ride which really challenged the little 300. My tank of fuel won’t last that long..
Now that fitting a regular sized quad in my truck is not an issue .. a newer 400 or 500 would be nice. Hmmm.
Aug 23 2014: SOLD
I’m taking the plunge… will be buying a new quad next week. I sold the 300 within the day of listing it. Off the Nelson on Tuesday to pick up a 2014 Sportsman 400 HO.
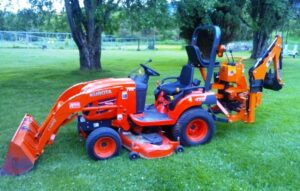
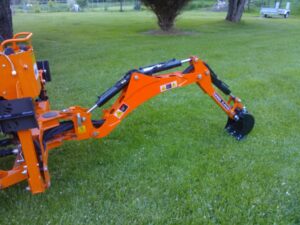
Three weeks ago I bit the bullet and ordered (on line) a very small backhoe attachment for my Kubota. It came to the Depot just the other side of the border and I went and brought it home.. That free shipping within the US was a deal breaker.. so that was the best way to get it.
This is the SMALLEST backhoe that you can buy.. And that’s good because my tractor is small too. I ordered orange.. though not quite a match , But I can live with it. It took me about 4 hours to unpack, assemble & get it attached to the tractor. The instructions are poor.. so it was a “figure it out yourself” kind of project. Good thing I’m a “figure it out myself” kind of guy.. My overall impression is good.. The quality seems to be at par with any Kubota attachment I have.
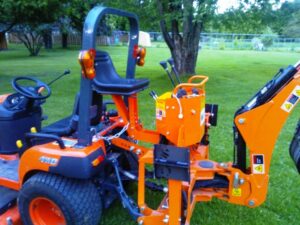
In this photo you can see the reason I have yet to really try the backhoe out.. the roll bar on my tractor is IN THE Way.. can’t sit on the seat.. I’m not a fan of the roll bar anyway, hits trees.. Kubota has R.O.P.S on all the tractors for safety. It was suggested to me to just cut off the top only so that there is still some roll over protection. Not a bad idea… Hmm maybe arm rest and grab handles .. cup holders ! I do have metal & welder..
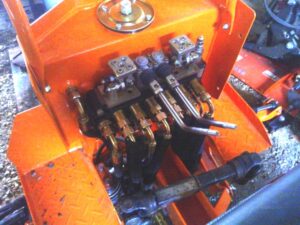
As I look at the three point hitch mount I see room for improvement there too. A sub frame like the BX 24 D has for the Kubota backhoe is something I could make. One cool thing with this backhoe is that it has it’s own hydraulic system , tank, pump and valves.. it’s driven with the rear PTO from the tractor.. and works even at low motor rpm’s. They supplied me with a new PTO shaft . But it needs to be trimmed to length. So I just used the one from my Rototiller . it was the right length.
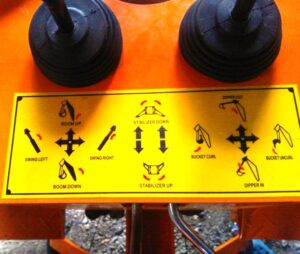
So I took the rops off.. so I could at least give the backhoe a try. The perch (seat) is good you can really see what you are doing… but the doing is going to take some practice. I found the controls to be … “unnatural” .
I kept wanting to push forward on the left stick to lower the main boom. And pull back to raise it.. I guess that makes sense to me because the front loader works that way.. and I’m getting very good at that. As you can see by the control diagram that they have it the other way. Which is different than the manual. Scratch..scratch.. I will swap the hoses around .. Because I’ll wrap my brain around working with the two sticks better. But I was digging away awkwardly and yes it’s small but it digs ! and I tried some sod too and no problem… big rocks are a problem … Big roots too.. so there are limits.
I removed the backhoe from the tractor tonight and pulled the cover off the valves.. Yup will be easy to swap the hoses.. not bothering till we get home from our Alberta trip in a week.
With the hose swapped the operation is more natural now.. And by the end of summer i’ve had a few chances to use the hoe. first I found out how deep it will dig when trying to remove a concrete slab in the yard. 4 ft ! that’s it.. It is a very small hoe after all.. so I can’t expect much. But dig trenches… Yes ! and quick too.. I can move forward from the backhoe seat too. I’m getting good..
Update 2019…
I’ve used the back hoe lots over the years with very few problems..
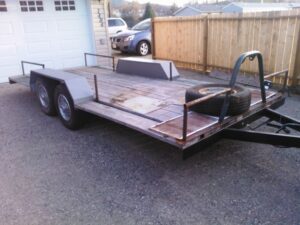
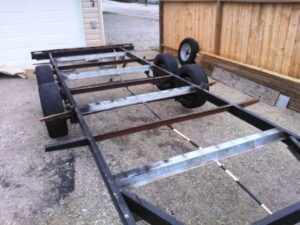
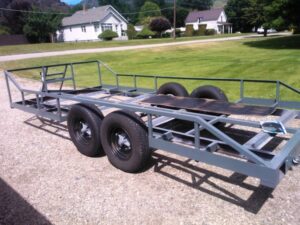
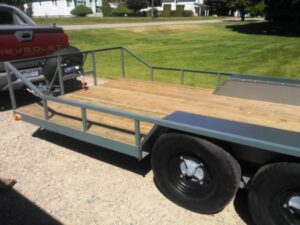
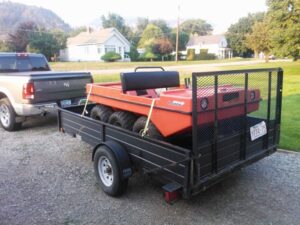
Boy oh boy .. I’m I distracted from the stuff I should be doing.. Too much to do .. If I was retired I could maybe get it all done .. Here I go with yet another project. When this trailer was offered to me for a price that was hard to pass up I didn’t have to think about it long.. Especially considering that my good old utility trailer that has served me long is rusting badly.. And now when I pack some weight.. well twice now the spring shackles have broken from the frame.. Also I can’t carry my Kubota in the little 4 x 8 trailer.
No it’s not a car hauler.. It’s built from an old travel trailer. So the frame is not strong enough for a car.. but it will work great for tractors. It has brakes… something Dave’s trailer does not have.. It’s nice and low ..and balanced.. tows great.. The deck is treated 2×6 and measures just over 5 ft between the fenders. And 16 ft long. Those wire hubcaps are only on one side.. so I’m removing them. It needed a new safety chain.. and then you could use it. Lights and brakes work good. However there is no ramp for loading.. And the tires are old.. but they are just common size car tires.
How to make it MINE..
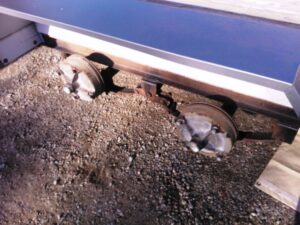
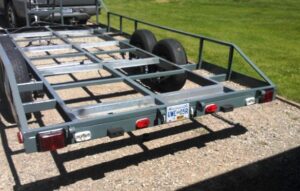
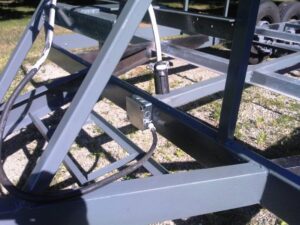
I’ve had the trailer sitting in the driveway for a week now.. thinking of a ramp for the back.. And today I pulled those hubcaps off and gave the trailer a bath.. Then Dave showed up and said, ” hey we should pull the hubs and grease the bearings”. So I lowered the front of the trailer to the ground and put some blocking under the rear.. then lifted the front up with the tractor till the wheels are off the ground.. If the tractor can do that then it must not weight more than 800 lbs. Cool. While servicing the hubs.. and the trailer up in the air I wanted to have a good look under.. Yup I’m thinking that the wiring under the trailer is messy… Not surprised with that.. and to find some wasp nests.. too.. not surprised again. Also a lot of the nuts were missing from the bolts that hold the deck on.. Hmm. I don’t care much for the pipe structure on the front.. and there is no sides for mounting stuff.. So I’m going to spend a few days and make this trailer GREAT.
Starting by removing the floor & the pipe railings. Then I can add to the frame, paint the frame, and re-do the wiring. Here’s the want list…
Stake pockets for removable sides
Tie downs inside
Ramps for the back / or a wind gate
A front structure that will hold a winch
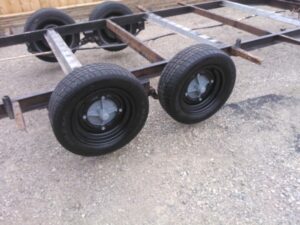
Here you see the work is started.. I have acquired four newish tires for a good price.. That will take the flat worries away.. I was given some heavy mesh that will make good ramps. Dave & I have been debating the width of the trailer.. There doesn’t seem to be a good reason to have the trailer wider behind and in front of the fenders.. So we may just keep the 61 ” width all the way.. and we may trim 12 ” off the back..
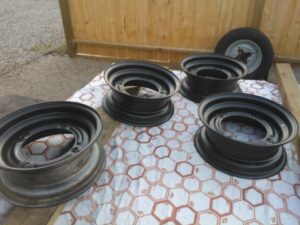
I’ll sleep on the width thing.. In the mean time I sand blasted the rims and gave them a satin black paint job..
And they are unique.. notice the Four bolt pattern.. and the large opening.. These could be hard to find.. good thing I made them nice again.
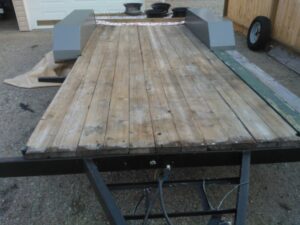
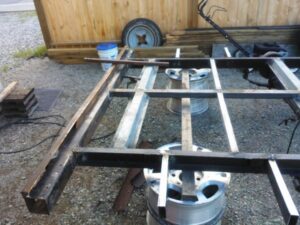
Here you see the new tires on the rims…on the trailer.. Also you will see that we’ve stripped the wood deck off, fenders off.. and now it’s time to decide what to do..
The frame is very minimal as you can see. and some of the cross members are very light.. I could bend them easily. So after looking at all this weakness.. we need to beef things up a bit. The first thing is to add a third frame right down the middle. A 2×2 ” square tube would do nicely. That would take a bit of the flex out of the frame. Then we will replace the lighter cross pieces with more 2×2″ tube. All welded to make a more rigid ladder frame.
Also we decided to shorten the trailer by a foot on the tail. This will do two things : First it will mean less stress on the back of the trailer when loading something heavy. Second it will move the two axles back further and make the trailer handle better. Sadly we will loose a foot in length.. but hey it’s long enough for me..
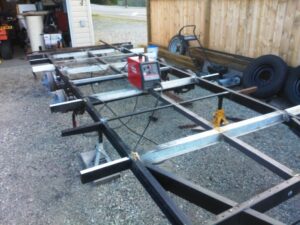
Here you can see the shortened frame, and the new 2 x 2 center frame plus cross pieces.
The 2 x 2 square tube runs the whole length and has stiffened the trailer a lot. We added new outer frame pieces and there will be a 4″ deep plate on the outside. When the 2×6 decking goes on this should be a strong but lite trailer. And yes I decided to take the deck out to the outside of the fenders. I have also forgone the stake pockets for a 12″ high wall on the sides.. sloping up to a 24″ high front wall. No wind gate either.. just two 16″ x 48″ mesh ramps that will slide from side to side and fold up.
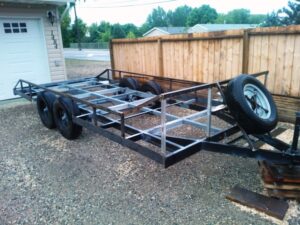
This has turned into quite a lot of work.. but the result is great.. You can see in the photo above the vision I had has taken shape. A spare tire and winch mount on the front. The 12″ high frame on the sides acts like a truss and stiffens up the frame.
Here’s a photo of the winch mount.. I have a new 2000 lb winch for the trailer.. At the bottom is of coarse the battery tray. I also bought a new hitch & jack. This will be a new trailer when done.. and it’s registered as a 2014 U-Build . Prior to this photo we used the tractor to lift one side of the trailer and had it up on it’s side. That allowed us to rewire the brakes. Proper soldered connections & loom , all routed through the 2×2 center beam. I also took the opportunity to give the underside a quick coat of grey paint.
June 29 2014:
Another case of “put aside”.. The weather has been ify for painting.. and other stuff got in the way of finishing the trailer. But today with improved weather I got er done..
All the welding & grinding is done.. cleaned it up good and gave the trailer it’s grey paint job. Once the paint is dry I’ll wire in the lights. Then it’s decking time.
Here’s the lights all on.. took a few hours . all the conections are behind the license plate.. The wires all run through the 2×2 square frame. Clean !
At the front they all meet here.. easy to get at and make changes..
DECKIN !
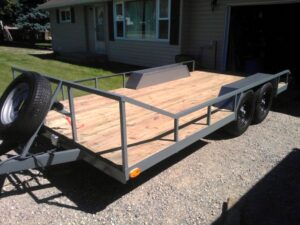
2×6 treated lumber & 2″ heavy metal screws.. And lots of cutting.
Got the fenders back on too.. and they fit perfectly. All that’s left to do is the ramps and wire up the winch.
I did not realize that at some time during our construction .. the shackles on the front axle got flipped around.. and this caused the tires to rub together.. it took me a bit of head scratching to figure out what it was that was wrong. But I got it..
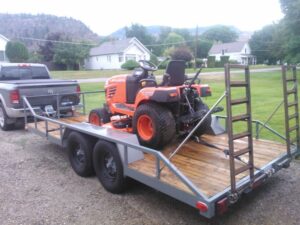
With the completion of these heavy duty ramps.. the trailer is getting closer to being 100% . The ramps adjust for width and can be removed. The Kubota fits with room to spare. It looks like I may have a mowing job.. so this trailer will be used. now we need to see how many quads we can carry !
Once again .. new month ..new page.. Welcome to Page 4.
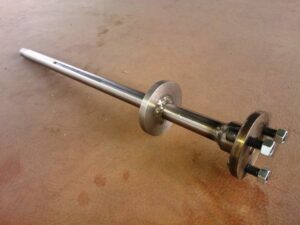
After putting new seals and bearings in it seamed pointless to use the bad axle. So I had a new one made. Nothing was happening to the Bazoo while waiting for a new axle. And that took weeks. But it’s here now so it’s back to work , and get the Bazoo finished.
It’s a work of art.. That’s what we said.. Nicely made. and pricey too.. but good work is not free.. So I cleaned it and painted the outside end like the others.. And the assembly starts..
After I tidy up some wires and put some in a loom the motor can go in.. We are getting close to launch here.. Here’s what’s left to do for testing.. If the test run is good and there is no other issues… then I want too: But back to the “Git R Done” stage.
Getting there.. The motor fits perfectly.. as it should.
So much time before hand was spent on lining these things up.. it was a pleasure to have them just fit ! If the weather is bad tomorrow I should get everything ready for a test drive.. Sure nuf.. the weather gods were in favor of working on the Bazoo.. Everything is in place.. Boy are my tires in sad shape.. two of them will not hold air.. So they go in the middle where it won’t matter. It’s kind of a 4×4 now.. 🙂 Here it is back on it’s wheels after a bit more than three months. We wore the battery down tuning up the motor today.. and discovered that the kill / solenoid system I devised turns the spark off when you turn the key to “start”. not good. so that has to be figured out.. Also the belt we have is too small so the motor still turns it at an idle.. Makes it hard to change gears. I’m sure more stuff will show up after the test drive. Tomorrow.
Hooray it’s May 2014:
Never did get the test run.. The motor started to act up and would not stay running.. Then the weather got nice and yard stuff had to get done.. Anyway going to look into the why, thinking a fouled plug ?
Here’s the Video.. after a lot of fiddling around
Yes We changed the two spark plugs and still the motor would stall.. Figured it was a fuel thing.. so we rigged up the tank that someone had in the Bazoo.. just to see if the motor was starving for fuel.. and it ran great ! And that is why you are seeing the video.. The sun came out for a few hours.. and so did the Bazoo.. And boy does it go.. Still need to make some adjustments but she flies.. I’m going to abandon the front gas tank.. just like before I got it.. So I’m looking for a good replacement that will fit on the back of the seat..
May 24 2014:
Bazoo is just sitting there while other things get done.. So I thought I’d see if there was interest in a trade for a quad. Yes there is lots of interest.. But that also made me want to remedy some of the little things wrong.. Last night Dave & I fixed the kill circuit on the key switch.. so now the motor starts and shuts off with the key. I also totally removed all fuel lines to the front tank and configured them properly in the temporary tank . and the motor ran great.. better that ever ! Now I have the throttle response I was hoping for. That just showed The other little mod I did was with the drive belt.. I knew that the common belts these days are wider than the one that would have been on the Bazoo’s drive.. So I trimmed 1/4 ” off the spare belt I had.. and the drive works so much better. So I when for a little drive around the yard… even more fun when things work good.
The Bazoo is SOLD..
My Bazooo went off to a museum for amphibious ATV’s !
And I have the goodies I need to make the secondary drives new again.. I also bought new master links for the chains.. and some nostalgic looking beehive marker lights.. that I’m thinking would look good for my running lights. Back to the drive line…
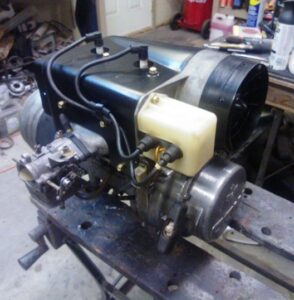
All new axle shafts and the inner bearings too. Looking good.. time to work on the motor mount. I added an extra 1/4 ” of rubber to the motor mounts. and I trimmed the mounting plate, flipped it over and the motor is in the right place. The belt lines up and there’s just that little extra room for the air intake on the carb. Forgot the photo.. Took the motor back off so the chassis is not so heavy.
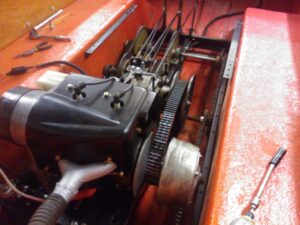
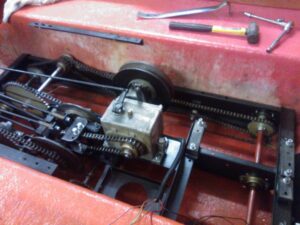
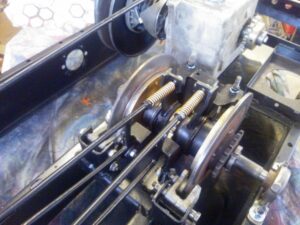
This photo shows the chains for the drives and a stop plate for the levers.. After trying things out and seeing how they work we realized that this was a necessary part. So I made a new one .. When the clutch levers are in the release position, they rest against the stop plate. ( adjusted properly ). To use the brakes you pull back further compressing the two springs you see.. This way you can’t engage the clutch & the brakes at the same time. ( Brilliant ). The one axle is now out getting fixed.. But I can still carry on. Just a few things to do and Dave & I will fit the chassis back into the Bazoo. I don’t know if I should call it a chassis or the frame.. it’s both !
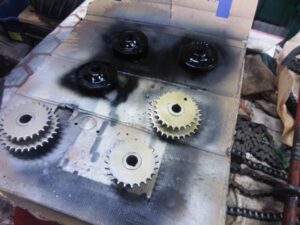
In the mean time.. I’m cleaning up stuff and getting the bits ready.. I know your thinking why paint the gears..Well RUST.. I don’t want them to rust.. that’s my answer and I’m sticking to it.. I have gold paint so that’s the color..Those black blobs are the seals & bearings that hold the frame to the body.. and keep the water out at the axles.. They bolt through to the frame on the inside. Four bolts each and a rubber gasket.. it’s all that holds the two together sandwiching the fiberglass body and the frame. I’ve got three different kinds… two are the factory aluminum castings, two are machined aluminum and two are machined steel. Can’t explain that one..
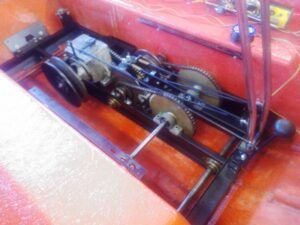
Here you see them again after we put the frame back into the Bazoo. I still need to paint the ends of the axles. Just stuck them in there to see the fit. So yes we got the frame in, and bolted five of the seals in place.. one is with the axle getting fixed. There is still a lot to do.. but this means more room in the shop 🙂 .. When I get the repaired axle back all the drive gears and chains need to be installed. In the mean time I could do the wiring now.
Even the choke control is in.. After I wired everything up.. I put power to it to see if things work as they should.. I think I blew ( no pun intended) the fuse for the horn.. but the rest works fine.. The red light is to show power on.. It’s kinda over kill because the hour meter has a flashing light. I may just rethink the running light thing.. and hook the tail lights to the head lamps.. and use the other switch for the bilge pump.. Yes a bilge pump.. don’t forget this thing is part boat too. I did not want drain holes in the bottom so a bilge pump is a better choice. I’ve got one kicking around somewhere.. As for the lights.. I have three different sets.. that include those beehive ones, some LEDs and good old trailer side marker lights.. the marker lights are my favorite because they are easy to install and durable.
Maybe they aren’t the prettiest lights out there but they work for me.. If you break a lens you can get a new one cheep. These now turn on with the head lamps. I’ll be using more of these on the Kubota BX to replace it’s factory tail lights. ( I broke one this winter) and I’m not buying the Kubota one..
Where your WAZOO goes in the BAZOO
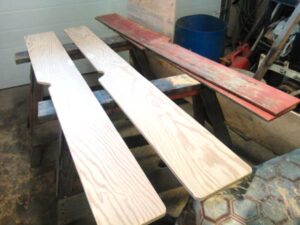
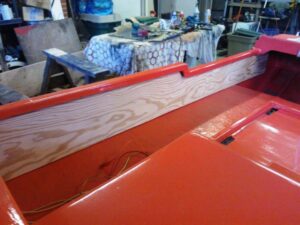
Other than the wheels, the seat was the other only thing to be untouched. I set it aside to be worked on later… Later has come now that I’m waiting for drive train parts. The upholstery on the seats is in remarkable condition for it’s age… presuming it’s the original. However the plywood that it’s stapled to is not. So I’m mulling over what to do. Mean time I set to work on the frame.. Someone had welded extra pieces to the top bar for a gun rack.. I used the grinder to remove those.. One of the cross bars had a broken weld.. and one mount was missing.. Zap Zap with the welder.. fixed. And above you see a new satin black paint job.. As for the cushions I’m thinking that at the least new plywood could be a good thing.. But a part of me would like to send them out for new covers too. However I should just wait and see .. they are easy to remove if I change my mind later. Yup that works.. Ya know I never sat in the seat till today.. I took things apart right away.. It’s actually comfy.. certainly does the job.. Next I cut new plywood sides for the interior..
They fit like this.
There you have it.. They are bolted through with carage bolts… that way the heads are flush. These add a bit of strength to the sides.. And I stained and varnish them too.. I’m jumping back & forth a bit , just trying to take care of loose ends.. & things I can do for now.. The muffler was one of those things.. A while back I cleaned and painted the muffler.. I have now taken the old piece of aluminum they had for a heat shield and re-worked it.. so it attached to the muffler mount and not to the body of the Bazoo..
Welcome to the second page 🙂 But don’t forget the read page 1 first
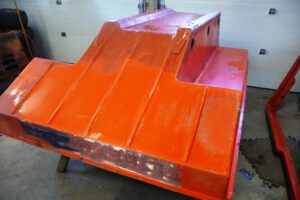
After the first coat of paint on the tub I thought it would be a good place to start a second page in the restore.. scrolling down to the bottom was getting to be too much.
While I wait for paint to dry.. 🙁 I thought I’d see about the dash board design.
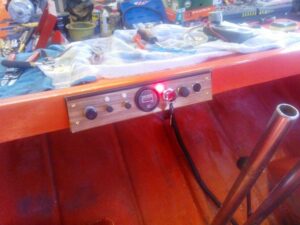
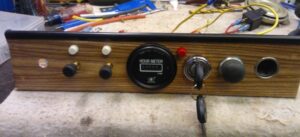
I lined them up the way I would like them to be on the dash.. From the right.. 12 volt outlet, Horn button , Key switch / with a power light above, Hour meter, Running lights, Head lights, And the choke will be next to that.. In the back is the relay that will kill the motor when the key is off.. All of this will be on an aluminum panel mounted at a slight angle in front of the control sticks. The only other thing on the rest of the dash will be the original HOLY- SHIT handle in front of the poor passenger. Not considered and not forgotten is a winch control.. later. Got the switches and stuff. mounted to the aluminum ( old deactivated road sign). Just need to cut out the shape and make the bends. The fuse panel will be up inside. Ya… wood grain .. but it’s a bit more to my liking than naked aluminum. The choke is still missing .. and so are the labels. But we have indicator lights for , power on , running lights and head lamps.
This is a far cry from what there originally was on the Bazoo. There was just a key switch , hour meter 12 volt outlet and choke control. The dash panel will easily remove with just four screws for access to the wiring. It took me a whole day to build this.. but I like this kind of stuff. I left the painting of the second coat on the tub till the evening, so I would not be working around wet paint all day.
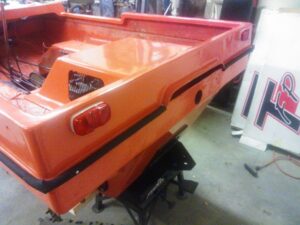
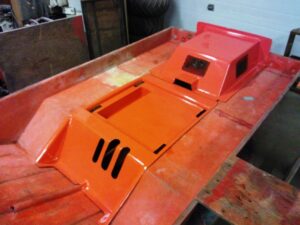
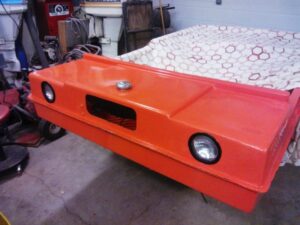
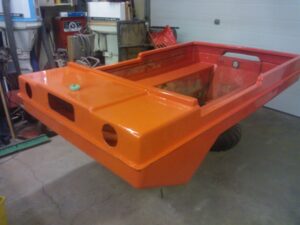
Nice and shiny.. the way we like it.. After a days curing the tub will go right side up on some stands. Tub’s over… and I was trying the interior covers on for size..
They are now in great shape. I still need to paint the screens satin black. And to figure a way to anchor them down. The seat holds the front one down.. but the motor cover needs a way that makes it easy to lift up. And hopefully no holes in the tub. Got lots of time to figure it out.
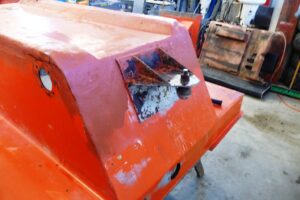
After trying several different ways .. I settled on this. hope it’s not to loud for the operator 🙂 Also in the photo is the new gas tank fitting.. threaded in there tight .. should not leak. I will test before I mount the top on the bottom..
I had to work fast before the resin set up.. just got the two together in time.. I used a slim strip of fiber mat and resin as glue. Tomorrow I’ll lift the body up a bit higher for painting.
Sunday February 16 th 2014
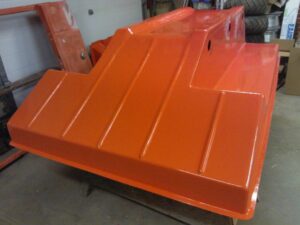
Well another Sunday …and more work on the Bazoo to be done. Last night I got the first coat of paint on the top side of the Bazoo. And because I only have just enough paint to finish.. I only painted the interior parts that will show. The plywood that was bolted to the insides of the sides will be replaced with new plywood. That is why I left those holes along the sides unfilled. I plan on staining & varnishing the wood, not painting it. I feel that the plywood helps give strength to the body. As for the second coat.. I will wait till the evening so I’m not working around wet paint all day .. and I’ll do some other stuff..like cleaning and painting the motor..
Motor Time !
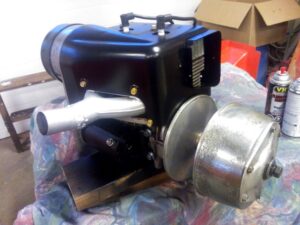
So yes I did take the motor apart clean and paint the parts.. It took all day.. but the result is worth it.. High heat paint on the exhaust header, Satin black on the starter , cowl and air intake. Will it run better ? don’t know. It ran fine so now it will look good running fine.
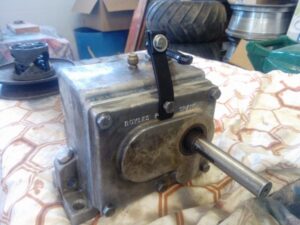
Transmission Time :
It was the transmission’s turn.. So I removed the secondary drive (in background) & the output gear. I slit the case apart and had a good look inside.. nothing wrong..no metal pieces.. So I cleaned the halves and resealed them.. Should be good to go..
I’m also trying something brave.. I painted the rubber headlamp mounts with the flexcoat bumper paint.. They are / were white from the factory.. very grubby and would not clean up.. If the paint won’t stand up to the flexing then I’ll have to think of another way. I’m not doing the white trim thing like from the factory.. I want black.
They are just 35 watt tractor lights.. but I could not find LED’s that are the same size.. These work ok so they stay for now. And I’ll be keeping at least some nostalgic stuff.
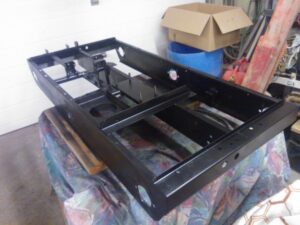
The frame got it’s satin black paint job tonight.. and looks good.. Next I’ll be cleaning and painting the bits that go on the frame..
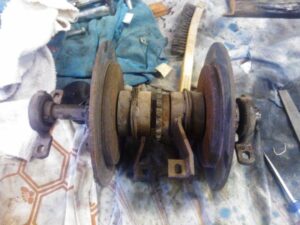
This is a critical part in the 6×6 drive system. It takes the power from the transmission and splits it to the two sides.. and the brakes for steering as well.
This is in very good condition. Not worn down at all. Lots of pad left on the clutches.. and the discs are good. Seen also in the photo is the control handles, they are chrome and I’ll leave them that way. Here’s the Two Clutches & both brakes are put back nice & clean.. Lots of adjustments on this system..
I don’t know what else to call the two split drives that are after the clutches.. so I’ll call them the secondary drives.. The final drives being the chains that join all the wheel axles together. Any Who.. the brunt of the abuse seamed to be here.. A lot of torque is on those small sprockets. And the key way in the axles show it.. ( upper right hand in photo) I bought new keyed 3/4 axle, and new bearings , key stock.. collars too. I took a break for a few days till I could get to Kelowna to get these supplies.. now its time to have at it again..
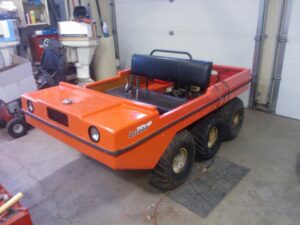
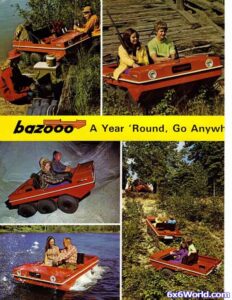
That’s what it’s called.. It’s an amphibious 6×6 ATV.. Or AATV.. very much like the Argo that everyone is familiar with. This Bazoo was made in 1971.. yes it’s old and kinda rare. Made here in Canada by Otaco Industries in Ont.. there is very little info on these, just a couple of copied brochures and one or two running ones on the forums .. So I’m thinking a cool project indeed.. and This little buggy looks like WAY more fun than a quad. It seats two people… side by side ! has room to carry stuff.. is the same size as a quad.. and goes in water, snow and through the bush.. What’s not to like about that !
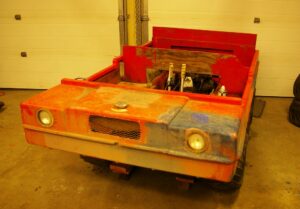
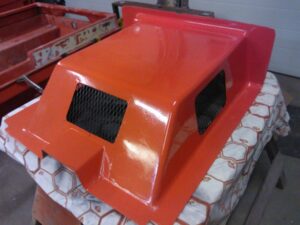
So here I have one in my garage. acquired from a fellow lawn tractor guy.. who did not want to bother with the Bazoo.. Mostly original , and a little cosmetically challenged. Just dying to have me put some love into it. Oh.. and the orange is the factory color.. and I intend to keep that.. however newer paint. I’m excited !
Not to forget we are talking about a 42 year old mechanical device here..
The tires are old and cracked / flat . However two unused tires came with it.. so that still leaves four crappy tires. Not really a problem since you can buy six new ones for a reasonable price. I’ve been told the drive chains are “newer” but until I get into this buggy and start testing things out it’s very hard to say what is needed. I can put tubes in the four bad tires so as to be able to drive the Bazoo around.. I can do a compression test on the motor to see if it’s worth spending time on. Then there is other parts such as the transmission that may or may not be good.. anyway I could go on .. but I really need to get the Polaris Quad finished up and gone so I can get going on the Bazoo..
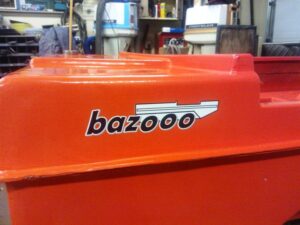
Hmm I was about that age.. in the ad. the kids in the top photo that is ! So the big question ? Is Bazoo spelt with three “o”s ? I’ll be sure to use three in the new decals. As for this post.. I’m lazy and 2 will do.
And Now :
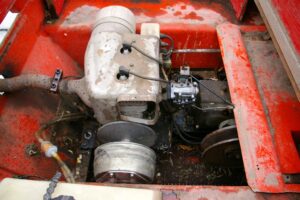
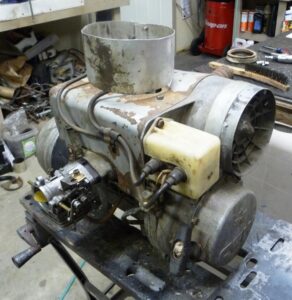
Here’s a quick photo of the motor in the Bazoo. A twin cylinder 2 cycle snowmobile engine. Very simple indeed, at least compared to the Polaris Quad I just worked on.. Now here’s a little info on the motor.. This is a CCW.. or Canadian Curtis Wright 290 cc , and yes Curtis Wright … of Wright Brothers fame makes airplane engines.. But here in the great white north.. the Canadian division made motors for snowmobiles.. Go figure ! The carb on this wonderful piece of history is a Walbro WR6.. and Walbro still makes carbs. so there is parts and info still out there. I printed the carb diagram.. and did a quick dismantle… conclusion.. I’m suspecting there is three missing springs inside the pump in the carb and thus the carb may not work , but we have not tried.. so I’ll be sorting that out first. After tests on the motor.
A Note Here : A bit of news I found out later.. I was told by the fella I bought it from that the motor was a 400cc.. well the label and the model number on the motor disagree. This is the 290 cc twin that was offered as an option for the bazoo. The standard motor being a single 240 cc. That explains why other photos of Bazoo’s have singles in them. Also of note is that the “Bazoo” was only made for two years.. and Otaco industries went though many changes and was bought by American Seat Inc.. and up till 2007 they made seats for buses and trains.. Then closed the doors. They are better known for the tin & cast toys they made in the fifties.
Thinking to myself:
How fortunate that this Bazoo came 99% complete.. all the inside covers, the original seat in good condition, all the original controls.. and a few questionable extras ..like a trailer hitch and some ugly mud flaps. The fuel tank in the front has been abandoned and now one sits in the back next to the motor. I’ll find out why ? The potential for improvement is churning through my mind.. One is the complete power train.. I can get the Hydrostatic drives from a zero-turn mower and then use a Briggs & Stratton V-twin motor that would be newer and easy to repair. That would mean no more transmission, clutches & brakes. Hydro drives would chain drive right to the wheels.. and provide instant reverse and braking on hills.. Think about it …. I am !
Hey While your waiting to see & read what I’ll be doing with this little gem.. or if you’re scratching your head thinking Rob’s lost it again..
Jan 24 2014: and the work starts..
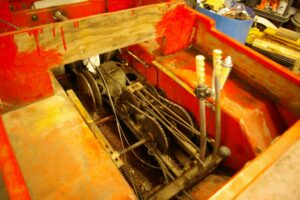
Tonight Dave and I pushed the Bazoo into the shop.. let it thaw out a bit. See those two ply wood cross dividers .. they are gone.. first thing I removed . The second thing on the agenda was to pull all six wheels off. and I was anticipating a problem.. was told by the previous owner that he could not get them off.. stuck ” you need to take a torch to those wheels” .. OK . Well he must have loosened them or?? because they came right off with a bit of a tap of the hammer. Looks messy , but it’s very simple. Dave & I tested the function of the drive line.. and it works good. The transmission shifts ..forward /neutral / reverse like it should .. the chains all seem good and the framework that holds it all together is not rusted or broken. There’s a bit of play in the levers, and the throttle cable was broken.. Minor stuff.. I’m impressed for such an old machine. But as far as use goes…. The Hobbs hour meter.. which looks original .. says 165 hours ! Wow that’s low ! Does it work ? Also it looks to me that someone at sometime replaced five of the drive axles & hubs. I know this because I’ve seen a photo of the factory inner hub.. and there is only one left. And the wheel nuts on that hub are 1/2″ and the others are 9/16″ ? That axle is also the loose one of the bunch.. So it may be the leaking one too.
I took a few parts to work and gave them a bath.. It’s sure good to have the two interior covers.
Testing The Motor:
Before I go taking too much apart.. I need to know the condition of the motor. Part of that involves the use of the starter.. So I needed to sort out the rats nest of wiring.. People do make a mess with the wires.. tons of tape & cable ties. There’s dead end wires , there’s dirty connections and fuses that don’t work… Well then I like to study the wiring diagram.. and in this case it’s not for the Bazoo but instead for the motor. And it turns out to be dead simple.. just like a lawn tractor.. kinda simple. Even the key switch is from a lawn tractor. It has four positions.. off/kill… on with lights… on without lights.. and start. I thought of using a new key switch till I realized that it needs to have a kill circuit in the off position. So I’ll keep the key switch ..it works ok. And what’s this in the photo below ? Checked the compression on the cylinders with two different gauges and we have 118 in both cylinders. That’s respectable considering the age. The spark was good too.
Check out the video.. After having a snowmobile mechanic look at the Walbro carb and tell me that it’s good and we are not missing parts .. Dave & I put it back on and hooked up the gas tank. Had to do a bit of adjusting but finally ..vroooommm… Dave is seen tweaking the mixture.. and the clutch is working too… Bonus ! So now we are getting six tires up and working.. Two are new and two will have tubes put in. These tires are badly cracked.. but I just need them to hold air for a test run.. And I need a new throttle cable, which is a bicycle brake cable. And a new belt for the drive. Then we should be BAZOOING !
Slight change in plan:
I had everything ready, Tires mounted, throttle cable… except the belt was on order.. Then we are standing there looking things over.. and we noticed the motor was not lined up with the secondary drive. And on these belt clutch / drives alignment is everything. So the motor would have to be moved over 3/4 “. Totally not to big a deal.. but a bunch of work none the less. The motor runs good… the Drive line could use a few adjustments.. So I made the decision to forfeit the test drive and get right into the “taking things apart” job. Hey we had the motor out.. anyway..
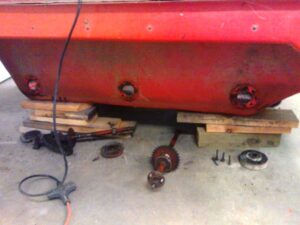
With the frame removed from the Bazoo it will be easier to work on stuff like mounting the motor. So I went to work on removing the axles & seals … They hold the frame in. I was right about the center axle on the left side.. needs to be replaced / or machined. One out of six … not bad !
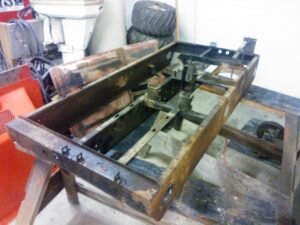
All the chains had master links , and so once they are off and the set screws loose on the collars on each axle… they just slide out. Each of the outer seals has four bolts through to the frame rail inside.. The frame is loose now but I need help to lift it onto some saw horses. Then I will have two separate things to work on.. The fiberglass body.. and the frame with all the mechanical stuff. Oh I almost forgot the motor.. I can’t leave it looking like that.. It needs some love too.
Well the frame is out and on the saw horses. And that’s one greasy place where it came from. I also got a few of the external stuff removed like the muffler & the stupid mud flaps.. Just need to remove the plywood from the sides and the top and bottom will separate.
It’s going to be easy to work on the drive up here on the saw horses.. way better than bending over the side of the Bazoo. I plan to remove the transmission and the chains. Then degrease the whole thing at work in the wash bay. Same thing with the bottom fiberglass tub. Lots of cleaning ahead of me here.. I need to think of a way to keep the chains lubricated without the mess. I believe there is a sticky chain lube that won’t get “flung” all over. We can do things better ! I ordered the paint I need for the fiberglass.. I use Interlux Brightsides polyurethane boat paint. I’ve used it before .. pricey but tough. Not wanting to get things mixed up..I used colored cable ties to mark the chains as to where each one goes.. there is nine chains. Same thing with the axles, want them back in the same place they came from.
Here’s the frame stripped of the drive parts and ready for the bath. This weekend I hope to get the body split in two and washed.. as well as the other parts.. The workshop is going to be a bit crowded with so many parts..
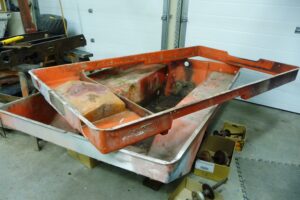
Here we have the top & bottom in two pieces. Now I can clean them properly.
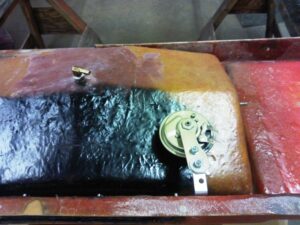
Here’s the old gas tank .. looking at it from the underside. I see they had problems with a leak.. It’s been patched , but the outlet is not there.. I’m guessing the outlet fitting would leak and so the new tank was the easy solution.. I would like to fix this and use it again. So that would be one of the improvements.. I have some others that we’ll see about later..
Rub-A-Dub-Dub.. Scrubbing my Tub :
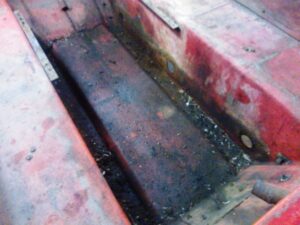
Sunday Feb 2 2014:It took a lot of scrubbing to get the greasy mess out of the bottom of the tub.. All clean now.. so I can see what’s going on .. Found two holes drilled in the bottom.
It would never float for long with all the holes I had to fill today. Once it was warmed up in the shop I mixed up some resin and plugged those UN-needed holes. A lot of messy patching has been done over the 42 years.. so I’ll be trimming some extra lumps down.
That’s quite the heavy duty hitch there ! I had to cut the ball off. Dave & I tried to wrench it off.. no way was it coming off. I’m deciding weather or not to remove the whole hitch .. and put it back on later.. I will keep it though. Ok I did remove it.. cleaning it up and it will get the satin black paint treatment. One thing missing .. is drain plugs. The holes were there.. but they’ve been fiber glassed over.. Need to deal with that.
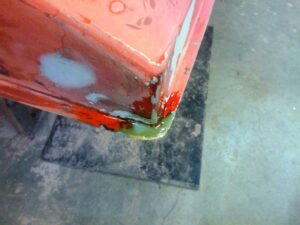
I’m taking the time to fiber glass the front corners to be like the rear ones… As seen in the photos.. This way I can wrap the edge guard completely around. I will be bonding the top & bottom when I’m done painting..
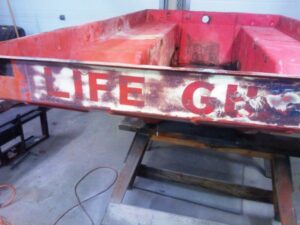
Funny what you find when you sand the spray paint off.. There’s three LIFE GUARD signs on the Bazoo… all painted over with BLUE ? paint.. on a orange Bazoo. ? WTF. Hmm what stories it could tell… Anyway all this body work is messy / dusty stuff.. so I want to get it done before I work on the frame and motor..
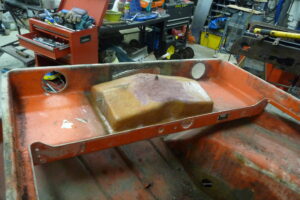
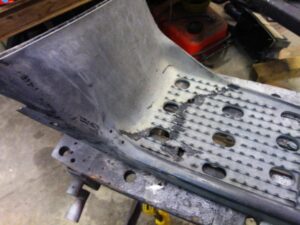
If you look at the photo back when I brought the clean tub back to the shop.. you will see that there is red primer all over the bottom.. And under a very messy layer of fiber glass was two metal plates. One is easy to see.. Presumably to protect the front of the bottom from damage. That would be OK.. but they are badly rusted.. and in a year or two would have dissolved into muck. On top of that they were leaking.. I found that out when I was washing the inside.. Mostly because not much of Buddies glassing job stuck ! I’m careful to sand & clean the surface before putting resin on.. Anyway they are removed and the holes filled and three coats of glass & resin go on the bottom. I have an idea for protecting the bottom from damage. It’s been a lot of work to fix up the bottom tub.. But if you do all this taking apart… don’t put it back together with things wrong.. I DON’T want any leaks. Nor do I want damage from rocks & stuff. So here’s what I have dreamed up for protecting the front of the Bazoo..
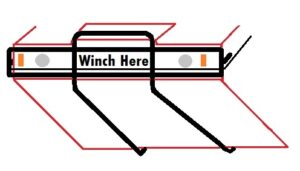
Yup.. I’m thinking this would serve best to protect the body of the Bazoo from unwanted bangs & scrapes.. I would make four strong attachment points while I’m glassing.. Build it out of square 3/4 ” tube. Attached to the bottom with metal skid plates… And … Once all the resin on the bottom is dry, I’ll do some more filling and then flip the tub back over and do a bit of reinforcing.. Got my supplies from the fiberglass shop.. including the Interlux paint. The bottom tub is all done ready for paint now. Time to start the top half.. not worried about leaks up there.. but I would like to have it cosmetically nice. Lots of work needed on the left front where Buddy fixed some damage.
Decal Time:
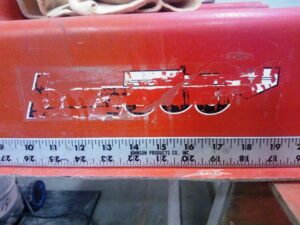
Nailed it !
It’s these little details that really make the restore. I’m having the decals made. Had to do this before I scraped it off.. Another weekend.. more time working on the Bazoo. It’s the top of the body that’s getting the love.
I’m continuing the body work stuff.. like I said I want to get the messy stuff out of the way and clean up after. Above you can see the motor cover is getting a few patches where there was holes.. and Buddy cut slots for the fuel line. Same for the front cover that goes under the seat.. With the body work finished., I cleaned the shop up.. Getting ready for PAINTING ! one of my favorite things to do..
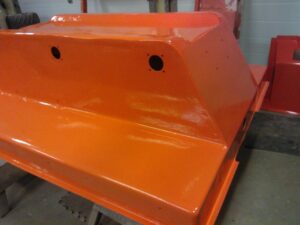
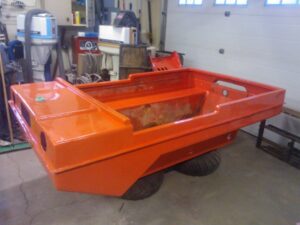
I cleaned up the two interior parts … And mixed my paint.. 1 Quart Fire Red + 1 Quart Yellow. and the color was a pale orange.. most likely because yellow has a touch of white in it.. but after brushing some one.. I liked it.
It’s not a vivid orange for sure.. but it’s easy on the eyes.. Interlux does not have a ready mixed orange.. so this is what I get. This is a polyurethane paint with a hard glossy finish. I used a good brush on these small pieces , but a foam roller will be used on the other big stuff.
I’m slightly ahead of my time…
Actually I’m trying to think ahead.. By gluing these pieces of pipe in there I can keep the wires tucked up out of sight. The long one across the rear is for the tail light wires. Yes there will be tail lights .. Yes they will be LEDs . I can’t help myself.. just got to pimp my ride.
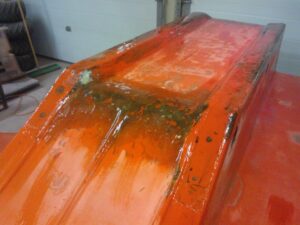
Rolled the first coat of orange on the tub tonight.. It will have overnight to cure good, then it gets a sanding and second coat.. The plan here is after the bottom is all painted then I’ll glue the top on. Then I’ll paint the inside. Last will be the top.
This Post is getting long… So I’m creating a second page
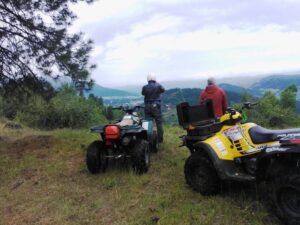
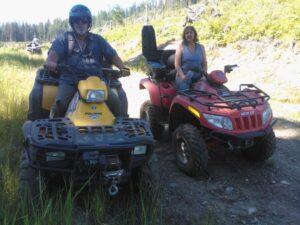
My sister invited me to join her for a Quad Adventure.. hosted by the Nelson Club. what the heck this is something I’ve never done before.. Kathy had two good quads , I used the 2004 Polaris 500 AWD. She had a newer Artic Cat , so away we go.. To the Bombi Pass on Hwy 3 .. Lots of logging roads and trails. And our leader / straw boss got a bit lost..and none of us had GPS.. or even a compass. What ! Live and learn.
Lot’s of Quads that day I think a dozen or so
He wanted to go to the power line .. we were heading the totally wrong way. .But it was fun.. and for a bunch of beginners we got a work out.. some very steep rocky trails.. and some just plain old logging roads. In the end it was all good DUSTY fun.. We just had to reverse back along the way we came..Good thing I’m good with directions.. The Polaris & I got a long just fine.. Even better when I remembered to take the parking brake off. I’m amazed at where this things can go.. It was a hot day too.. Here we are found some shade to wait for the others to catch up. The Quad I was ridding is the one she sold to my friend Dave.. It’s great. The red Artic Cat that Kathy is on she has sold as well.. So now I’m fixing up one of my own.. See Post.. Let the adventures begin.
Kathy & me .. This was the start of a love for quading for me.. The Polaris 500 that I’m riding has become Dave’s quad. He loves it.
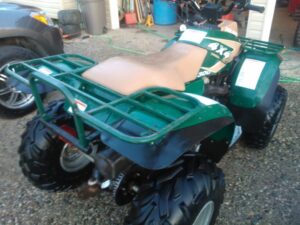
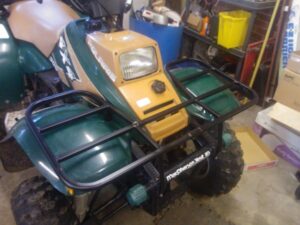
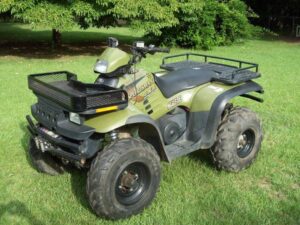
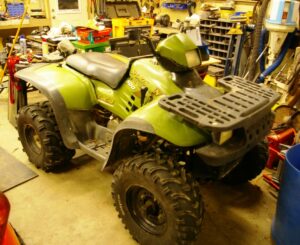
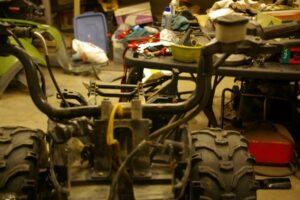
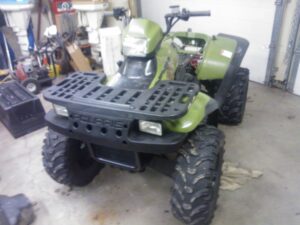
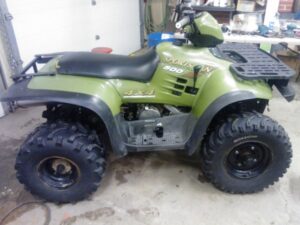
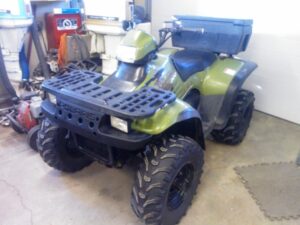
In my search for something to work on / putz with in the shop.. This Quad popped up and got Dave & I’s attention.. Cheap ! Beat up , dirty, not running good… and left outside .. PERFECT for me.. And more so because these are one of the best quads out there.. Not too big ..not too small.. go anywhere.. I know cause Dave has a 2004 version of this quad and I rode it for a whole day. .SEE POST . But mine is missing a few things, like the rear rack. And some of the body parts are broken.. but I’m good at fixing that sort of thing. Needs a new muffler too.. and as I get involved there could be more things. For now it’s getting stripped down and cleaned.
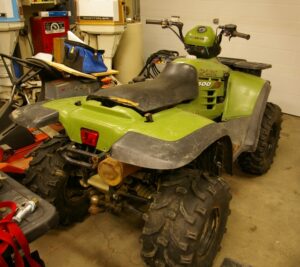
My Quad …the good side.
It’s green ! that’s ok Daves is yellow.
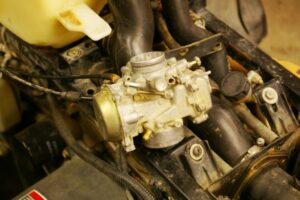
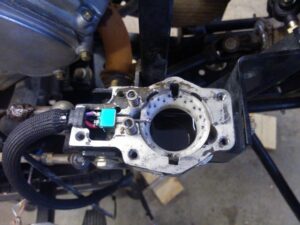
I’m waiting for a warm day to do the cleaning.. or maybe take the quad to the shop at work.. Anyway what you see in these two photos above is me placing the body parts on for a photo shoot.. and another one from the net.. To show what it would be like in nice shape..The one I have came all in pieces. and one interesting thing was the carb wrapped in a bag and hanging by the throttle & choke cables… Was told that the quad would run but barely .. and would stall out.. thought to be carb issue. And that was correct ! And it wasn’t just the spider making a cozy home in there.. nope the first thing I found was the choke spring not in it’s proper place. See the following photo..
With a hole in the diaphragm the throttle would not open all the way.. So I’m thinking once I get a new one the quad will run fine..Or there could be more..won’t know till I get the parts and try starting the motor.. In the mean time a bath is needed.
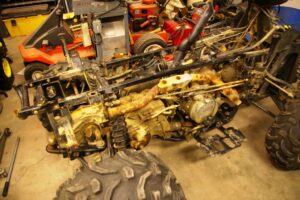
Ya I know.. they are suppose to get dirty.. but wash it when you get back from getting it dirty ! For me it’s way easier to work on.. and this poor quad has not seen a grease gun or an oil can for a while.. So take note of the photo above.. cause it WILL look different after the bath. One other thing that is of concern is bent stuff.. this quad had a rough life.. and the owner had replaced the front suspension …so it’s good to look at the frame carefully. First thing I noticed was the bent down handlebar.. a common thing but I will fix that. You can see in this photo below..
But which is bent ? Well it’s a little of both.. the bars are bent down on the right side, but there is also a slight “skew” to the right-top frame rail. not enough to be overly concerned about. If I’m able to pull it straight then great.. if not.. no worries.
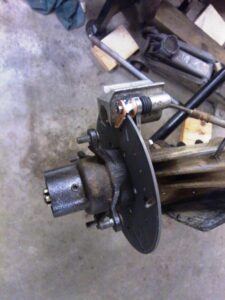
Now it’s had the much needed bath. And under the dirt you always find stuff.. Missing screws, missing front disc brake. Hmm. I would have discovered that when I pulled the wheels off anyway. Just another part needed. Last night I took the pull starter off and cleaned it up.. wound the rope in a bit.. and put it back on.. one more thing fixed.
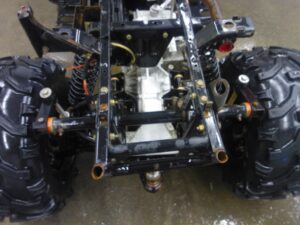
Today we tried in vane to pull on the upper frame.. just to tweak it a bit.. wouldn’t move.. So I’m thinking leave it alone. We also pulled the valve cover off to see if the cams are worn.. nope everything is fine.. I bought a motorcycle lift today and now the quad is up higher and easier to work on.. pulled the front wheels off and found … the right side had a brake disc.. but no pads left.. the left side is missing the disc but has wore out pads.. So there’s more stuff to buy. Then I moved on to the speedo cable .. and where it goes on the transmission. That part was seized.. so I took it apart and freed it up.. but I need a long square key to put it back on..
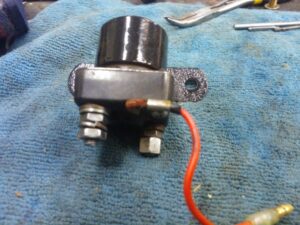
I’ve now ordered all the parts I need. and they are: new front brake pads, new front brake rotors, new carburetor diaphragm, new key for speedometer, new shifter switch. Then there is the stuff I will fix: the muffler, the plastic body parts, the speedometer, the rear rack. I have a few days before my Sister brings the parts. So I’m working on some of the small stuff.. I took the rusty but functioning starter solenoid off and cleaned it up and bench tested it for function.. Works fine, but I have a bare wire that will have to be covered.
I was also working on the Rear/ Drive train brake. Unlike the front bakes this one is all there and working good.. So I just pulled the caliper off and cleaned / lubricated stuff and made sure there was enough brake pads left. Oh and today I ordered LED lights to replace all the bulbs except the high beam light.
Rather then flipping between the different things.. And now that my parts are on the way.. I’ll list the fixes.. Starting with:
The Speedometer:
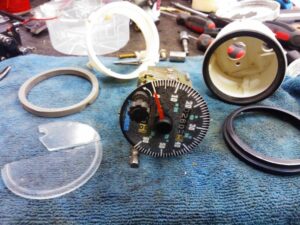
My poor sad speedometer.. I’ve taken it apart a week or so back and left it for dead.. Basically it has not been working for a while. And upon investigation… it was the right angle drive off of the transmission that was seized. And that twisted and sheared the square 2 inch long drive key. It is supposed to do that but then you fix it 🙂
This little baby with two 45 degree gears was the problem. Normally you would get a new one. NA I was so bold as to take it apart ( you can see where) and clean it and make it work . I may not have done the neatest job but It works again.. So once I get the new key (not able to fix that) then this goes back on the side of the transmission. The cable is good. .. but the speedometer had a broken glass..
Letting mother nature into the speedometer is never a good thing. You can see what’s left of the glass.. I CAN FIX. So I took it all apart too.. (I have no fear with this stuff) I clean and lubed it up and it works fine now. I made a new lens from some lexan I have . And …
I say “almost” because the black face is weathered. And it’s in miles ! what’s up with that ? Speaking of .. there is got to be more than the 2603 miles that shows in the ODO ., but I’m leaving that alone. Dave says set it to 0. I’ll just be happy to know how fast I can go before I get scared.
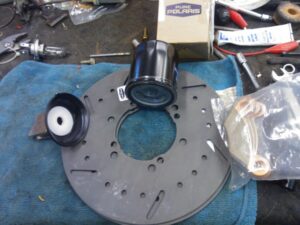
The Battery:
And the holder ..and the solenoid. I was contemplating removing or cutting the battery holder to fit the battery I have but I’m thinking it would be better to just buy the correct size battery.
I removed all the rust and gave it a paint job… new positive red wire too. Seams a little exposed for a hot lead.. I need a second rubber boot. I’ve still to go over all the electrical, but I have not found a problem yet other than the shifter switch and a few burnt out bulbs. Speaking of those.. one of the burnt out bulbs was the AWD light.. a tiny bulb , never seen anything like it.. So in my bag of tricks I found a blue LED tiny bulb that I soldered on to the old bulb holder.. and now the AWD lights up blue.. very cool.. I took the handlebar off and all the switches that mount on the bar.. and I’ve tested and cleaned all of them now.. The exception is the brake switch, I’ll need all the brakes installed to test that because there needs to be pressure on the brake lines. If that works there should be no electrical woes .. Hopefully.
The New Parts:
It’s Christmas.. and the parts arrived with my Sister.
Not shown here is the shifter switch .. I was antsy to see if it would work.. It’s a new design. Seems ok.. it fits and should do the job.
I’m a bit nervous putting the shifter back together. The service manual tells you to be careful because the switch needs to work ! but does not go in great detail. And this being an expensive part I do not want to damage it.. I can see now that it’s a more robust switch, it’s metal not plastic like the old one.. The shifter went back together without a hitch.. the switch works good too. Yessss.. Now I can finish the carb.. and work on the front hubs.. Today is Boxing Day.. I thought I would take the handle bar over to Peter’s shop and use a torch to take the slight bend out.. So I heated it up carefully and got it perfectly straight. I sanded the bar and gave it a new paint job. I also cleaned and polished the bar clamps and replaced the missing bolt. Done. When I was taking the grips off I noticed there were a bit ratty.. so some nice new ones … maybe heated would be good 🙂
Them’s The Brakes :
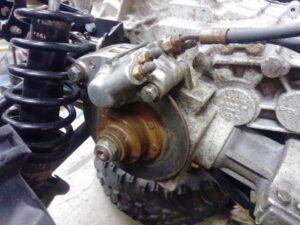
Now that I had all the parts I needed it was time to do the front wheel hubs and brakes. You need to pull the hubs off to replace the disc rotors. It’s a good thing to inspect the locking hubs for wear and broken parts.. Everything was in good order despite the fact that one hub hadn’t seen much oil for awhile. Your supposed to fill them 1/3 up with oil.. there was a bit in one side only. So they got some oil and put back together with new rotors.
So the brakes are like new.. and the brake light switch is working too.. There does not seem to be any air got into the lines. So them’s the brakes 🙂
Sunday Dec 29 th :
I thought I’d get a lot more done today.. but I ran into a snag or two. I did get the carb back in it’s proper place.. I now have the proper battery. And with those things I thought I’d be starting the motor.. But I wanted to have ALL the electrical in place and working..
The other evening I got the handle bars all fixed and painted .. installed with new grips. So today I figured I better get the pod back together.. witch meant fixing the broken mounting holes.. I used new metal to reinforce the plastic . Worked great. Even did a bit of plastic welding with the soldering iron.
I placed the top here so I could check out the lights . See the little red light in the middle. That’s my new brake light. It will tell you when ever you use the brakes.. but the idea is for you not to drive with the parking brake on… Something I did and not proud of. Will it be annoying.. ? I’m not sure yet. Anyway I got to testing all things electric.. and found that the starter would not work.. Wow whoda thunk.. I seriously could not get it to turn over. 🙁
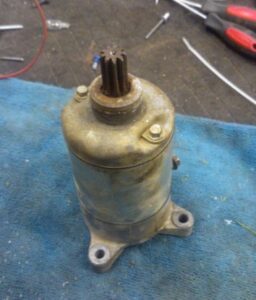
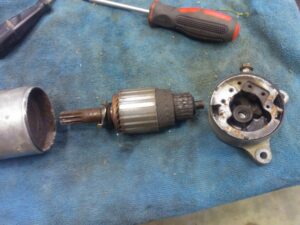
So out it came.. not to hard .. two bolts. When I did get the shaft to turn it make some BAAAD noises. I printed the instructions for taking it apart, and got to it..
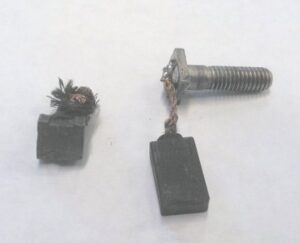
Boy was it dirty, no lube , and one of the brushes was welded to the armature.. None of which was good, but explains why it was a no-go. So Clean-Clean.. lube-lube and back together. And it works. Yay.. :)…. Until I put it back into the motor.. it cranked the motor over about six times and click.. nothing. Took it back out and apart.. The brushes are too short.. or wore out too much.. need new ones if I’m going to have electric start. So I’ll move along to something else:
Bonus !
Dave Had a motor brush that worked ! With a little modification and some solder I repaired the brush.. and the starter now works great.. all the time every time..
You can see the difference in length in the photo above.
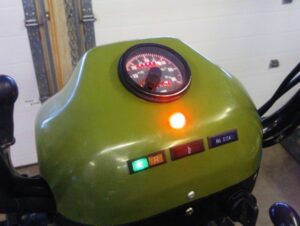
I also got the pod all together and as you can see all the lights work, red speedo light , and the bright red one is the brake light.. coming along nicely. 🙂
The high beam light got a new H4 bulb, and a polish to take the yellow and scratches away. It’s mounted properly now and you can adjust the angle.. It always should be that way..
Where are we at :
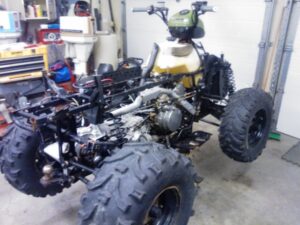
Time to take stock: I’ve yet to start and run / test the motor.. But as of tonight I could, it’s mechanically all together, but there is no muffler yet. Here’s what I do know.. The starter and all electrical is working. The brakes are excellent. The wheels go round & round.. Ok that’s silly. Maybe it’s easier to say what I know needs work. The left hub did not engage when I tested the AWD .. That side had a bent disc that I straightened, it’s also got a bad rear oil seal.. so that’s work to do. Strangely the tail light won’t work ?? it worked before ? not a big deal but it bugs me. The Unknown: How well does the motor run ? Does the belt drive do it’s thing ? Does the charging system work ? Will the wheels fall off.. That’s silly again. Seriously though I’ve done a lot of hours of work.. and spent some cash here .. so crossing my fingers.
We have a running motor !
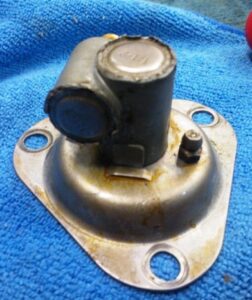
Took most of the day to fart around with checking for fuel..and trying to mickey rig a muffler.. but it started and it ran good enough for a boot down the street and back.. but the muffler is to restrictive and the motor runs like crap with that. The good news is it RUNS, The Drive line works good too.. and things like the fuel pump are working good.. But I need a proper muffler.
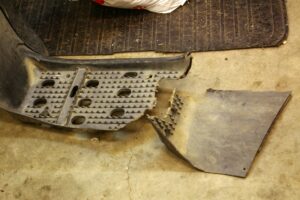
Welding Plastic 101 :
Well I’ve heard of it being done.. but never tried it till today.. I have a flat tip for the soldering gun.. that’s just the ticket.
One of the foot rests for the quad was broken right in half. not anymore !
Exhaust & Muffler :
Breath in … Breath out. Instead of spending hours TRYING to build my own muffler I found an “off the shelf” one at Lordco that is perfect.. and cheap.
This seams to be working fine.. the mounts are a bit of a compromise, but I’m thinking the muffler will do the job at a fraction of the cost of the Polaris one. Once we get the motor running better we’ll see.
Dave’s coming over and we are going to check the gap on the valve cams.. Very important that they work good. But what I found today while removing the fuel tank .. may be the problem with the motor performance, or a good part of it.. I noticed that when I pulled the fuel line off the shut off valve .. I saw the fuel just dribbling out of the fuel line.. even though there was lots in the tank. So I replaced the two fuel lines coming from the fuel tank.. better flow.. While setting the valve clearance the starter calved again.. I’m buying a new jobber one it’s not expensive.. so why fart around with the old one. Also seemed the carb was not working good .. pulled it off and apart to check the float setting and found the jet seat loose in the float bowl.. All these fixes should mean a running motor when I get the new starter.. So no more work on quad till new starter comes.
Wee Haa !
Yup Got the starter installed and Dave & I fired up the Quad … runs great, idles nice .. so we put the air box back together and the seat on and went for a boot… Even better with all the stuff properly together.. Much quieter .. Gobs of power… and go.. Speedo works ! It was dark so I did not video that.. maybe on the weekend. A few tweaks are still needed.. and the left hub needs it’s parts to function properly.. will get this stuff done on the weekend. So I also need to build a new rear rack and put the body back on. Oh and the problem with the tail light was a bad bulb.. Ha.
More Tweaking:
I got the parts to fix the Left hub.. and after getting that done Dave was anxious to test that the 4×4 was working.. The Polaris fired up without choke in seconds.. It’s running great. So here’s the Video..
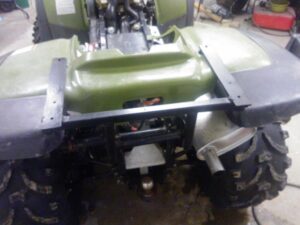
Short little clip, but shows the 4×4 working in the snow. I’ve got all the front body and rack on today.. after the bit of fun… I went cruising all over the back yard. We set to work on a rear rack..
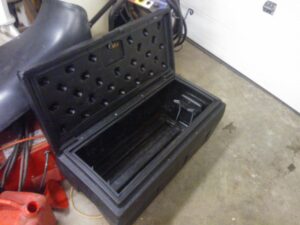
This is what we came up with.. it’s only to mount the box that I have for the rear..
This box will be at home on the back of the quad.. It’s roomy , weather proof.. and will hold plenty of stuff. I decided to work into the evening.. and see what I could finish.
If the LED’s ever show up and go in we are done.. Up for sale now.. we’ll see what happens.
Lots of action on the sale.. someone came and took it for a ride.. really liked it. Others want to trade everything and anything for the quad.. Guys like quads ! ??