Author Archives: robsworkshop

31 ft Challenger Fifth wheel

Aug 21 2015

Love at First Sight …

Was dropping a driver off while fetching cars in Kelowna.. and I couldn’t resist checking out the trailers on the small lot.  And there was a really nice fifth wheel that caught my eye..   As soon as I stepped inside I was in love..  And in love with the price too.   So I took some photos , ( one above included)   And when I got home showed them to Mo.   She too was impressed..   Not new.. nope.. 1997 in fact..  but one owner.. and they took good care of this unit and it showed.

When you see it you would think it was much newer..   So we decided to go for it.. We had the cash.. and the price was low..  So Dave & I headed for Kelowna and had a closer look..  everything worked as it should..   This RV ticks all the boxes for me , Aluminum framing.. truss roof..  large storage..  bigger fridge.  good quality throughout..  Built by Damon Corp..  who builds coaches..

With a flat floor, and hide a bed,  Real nice Table too !

With lots of cupboards.. even a pantry

Not a RV queen..  bigger..  with an opening window at the head.  This room has a BIG closet too.

We used this trailer a few years. I had the truck to pull it and we enjoyed the space.

Bought a 3rd Terra Jet

March 2015

This is also a 453E  like my second one..


But unlike the second one .. this one has the body.  And the tub is original except for the missing bottom !   Yes someone cut the bottom off intending to replace it and ..never got far.   No biggy that’s half the work done.

All the parts & pieces are in bins.. ALL  taken apart..  Again that’s half the job done !  Win Win..  So what’s missing:

  • The motor.   However I got with it a 20 hp Honda.. Yessss
  • The Clutch..   which was most likely still on the motor.
  • The seat cushion..   But I got the frame !

Now… more importantly I got some things that I did not have !  Even though the 453e I got last fall has most parts, it’s was missing :

  • The Body !  and the motor hood
  • The fuel tank
  • the seat frame
  • The cover for the chain.

I was pretty stoked to see a fuel tank.. then not so much cause it’s cracked..

Fixable ?  I’ll try.  If nothing else it’s a good template to make a steel one.   The body like everything else needs repair..   I thought I was just buying some spare parts.. but I’m thinking this is a repairable Terra Jet..

All the terra jets are stored for the time being..  future projects when the mood strikes me.

Sept 2019…   This is the one that I chose to restore..  even though the bottom of the tub was missing I would replace it anyway.


1968 Jiger 6×6

Feb 2015

Once again I could not resist a deal on something weird..  or cute.. or Yellow.  no wait my favorite color is blue.   Oh whatever it’s still cute..  it’s still got gears and chains and a motor.  I love it..  Don’t need any more projects..  This one runs.. not great but it runs.  Drove it into the back of my truck..  That beats winching or pushing  it into the truck !

Shorter yes… But it’s wider than 4 ft.. cause two wheels had to go over one wheel well.

  So welcome my little yellow friend to the place where old things get made new again… When I have time ..

Fact:  jigers where the first AATV’s made.  Fact:  made in Canada EH.  It is believed that these were the reason Argo’s were made..  And Argo’s are the longest production AATV.

This little yellow guy is the last of it’s kind..  speaking of production that is.  1968.. last year for the jiger..  It’s just a tad longer than the first Jigers. (can’t imagine it shorter).. and it has a hydrostatic drive.   I’m a fan of hydrostatic stuff..   However..  this one I may not like..  as much..  Being old hydro units.. they are not as “refined” as the newer stuff..  They seam a bit “jerky”  Now this could be something else like the chains driping with oil .. yup ..  Skippity Do Da..  Or maybe the sprockets are worn..  Skippity Do Da..  Or when you break a linkage to one of the hydro units.. and are trying to drive with power to one side only..  and that side want’s the other side to help too…  Well maybe..  I guess I’ll know when I fix that.  YES I drove it about  50 ft from the truck when I noticed that the right lever was not doing anything…  Kinda drove in a big sweeping curve..  So Here’s what we have :

  • Newer 12 hp 2 cycle single motor , runs good , pull start only 🙁
  • Re Engineered ???  levers, with a twist throttle.
  • Wheels adapted to 5 bolt 8″ trailer wheels…  Yes Good
  • Good fiberglass body.. No repairs needed.  could use paint.
  • Missing seat ?   not hard to make one..
  • Key switch not hooked up.. ? I’m good with electrical.

Plus there is a few details that I could look after..   It’s one of those things you fix and use or really get into..  yes… restoring…  or maybe improving !   It will never be original again..  the T-handle control is gone.   I like the new lever set up that is there..  with a few improvements it may be great little runner..   OR maybe this is the one that gets the “Toro Treatment”  And by that I mean taking the drive system from this ……

This is a diagram right out of the service manual.. and this is one side of the drive chains..   I see 4 sets of chains.. each side..  I also see one of those sets is unnecessary.  But only from my point of view.  Extra chains means extra points of failure.  I think this can be done with 3 chains and 2 less sprockets..  But it is what it is ..  and unless I’m totally changing the drive system it will stay like it is.

Update:  Feb 2016..

The jigger sat broken under a tarp for most of last year..  just too much going on..  when the chance to trade it for a broken Yamaha quad came.. I did just that..   It went back to the guy who owned it several years back..   He knows how to fix it.. In his place is a good thing.

Movin on…

1994 Chevy 2500 4×4

Feb 2015

I’m at it again…  changing vehicles.  After watching all the new ones on the lot.. come and go.. and driving the Dodge for six months.. It was nice to drive… yes..  But I’m seeing a lot of problems with all the gadgets in the new vehicles.   I’m seeing too much crap..  TPS sensors..  back-up warning sensors..  All very exspensive to fix when it starts screwing up… I’m going back to simple..  I bought this truck back in January… it was a good trade.. looked after well.. and I got it cheap.   So I just took it home.. parked it while I thought about what to do.. WELL  I’m keeping it..I’m fixing it up… and I’m going to use it !   Here’s the details about the truck:

  • 1994 Chevrolet Silverado 2500 4×4
  • Regular Cab Long box.  Seats 3
  • 350 V-8 with 4 speed auto , 4:10 gears
  • 213, 000 kms.  New Transmision
  • Features:  power windows, power locks, siding rear window, AC, Cruise, chrome bumpers & grill, box liner. towing setup.
I love to pimp out my ride !

And everything listed above is a good place to start. I’ll be adding :

  • Keyless remote locking
  • New multi media stereo with touch screen.
  • Back up camera.
  • Gull wing tool box.
  • Reworking the rack to include side rails and a removable rear rack for the kayaks.
  • Installing the fifth wheel hitch.

New pull out towing mirrors.I know what your thinking… Rob your adding all those things that you said would break !  No.. not all..  and what I’m adding will be better quality.. and independent systems..  New vehicles have computers that run all those gadgets..  And to replace some of those things… the back up camera on the Dodge costs more than $300 to replace.. The very nice one I bought was $24.  The new stereo I’m getting is a Kenwood  for $250.  The remote locking system was $26.  The truck already has the power locks.. I’m just installing a box with an antenna  that will flash the lights and it has a little security light.

Here’s the lock system…  I have bought and installed these before..  they work good..   And these fobs are better than others I’ve seen.

And Here’s the Camera that I’ve chosen.. Color / night vision..   The housing is all metal not plastic..  and on the screen are the lines that help with the distances..   Only the price is cheap.   And !  factory back up cameras are just that.. they only work when you are in reverse..  Very annoying when you are maneuvering to hook up a trailer,  and that is what I want the camera for..  Therefore I will be having a switch on the dash to turn on the camera when I want it.

Processed By eBay with ImageMagick, z1.1.0. ||B2

These are the mirrors that should be arriving any day.  Not power..  They fold away, and you just pull them out for towing…  Perfect !

It was a slow day at work so I brought the truck in for an interior wipe down.  And I took a few photos.

These photos are of the way I got the Chev..basically untouched.    That wood box has got to go..  And that mesh screen too.  I doubt I’ll be carrying things that would break the window..   I would rather have a good view.

All I’ve done is wipe it down a bit.. the carpet and seat need a good cleaning.. But that’s all.  As you can see it’s in great shape. And my favorite color for a “easy on the eye” interior…  Brown. 🙂

The only piece I found broken is the cover for the fuses. It’s missing a tab.  I can fix that.  or find one at the wreckers.

What no drink holder in the pocket !   you’re lucky to get any for this year..  but there is two (pull out ) on the dash,  so no worries.  Even though it looks great there is so much fixing up I could do to this truck..  The tailgate has a little bend in it..  The passenger side window is pitted from what looks like grinding too close.   The lights could use a polish..

And these fender skirts could use new paint..  Satin Black  of coarse.  And I would give the rims a fresh coat of paint too.  All this will be done in time.. But first it’s getting the mechanical stuff dealt with.  And once I’ve collected all my goodies I’ll set to work one day “Pimp’n”

The truck had it’s service and check up..  No problems !   Wow.  I thought for sure there would be something needed..  The steering is just me expecting it to be as nice as a new truck..  And the loud exhaust is just that … a loud after market muffler..  combined with the holes in the fire wall letting all the noise under the hood into the cab..  and Yeah.  It’s noisy.   I can fix quite a bit by sealing up those holes and adding some sound deadening in key places.

The mirrors came today and I had time to install them too.  A perfect fit and not too to hard to do..  These will be sooooo nice when towing a trailer. Remember they are manual adjust.. and you pull them out for towing… so cool and simple.  These same mirrors ( but power of coarse) are found on newer heavy duty trucks.     I’ve also picked up the new Kenwood stereo while in Kelowna ..  and I bench tested it last night.. Also  Perfect.  Just what I want.  But I’m not going to like it with the crappy factory speakers..  So I’m searching for some nice replacement ones..  I also got a smokin deal on a tool box for the back..$25.  Yup.

I’m a dummy … I sold the truck before doing anything else.

Terra Jet Page 6 ( The Re-Assembly continued )

March 2015

It’s the beginning of March and it feels like spring out there..  But I carry on with getting the jet together..

I did get the tires off the rims.. and I did order new tires..  but about these rims.. the two on the left are real Terra Jet rims..  12×12 with a 8″ off set.  The other two are different..  I’m thinking that this Jet being the first production model they hadn’t figured a few things out yet.  Like the length of the rear axle.  Let’s just say these rims compensate for that nicely.

It’s very hard to source the proper tires that are used on the Terra Jet.. these come as close as I can..  and they are a good price.   Should arrive in a week.  Also waiting on more chain..  I used all ten feet on the front drive.

The new drives chains are on and we made a new idler sprocket for adjustable tension.  There is new nylon in the bottom of the chain trough too. So many parts & pieces were missing from this Jet..  Having to make a lot of things from scratch…  But that is also a chance to do it better .

Mid March:

And this weekend I went and got another Terra Jet all in pieces..   So here’s the Post for that..  HERE

I think it’s more than just pieces, I’m thinking a third Terra Jet.. could be had… the important stuff is there … I may just take two of the rims & tires..  and the best two tires I have from the 400E and keep the new ones for one of the other Jets..

Got the tires all mounted on the nicely painted rims..  Tubes in the tires will keep them good..  And I put the wheels back on and pushed the Chassis out the door for a photo.

YES..  getting closer to that drive..   That’s the proper Terra Jet fuel tank in the front.. needs a repair..  but that’s where it goes.

Getting closer.. If I wasn’t so lazy.. and took less breaks.. I might just have finished the jet today..  but it still needs wiring and the brake caliper installed.

Unfortunately this is as far as I got before the yard work was calling. It’s full on spring now and lots to do..  So I moved the Jet out of the shop and tucked it away.   Fully intending to get back to it in the fall.

Feb 2016…. Update:

In the fall I agreed to sell the Jet to a friend in it’s un finished condition.  To be picked up this spring..  So it was left under cover for the winter..  I had a look and it’s all good.. tires are still up and only a little surface rust on the bare steel bits.   So very soon it’s off to it’s new home..  Kinda sad I did not finish..  But I have a newer Jet that I can work on next winter.  So off it went…..With an old golf card for company.


Terra Jet Page 5 ( The Re-Assembly )

Feb 2015

We are almost finished restoring all the bits & pieces..  But enough to start putting things back together..

Back together again..  The newly painted frame goes back into the (painted a month ago) tub.   First is to get the axles , bearings and housings bolted back together.

The rear axle is in and sealed..  this is the drive gear side… Interestingly it’s adjustable for chain slack.  For the very short chain from the jack shaft.  This Terra Jet has three chains.. Something not found on 1973 and up models.. which only have one chain running between the front and rear axles.

This is the other side..  New bearings & seals.  The front is next.  Plus stuff like the jack shaft.

Meanwhile back to the steering:

Can’t assemble the front axles with first fixing the steering.  As talked about on page 4.   I saw a friend with a metal lathe today and made 4 new collette’s.

Here is one sitting where it goes on the steering tube.  Once the bolt is adjusted correctly the allen bolt will lock it in place… SLICK.   There will be a hole made and the collette will be welded in place.

Here above you can see the newly welded in place colletes.   Big gobs of weld.. Have to be strong.  Now isn’t that better than nuts welded on.   Time to clean up the mess and paint them..

Today we got the front hubs back on.. and the new steering bushings work great..

We also straightened out the rear  wheel hubs..  they bent a bit when we were using the puller to get them off the axle..  All better now.. I will be installing new wheel studs.   Imagine… have all the nuts on each wheel… so many things I’ve brought home have missing wheel studs or nuts..  Not happening..

Oh Oh…  I noticed a problem..  The front sprocket is not in proper alignment.


If you look at the above photo.. you can see a bit of the front sprocket hiding in there..  and you can see that it’s too far to the right.. That means the chain will hit the welded nuts.   Oh darn !  The only way to properly fix this is to remove the front axle.   I assumed that this sprocket was in it’s proper place.  Not so.. And this may explain why there was no chain on the front drive.  It most likely broke.   So we had to take apart the front again..  Sigh.

Of approximately 3/8″ .. See that distance up to where the E-clip goes..  ya..  that’s a lot.   Tried to hammer the sprocket into place.. nope.  So off to the press and we pressed it off the axle.  Out comes the emery cloth.. and cleaned  everything good .

And I don’t want this to happen again.. so I drilled and tapped for a set screw.

Just need to slide the sprocket up to the E-clip.. and lock it  now.. and Then.. back together.

March 3 2015:

We got all the front axle back together ..and the steering too.

No play in the steering.. solid as can be..  It’s true rack & pinion steering..

Lots of grease on the parts..  Even did an EYE BALL alinement.   And we got the threads fixed on the rear axle and the hubs …with their new wheel studs are on..

Wee ha.. got a rolling chassis now..  if I put the wheels on…  They need the paint first..  … And this post is getting long.. time for

Page 6…  continue the re-assembly:


Terra Jet Page 4 ( the Frame Part 2)

Jan 19 2015:

Onward like we know what we are doing…

Today we did a compression test on the cylinders.  The results were good..  110 psi in both.  not the best but good.   We decided to fire up the motor again and see how well it would run with a gas tank.  I had the GoPro ready but pushed the wrong button..  so once again no video.   🙁   We ran it for a good minute and had to stop the gas flow to shut it down…  Then tried to start it again… nope. It’s flooding very easy.   Once the carb kit is in and the carb adjusted good that should not be a problem.   So I went back to reassembling the drive line and hooking the controls up.

Here’s the Transmission all done and secondary  drive, disc brake too.   I need a castle nut for the brake adjustment, but everything works good..

It bothered Dave that we could not re-start the motor…  So he wanted another try.   With this run the transmission is installed.

Here’s the promised video..  I think the belt is just a tad too wide..  it can stall the motor when you apply the brake.  Otherwise everything is working great.. as it’s supposed too.

Work has been slow as I think about the cables and try to find some ambition.

Got it..  Just a bit more welding and I’ll paint the frame..

I’ve also been working on the front hubs..  just to do something else.  They are all done now.  Cleaned re-greased and painted.

These are three times bigger and heavier that most Quads..  In fact these could work on a farm tractor..  The U-joints are the same as on my rear PTO on the tractor..  I can see how one could install locking hubs too.  Something to think about for the Jet I’m keeping.

Meanwhile back at the FRAME:

I’ve welded more seat support , a battery holder and new nuts inside the rear axle case.   Now it’s paint time.

Here’s the underside with a coat of Por15.  It’s a very hard frame paint for cars.  Not sure if this is better that good ole rust  paint..  After all the Terra Jet frame is protected inside the tub..  But water may be there too.. so. We’ll see.    Everything I do to this Jet is a test to see what will work the best..

All done now… And I’m reserving judgment till it’s cured.

I was in a painting mood.. so I got some of the other bits painted too.  And I turned some attention to the front steering.

Axle Tubes ?  Don’t know what to call them, and when you look in the Terra Jet parts catalog… they don’t either.  Suffice to say they hold the bearings and are an outside extension of the frame.  The steering pivots on these..   So yes they are very important.  The one on the left has one of the original collette’s still in place..  The rest are 1/2 ” nuts welded on !  What a mess.  No good…  I want to make new collette’s and have set screws to lock the bolts instead of someones holes with bent nails through them..  GEEZ.   These pivots need to be strong with a good surface area.  Think of the forces on here..   Continued on page 5

Terra Jet Page 5…  The Re-Assembly


Terra Jet Page 3 (the Frame)

Jan 1  2015:

New years resolution…  to finish the Terra Jet..  for now..

The frame is a very important part of the Terra Jet puzzle.  Everything but the steering linkage is on the frame.  With a bit of welding you could add that too.  Then you could go cruising around no problem..  The tub is basically just the bottom of the body.. and the “boat” part too.  It’s a very cool design overall, and has stood the test of time.  I will be experimenting with a few “improvements” of my own, such as better pedals, linkage and a center floor board.

Here’s the frame up on jack stands ..with the steering wheel attached.  I’m testing the seating position.  Turns out a bench seat straight across will work best.  I was concerned that the steering wheel would be too far away for comfort.  And was considering a middle seat that was forward more.  Not necessary.

Also the pedals… these are just wrong!  However right foot braking will be necessary due to the narrowness of that part of the tub.  So a pedal on each side of the steering shaft.  But a better design, and just a bit closer to the seat.  The steel plate is just there to rest my heels on.  Plans do include a floor across this part of the frame.

Also turns out this is a good place for the shifter.  So I need to keep it here and I want to have the choke and key switch in this location too. Now it’s time to remove the unwanted stuff and weld on new stuff.

Control Freak:

I spent hours looking through my scrap metal and thinking about how to rig a better pedal set up.  I wanted them to be comfortable and the brake pedal to have good leverage.  I wanted the throttle pedal to be adjustable.  And both to have the leavers go down between the frame tubes.  I believe I have done all that!

looks a bit complicated..  If you took away the steering shaft maybe not so.  Yes ! I used an old brake pedal from a lawn tractor.  Upside down from the way it would be on the tractor..

View from the other side.. you can see the adjustments I have for the throttle pedal to make it comfortable.  The sheet of metal you see represents the floor and where it will come too.   So that should be fine..  But they have to hook up to the things they control.   So I figured I better mount the motor and the transmission and get all the linkages proper.  May have to weld more bits & pieces to the frame.   It’s looking like a cable would be better for the throttle.

The 340 CC motor.

Well here it is in place on the frame..  seams like a good place to work on it.  The Carb is off and the covers too.  The pull start and fan cover are missing.   I’m planning on making new ones..  because finding those would be hard.

This is a snowmobile motor !  Air cooled ,  high RPM , but very simple.  I hope the carb works good.  Before we get carried away though we need a few tests on the motor like we did with the BAZOO.   There needs to be good compression in both cylinders for the motor to run proper..  So that’s the first thing to check.   And spark !  won’t run without spark.

Here’s the Tillotson carb ready for a bath and inspection.   It was amazingly clean.  And the motor too…  I’m thinking it wasn’t very long ago that this ran.   Optimism builds.

Attached to the motor is of coarse the clutch..  this is an interesting one.  When I pulled the cover off I see there is these four plastic / weighted thingys..  I forget what they are called..  When the motor speeds up the weighted “Things”  push the two halves together engaging the belt.   Typical snowmobile stuff.   But usually they are metal rollers..  Hmmm.  This is very rusty and in need of lubrication..  Badly.  So I hope it will work.  I cleaned it the best I could and greased up the sliders.  Put it back together.

Jan 12 th :

Dave came over today so we could run the motor..   We could not get it to run for more than a minute… just whatever gas was in the carb.  But it fired right up…  so Thinking if we had a gas tank and proper adjustment of the carb.. away it would go..  I forgot to get a video to prove it.. so take my word.   But we now know that the motor will run..  I also found a throttle cable in my bike parts.  So that’s one of the next things to do.

The Transmission :

Same transmission as the Bazoo..  So I’m very familiar with this..   And like the Bazoo it works fine..  But the silicone job joining the two halves is poor and leaking.   So once Dave helped me get the secondary clutch disc off the shaft I was able to do a clean and Re & Re on it..

Is that clean or what..  I took my big sander to the two halves and flattened the surfaces good..  With better gasket stuff should be no more leaks.  Also the end of the change lever that rides in a grove was warn a bit so I built it back up with the welder and got a better fit.  These transmissions are tough..   This one is very old but works like new.

Ta Da…  Ready for installing..  after I put the secondary drive back.

Long Enough…. Continued on Page 4

Terra Jet 400E Page 2 (The Tub)

November 30 2014:

Cleaning & Repairing…

Today I took the frame and axles to the wash bay and degreased them..  nice and clean now..  makes it a bit easier to finish taking them apart.  Did not clean the tub..because  I’ve decided to replace most of the bottom of the tub. Front and back too..  Just too many holes and thin beat-up metal..   So I’ve ordered a 4×8 sheet of 16 gauge steel.  this is a bit thicker than the factory 18 Gauge of the tub..  I used this same steel to make a hood for the Kubota F2400 mower that I restored.  Got to bend it with a torch because it’s too thick to use the bender.  But it will be easier to weld than the 18 gauge.

Holes like this will be gone..  the 16 gauge will take more beating on the bottom than the thinner stuff.

Here it is.. nice and new , no rust..  I use the jig saw with a fine tooth metal blade..  makes a nice cut.

Well it’s more of a bump.. and it hangs down under the body, one front one rear..   This is where the chain sprockets live.. and this is the rear one and it’s in good shape so I’ll save it.  The front one needs a rebuild… is full of holes.

This is the rear of the bottom.. and under the striker is the place to cut out for the rear bump.  We have also bent a 1″ lip to the correct angle for the rear piece to weld to.

Now you can see what I’m up to… and how much of the bottom I’m replacing.  Lots !  I need to weld as much as I can then flip the tub over and cut out the “unneeded ” old  metal.   That will take some patience..  I did not want to remove much of the old bottom so as to keep the form & dimensions.    When the tub sits flat on the floor “like in the photo” the shape will be intact too.  From the factory the tub was in just two pieces, and a press was used to put those bumps in for the chain runs..  And other bends too..  Can’t work that way ..so we’ll now have three pieces, and my front bump out will be welded.

The Bottom is 90 % welded in place now .. And I’ve cut away what was left of the rear..

As tough as these Jet’s are.. this is one weakness. 18 gauge steel is just too thin.  16 gauge is not very much heavier, but I feel it will take more beating before failing.   Another weakness is those aluminum bearing hubs..  We actually got the one out of the front left housing  INTACT. !  Wow. Here’s the new panel for the rear of the Jet.. all welded up.. just needs grinding.

Here’s one ..the rear one .. of the axles holes for the tub.  The hole is six inches round so you can get the chain sprockets inside. Then a cover plate goes on with the bearing holders.   If you look back you will see that these only on the chain side  are bent & beat up..  Welding new pieces with smooth new metal will make the seal work better.

And speaking of seals & bearings…  Above you see I have only two good holders..  Both the rear axle holders were cracked.  I would like to replace these with machined steel holders and four new bearings and new seals too.  It just don’t make sense to have heavy 1-1/4 ” axles… nice big bearings and put it all in a wimpy aluminum holder.  ?

Dec 15 th 2014:

Meanwhile back at the Tub….  I put the frame back into the tub so I could line up the new mounting plates.  Then I removed the frame and flipped the tub back on it’s side.

Here’s the rear one all welded.  I’m not the best welder. it’s a bit messy.. but  the whole tub will have a thick coat of black paint… And most of where I welded would not be seen unless you look under the Jet.

A bit of fancy bending needed here… and some trimming too.   This part of the tub gets sandwiched between the inner frame and the hubs that hold the bearings..  I will make thin rubber gaskets instead of just using silicone.  Also today I went to the auto parts store with my one good bearing.. and they had the perfect match.. So I bought three more.  They did not have a seal that matched .. sigh.  So I’ll be looking for those. Got the front all welded now.

Getting closer to finishing the tub..  just a bit more welding and a lot of grinding.. and cleaning.  I’m considering using truck box liner paint.. it’s thick and tough.  So Here’s a Video of where I’m at  with the tub and stuff..  Got a GoPro for Xmas..

It’s a so so Video..  My first attempt..  I’ll do better.

December 27 2014:

Christmas is over and I have more time to get back at the Terra Jet.   I got all the welding finished now ..  No holes that I can see.   Everything is all cleaned up..  and today I ran urethane caulking around the inside of the tub..  And I gave the tub a coat of grey paint.

Grey !  I thought that I would try something different that the back.   And I had a can left over from another project.   Keep in mind that this Terra Jet is my learning one..  When I get to fixing up the second Jet I’ll know what works..and what I like.

Like this … Box liner coating for trucks..  It’s a two part epoxy thick coating.. much like tar..but hard.  and very durable.   I’m hoping the this is the ultimate coating for the bottom of the tub..  When they do truck boxes with this stuff and seal all the cracks.. the box holds water..  for months !  so if the opposite is true ..than this tub with never leak  through my crappy welds.

However if your wanting a smooth surface this is not the stuff.

And with these photos the tub is 100 % done…. now to start the frame on a new page…

PAGE 3 ( the frame).


Terra Jet 400E UATV Page 1

Nov 24 2014

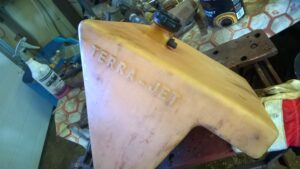
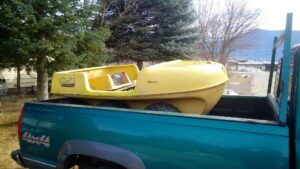
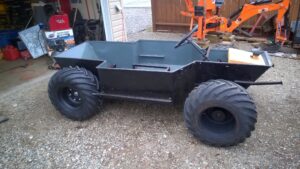
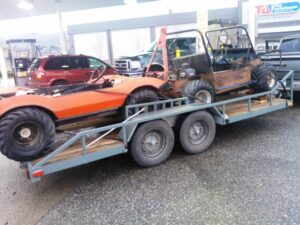
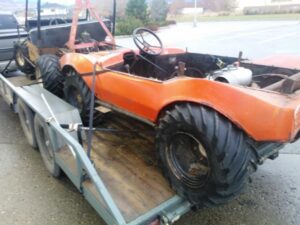
This POST will be for one of the two Terra Jets I have for restoring this winter…  There will be a separate post for the other once I start it.  The 400E (in the shop now) looks like a Corvette with monster mudder tires.  This is the start of a love for these rare amphibians.

Yes they are different !

All About A Terra Jet:

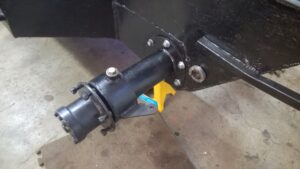
What we have here is a power train similar to the Bazoo that I restored last winter.  A 2 cycle snowmobile motor and belt drive / clutch.  A simple transmission with just forward , neutral and reverse.  The difference is:  Far less chains,   a steering wheel instead of leavers,   Four wheels not six.  Like the Bazoo there is no suspension to cushion the ride..  just the soft tires and hopefully a soft seat.   Controls are a gas and a brake pedal very much like a little car .  Ahh but a 4×4 car.. all four wheels are driven..  full time.  Very simple straight through axles..  I would imagine that turning would not be tight with the two rear wheels trying to push you straight.  But you would have tractor like traction..   AND you also have an AMPHICAR  that floats and the wheels paddle it through the water.  How cool is that !  Well its’ so cool, and the design is so good that 44 years later they are still making these..  Yup you can buy a new one.

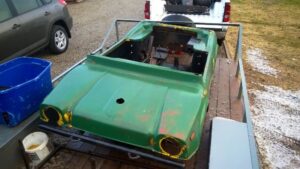
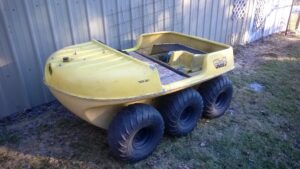
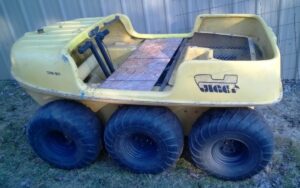
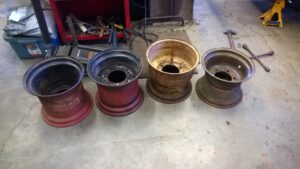
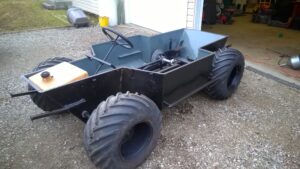
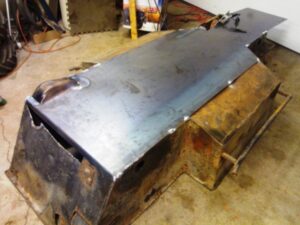
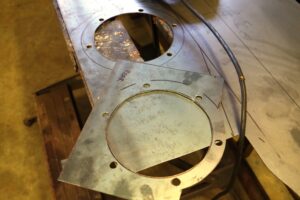
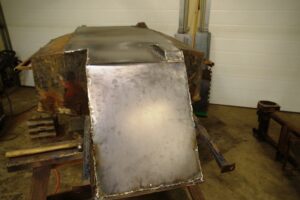
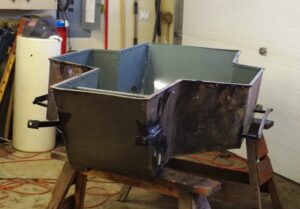
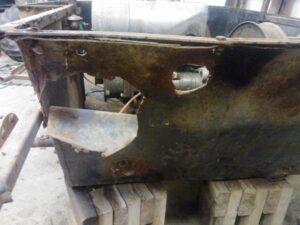
When it comes to taking things apart I do not wast too much time .  But I wish I’d stopped long enough to take more “before” photos.  Hopefully one can glean a picture of the sad little Terra Jet from this shot above.   SOOOO   Got the wheels off and the body off.. The body get’s set aside for later.  Once I do work on the body You’ll get a better idea of the roughness of that.  The wheels will come off the rims so the rims get cleaned and painted.    But first I need to start with the tub and inner frame.

Things to deal with:

As I dismantle the Terra Jet I’m going to find the stuff that needs attention. Here they are:

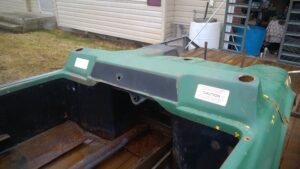
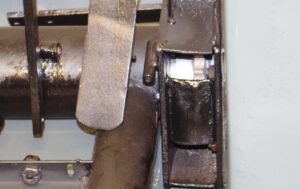
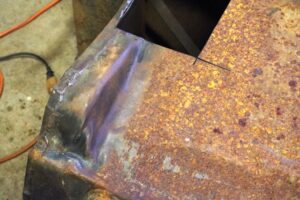
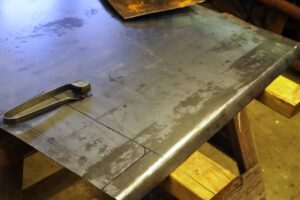
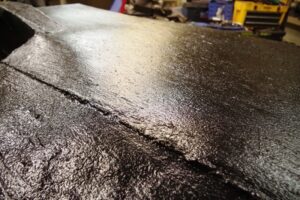
Holes: Yup there are a few..if you want to cross a river or go out on the lake you can not have holes.  This is a steel tub so it’s patchable just like a car body.  And I have two welders !

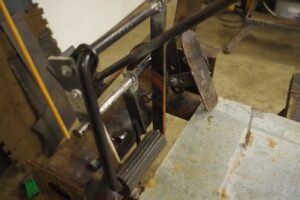
Some play in the steering.. caused by this interesting steering gear.  It shouldn’t be a problem to fix.  Some guys replace this with an auto steering box.   Oh you can sorta see those foot pedals…  real crappy.

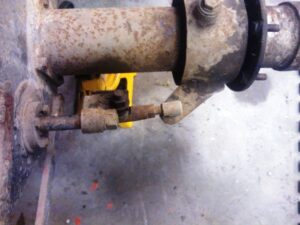
In this photo you can see the little short steering tie rod.  they are worn and so I’ll need new ones from Princess Auto.

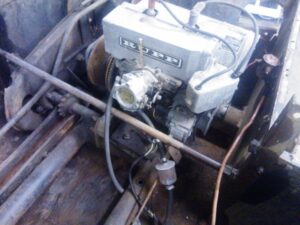
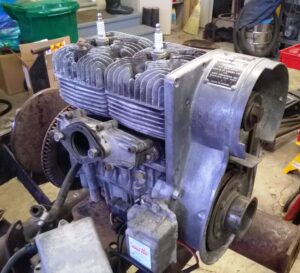
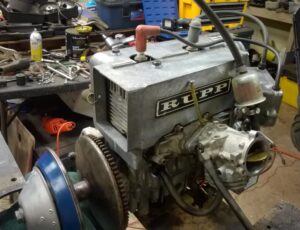
Before I use this motor to anchor my boat.. we will test the compression and look it over good.  It does have a better carb, but it’s a noisy 2 cycle..

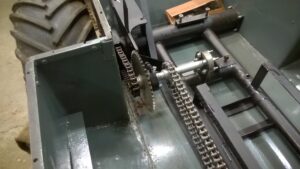
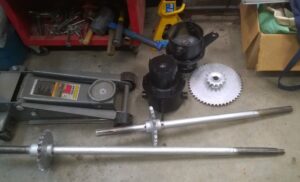
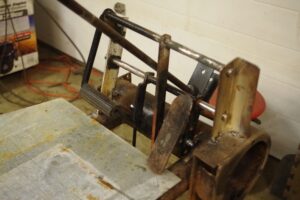
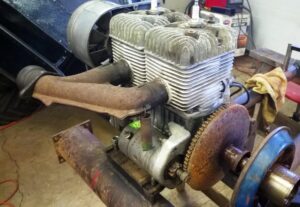
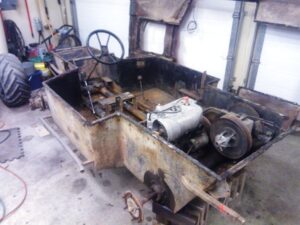
As we carry on taking things apart.. there is lots of rusted and seized stuff.  Like the nuts on the end of the rear axle..  Big wrenches needed here..  Got the motor and transmission  out.. and chains off the sprockets..

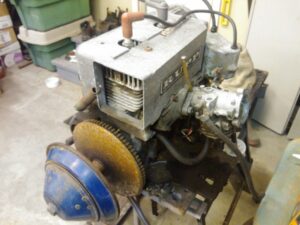
Here’s the motor liberated from the Jet..  Couldn’t resist cranking it over a bit.. Hmm we think it would run fine..

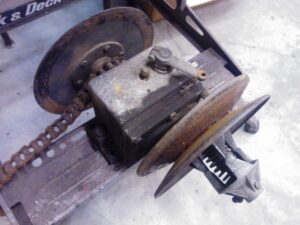
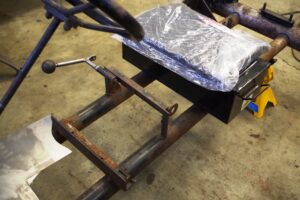
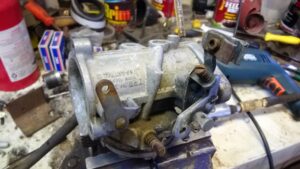
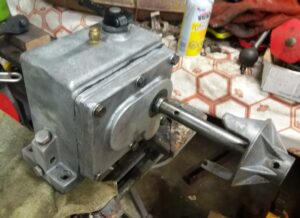
Oh ya… deja-vu  The very same trans that the Bazoo had..  So I know what to do..  sure hope there are no cracks in the body..  But they are built tough so I’m doubting that.    The big disc for the brake is a bit bent..  and it seams too thin.. Maybe I’ll get a thicker one made.

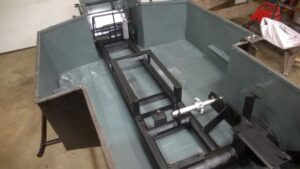
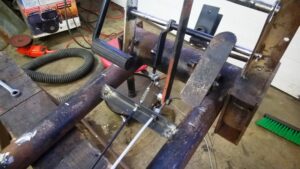
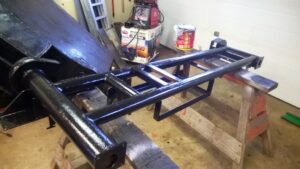
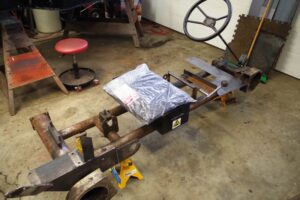
This is where I’m at .. the hubs and axles need to be removed ..then the frame will just lift out..  and boy it’s not easy..

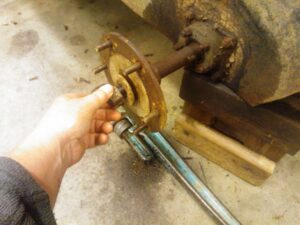
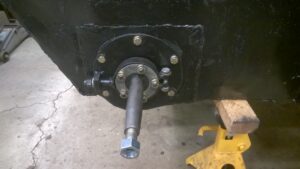
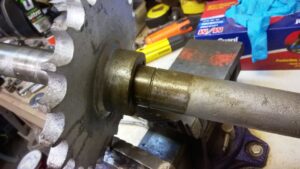
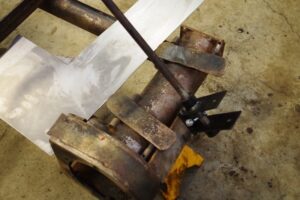
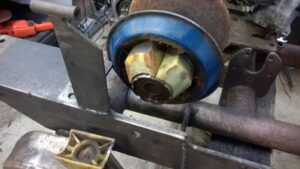
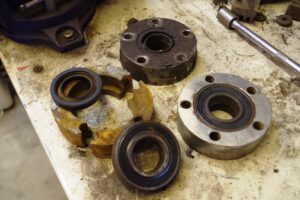
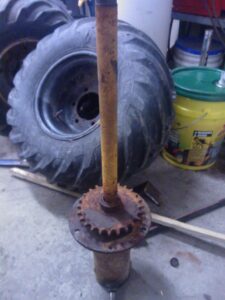
The Left Rear Hub:  These parts are all seized together..  Needed a very large wrench to get this nut off.  And still the hub is stuck..  I guess a torch and a puller is the way.   Once this hub is off and the bearing and seal slid off,  the whole axle pulls out through the right side.  Same with the front axle.. comes out the right side.. because that is the side with the drive sprockets, and larger holes in the tub for pulling them through.

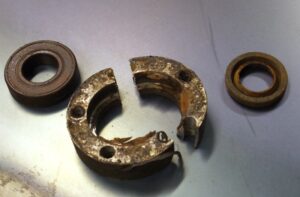
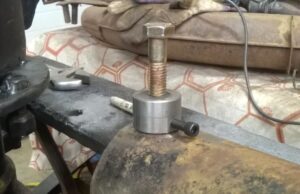
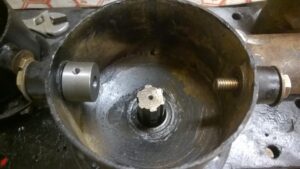
OPPS.. I broke the aluminum bearing cup.  The bolts were so seized in there that while trying to punch them out the casting cracked in half.  This should be a steel part so it won’t react with the steel bolts.  The bearing was toast too..  Ah the start of the parts list.  And I’m shearing bolts off constantly…   Oh well it’s all good fun , and part of restoring something old and rusty.

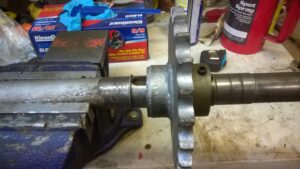
And speaking of rusty !   I did get the front axle out.  That’s good but it still needs to come apart.    The steering came out without too much swearing.. So that’s out of the way.. I only sheared off two bolts for the front hub.. They are in the frame…so once the frame is out I can remove them.

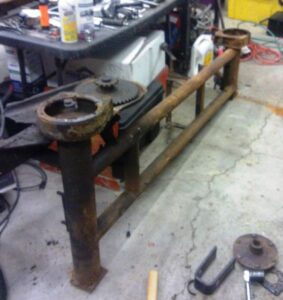
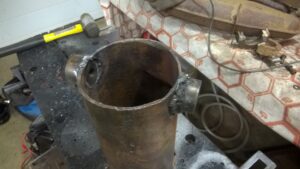
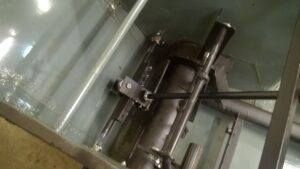
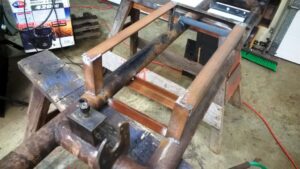
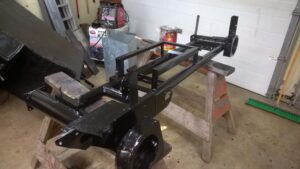
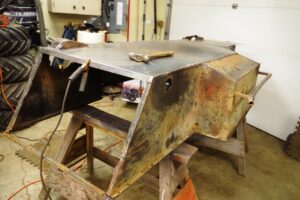
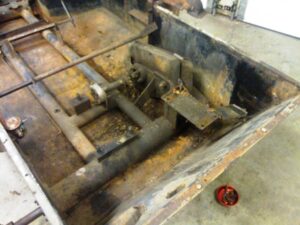
Well after much toiling and foul language..  We got the hub off the rear axle ..  and the frame out of the tub.  Here’s a photo of the frame standing up on it’s left side.  Tomorrow it’s off to get pressure cleaned and de-greased.

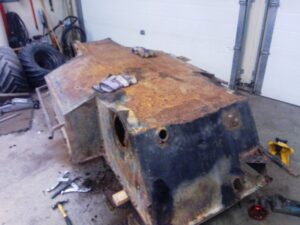
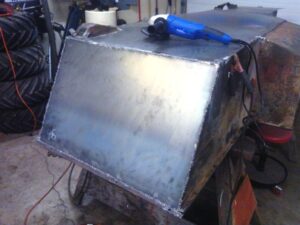
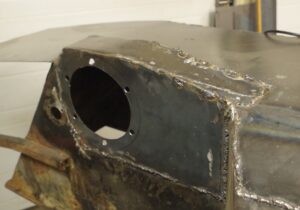
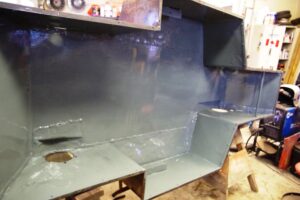
We flipped the tub over to see just how bad things are..  Yup there is a few holes…well lots of holes..   Once it’s clean and I run the sander over the metal I’ll see the bad stuff..

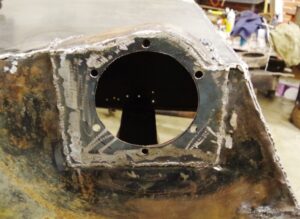
Some is obvious..  Like this hole for the rear axle.  Going to weld in a new piece here for sure.  There has to be a gasket here..so it needs to be good.

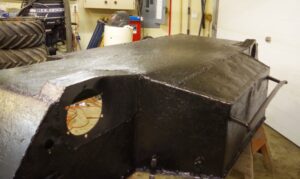
This is a big project..  and will need several pages.  Now that the destruction is done,  it’s time for cleaning and repairing..  on to…

Page Two :