Category Archives: Cars & Trucks

1990 Suzuki Tin Top Page 2

Feb 2016

The Mechanical Stuff:

I’ve ordered a new exhaust system, and a valve cover gasket.  So far.   Tomorrow we do an oil change and a complete inspection.  Who knows what else we find..  I do know there is an oil leak,  but not sure where.  I’ll clean the K & N filter..  turn down the idle, and see what happens.

At The Auto Shop:

Really the only things revealed from the inspection was the front CV axle boots, ( 3 of the 4) and the exhaust header gasket.  Since there is a little play in the CV joints, it’s a better deal to replace the axles as a complete assembly.  So we are doing that tomorrow as well as the gasket.  It’s a big job, so we need all day.  Today we replaced the muffler and tail pipe.  I also changed the oil and filter.  Then we tackled the valve cover.  When we removed it we discovered a broken gasket.  It was leaking oil out both rear corners.  Perhaps 90% of the oil we see all under the motor was from there..  Some other oil may have been coming out the drain plug!  the plastic washer was broken.   After installing a much better looking valve cover I had with a new gasket..  We fired up the motor and turned down the idle.  It ran smooth !  Really smooth.  Why the F**K was the idle so high ?  Who the F**K changed the oil last ? After all that I could not find any other things needing fixing.   We even got the plugs out of the diffs and the transmission.. oil in those is good.

Feb 11 2016:

I went to the shop early.  And while waiting for my help I decided to clean the underside of the Sidekick.. motor, transmission and parts of the frame.  All have oil on them.  Now that it’s clean any leaks should be easy to see.  While cleaning I discovered a loose U-Joint on the front drive shaft.  So I had another sent up.  Dave arrived in time to see me removing the drive shaft.  We pressed out the old and pressed in the new.  Done!  Then set to work on the exhaust gasket..  Took till lunch just for us to do those two things..  But we did get the two axles replaced by the and of the day..   The Suzuki is back in my shop.. mechanically sound … mostly..  I’m sure something else will pop up.

So here we have the motor .. looks much the same except for a better looking valve cover.   Runs way quieter !  And idles like it should.  So what got done?

  • New muffler and tailpipe
  • New front CV axles with boots
  • New valve cover and gasket
  • New U-Joint for the front driveshaft
  • New gasket on the header pipe flange
  • Oil change and filter.

With the known mechanical stuff out of the way..  it’s time to Pimp..  No wait I’ve some holes to fix…. and other stuff.

Feb 12 2016:

Good news (so far) NO oil leaking onto the floor.  NONE.  Lets hope we have all the leaks fixed.   Onward to other things..  The seats have been a real thorn in my plans..  It would really blow the budget to have them redone.  So we came up with a solution.  Since this is the one I’m fixing to flip.. and I’m keeping the Tracker.. then the nice seats from the Tracker will go in the Sidekick..  and these bad seats will get seat covers for now.  I’ve ordered them, and I’ll install them semi permanently.  Now I feel I can make some color & design decisions.  Here’s what is planned for the sidekick:

  • New Red paint job exterior, with black trim.
  • Paint the exposed interior metal semi gloss black.
  • Re-upholster the door panels and rear panels in black.
  • install keyless power locks
  • New stereo and new speakers
  • LED interior lights.
  • LED driving lights
  • Tint the rear quarter windows.
  • Transfer the alloy wheels over from the Tracker.
  • Transfer the front seats over as well.

So all that said.. lets start a new page for the bodywork..

PAGE 3

1990 Suzuki (ZOOK TIN TOP)

Feb 5 2016

It’s the beginning of February….

So.. what the hey.. lets start another project while it’s still yucky outside.

Introduction:

Here below is a photo from the ad.

Folks from down under call this a ZOOK.  A Suzuki Sidekick.  They also refer to this model as a TIN TOP to note the difference from a convertible like the 92.  This version comes in a 2 door or a 4 door.   I went to Vernon and bought this from a guy who does drywall taping.. Which is very evident when you see the interior.  Used as a little work truck.  But it was being used.. not sitting for years or even months.

To be fair I was warned..  I don’t care about messes in cheap vehicles.  And yes . another cheap one.  A little bit more than the 91 Tracker.  BUT I drove this one back home no trailer needed.   So that’s got to be worth a bit more.  I wouldn’t say it runs good.. needs a bit of tweaking.   But gets you where your going.  What I like about this little ZOOK is that the things it needs are the things I’m good at..  and I have most of the parts ! It’s a cosmetic disaster not a mechanical one.  It has less rust than the 91.  And it has all of the body parts..  So a great place to start.  I’m going to do a walk around video tomorrow and talk about the  ZOOK.  And I’ll post that on youtube.  But I’ll still write that stuff in this post too.  Without putting the Zook on a hoist , pulling the wheels… etc..  The mechanical needs are mostly unknown.  But after driving it for 3 hours through two cities and 300 kms of highway.  I can say there is no issues with the clutch or transmission.  The motor is running cool and not puffing smoke.  In fact it has good power, and climbed the hills without slowing.  The steering feels fine , and the brakes are doing the job.  Even the park brake works good.  What is noticeable is the idle is quite high.  And starting from cold the motor stumbles.  The check engine light came on briefly when the stumbling happened, but never again.  Peter will help sort these thing out.  Also the muffler is most likely toast and once again no tail pipe.  My ride home required ear plugs… wish I had some.

The Cosmetic Stuff:

This must be the very base model.  No center consoles, No cigar lighter, no tachometer, and flat ugly door panels.  But the dash is all there, no missing bits.  Love those cup holders,  Totally hillbilly.  but handy for my  Tim’s icecap on the way home.

The inside drivers door handle is broken,  as well as the window regulator.  I have those parts ! YAY.   The seats are way worse than the 91..  So that’s a problem to solve.  The carpet looks rough too..  Seat belts are rough as well..  Again I have extras.  As for the body:  The registration shows a “rebuilt” status.  That means it had an accident bad enough for ICBC to write it off.  On a 26 year old vehicle that wouldn’t take much.  I suspect the front drivers corner was hit.  The fender, grill and headlight are newish. But probably came from a wrecker. And the fender is not fitting proper ( rubbing the door) so it was fixed at home.  Once I pull the bumper cover the truth will be revealed.  Aside from that it’s the normal rust repair for me.   Check out the seats !

Yucky…   These seats are exactly the same as the 91 Tracker.  But oh so wrecked.   The rear seat is ok, just dirty.  This may be pricey to fix these.  I’ll need some quotes from the two upholstery guys in town.  I would like them to have a more black look to match the dash and the door panels.   Which brings me to color choices.   Red came to mind first.  I found a red one on the net that I liked.

Don’t care for those gray panels though.  Good thing  I kept the rubber body trim from the Tracker, I also have the rocker covers at the bottom.  And I like the paint treatment on the bumpers.  This time I might paint the mirrors,  door handles and grill.  But that’s just me running ideas through my head.

Here’s the video introduction link..

After making that video…  I got anxious and I couldn’t resist turning a wrench and spinning a screwdriver.  So I fixed the drivers door.  Replaced the window regulator, and the inside handle.  I also removed the drivers mirror to see why it was hanging off..  It’s broken.  I have another.  Dug through my spare parts bins and pulled out the bits a will need.


I also couldn’t resist taking out the rear carpet.  Expecting to find more rust..  I was pleasantly surprised to find a clean shiny white floor !  First one I’ve seen in a while.  However typically the bottom seat belt bolts are rusted so bad that the metal will fall apart when you try to remove them..  So I will just pull them out and weld new metal plate there.  I need to get the carpet all out soon as I’ve found it to be damp.  I think buddy spilled a lot of water and drywall mud in there.  Or the wet is coming in from the road..  Could mean more holes.

Here’s one more Video.  I plan to do videos more.

Feb 8 2016:    Not much going on today.. so I wandered out to the shop.. and started stripping more stuff out.. seats, carpet, right side door panel, seat belts.  Now I can see the extent of the rusty floors.  Turns out the wet carpet was from me driving it home.. The holes are big and on the passenger side it’s right up where your feet go.. behind the tire getting all the muck.   So four holes to fix in the floor and three in the rear.  Not bad.

Two small patches needed here.

One bigger one up front in the passenger foot well.  This one I did not see coming..  The drivers floor I knew about.   I now need to fix the sliders on the drivers seat and put it back in..  We plan to trailer the Zook over to the auto shop to do the inspection..  While there we will install  a new muffler and tail pipe.

One more video..  then it’s the Mechanical Stuff.

Onward to the next  PAGE 2   the Mechanical Stuff.

1991 GMC Tracker Page 9

Jan 31 2016

Final Page – End of the Project:

Nine pages!  could have been shorter if I want each post page to be longer.  But I don’t like to scroll down so far..  So this last post is a wrap up.. and thoughts on my second Tracker project.  The first being the 1989 Tracker I restored in 2008.  Please note this is the third Tracker I’ve owned.  I had a 1989 back in 2001.  I really like these little 4×4’s.  And I’m not alone ,  They are very popular, and when in good shape command a higher than normal price for a 26 year old vehicle.   Anyway I took this:


Sad, beat up , not running , rusty and un-loved Tracker..  To this:

Happy, bright blue, running, rust free and much loved Tracker.

It took three months of my spare time, and a modest budget to get to this.  I had a lot of help when I needed it from my good friend Dave and my Nephew Peter.   I was able to use Peter’s Auto shop for some of the mechanical work.  And his parts discount for all the parts that had to be purchased.  Otherwise this would not have happened.  I don’t have a hoist or the vast amount of special tools for auto repair.  I do have what it takes to make stuff look good..  I’m by no means a good body guy.. or even a good painter.. but I can do it .  Pimping things is what I do..  I tried to be reasonable with the pimping.. so I kept it to things I had on hand,  Like the LED running lights, and the power locking system.

I would like to do a recap list of what this Tracker is and what’s been done to get there.  I started with a :  1991 GMC Tracker 4×4, auto trans, power steering,  removable hard top, convertible.  First the Mechanical stuff :

  • Used but good motor swapped for non running one.
  • New timing belt
  • New belts
  • New battery
  • New valve cover gasket
  • New front rotors and brakes
  • New front axle boots.
  • New exhaust tail pipe.
  • New rear shocks
  • Used alloy rims installed
  • Service Transmission / flush and filter
  • Run injector cleaning  for 30 min
  • Oil change and filter
  • New spark wires, cap and rotor

Then there’s the stuff that makes it look pretty.  Remember I wrecked out a free 89 Suzuki .  These are the things that it donated:

  • The motor
  • Both doors
  • Hood
  • Tailgate
  • Dash and gauges
  • Steering wheel
  • Tailights
  • Speakers
  • Door switch
  • Heater fan rheostat
  • Front seat frame

And this is the other stuff I spent money on:

  • Used left headlight ( expensive)
  • New winch with remote
  • Repaired upholstery on the front seats
  • New lift cylinders for the rear gate.
  • Newer spare tire
  • New trailer ball
  • Sound deadening foam and rubber
  • Under felt for carpet
  • Lots of paint and undercoating
  • Power keyless locking system
  • USB, clock and power plugs

There was a few things that I had in my shop already.  I had bought them a while back.  Like the LED lights and the bush guard.

Although I’m  now driving the Tracker and consider it done..  There is a few things still that need attention and replacement.  The Anti lock brake sensor on the differential is broken. This causes the brake warning light  to come on.  They are hard to find.. and even harder to remove the old one.. WE TRIED.  The other thing I’ve noticed is the throttle kick down cable for the transmission is frayed.. not broken yet.. but could.   And I would like to service both of the differentials oil, but the plugs are seized bad. The windshield needs replacing as well, but that needs to wait till spring.  These things will be fixed as I get to them.

Conclusion:

The total cost for this Tracker is half of what it would sell for on the market today.  So the temptation to make a profit is there.  But this one and it’s features are on the rare side..  I much prefer the automatic to a standard.  And the power steering makes zipping around town so easy..  and I’m certain that on the back roads I’ll like both those things even more.   The hard top will out last any soft top..  and those are not as cheap anymore because of our low dollar.  Also the hard tops are in demand, and folks are always looking for used ones.  A new hard top is over a thousand bucks.  I would like to make a Tonneau cover  like in this photo below:

Because I don’t care about squeezing 4 people into my Tracker I’m not bothering with the back seat anyway.  Also I like the idea of the sliding rear window..  like a tiny truck !  A mini Avalanche !  Too cool.  Ah but that can come later too..  I’ve ordered a new stereo that is just a AM / FM media player.  No CDs.   It’s also Bluetooth , so this brings the Tracker even more into the times.

If you need to go back to where this all started ..   HERE

1991 GMC Tracker Page 8

Jan 26 2015

Page 8  The final work:  Almost done

Here it is back on the new feet, and all done except the canopy.  We pushed the Tracker forward for room to work on the tiny canopy.

Fixin The Hard Top:

I removed the rear lift gate so It would be easier to fix a few things.


One of those things was the rear window defrost grid.  Both the connectors were broken off..  So I soldered them back..  a little messy but they work good..  And since I went to the trouble to wire this feature back up..  it’s nice to have.  I also repaired two cracks in the plastic where the hinges attach.

Then I needed to have a look at the problems with the top.

Both rear corners have broken pieces that someone fixed with resin… But they cracked again because their resin did not adhere to the plastic ?  I could easily peel the patch off.  Maybe they did not sand and clean good enough.  These corners where the gasket goes is the only part holding the top from flexing.  The mount for the lift cylinders goes here too.  I’m thinking a long curved metal plate would add enough strength to keep the cracks form happening again.  But first I must try to resin and glass them back together.

I could use aluminum and put the plate on the outside to make a sandwich with the lift mounts.   But !  once the repair was cured it was strong..  Not so with the repair on the door..  The way the hinge is mounted wants to crack.  so I had to go back and use fiber cloth to make it stronger.  And adding thickness was a good thing too.  The door was too low.   Here’s a video I just did .. remembered I had a GoPro..

And here’s two “after” pics..

Still a few small details left..  And a day on the hoist servicing the transmission, installing new shocks, repairing the anti lock brake sensor plug and a bit more undercoat.

Jan 28 : Took the Tracker out for a drive with Dave today..  All’s well.   So I made another video after it can back in.

All done for now..  Let’s do a 9th page as a wrap up.. and final thoughts:

   Page 9 The End


1991 GMC Tracker Page 7

Jan 2016

PAGE 7  Putting it all back together:

Everything worked it’s way up to the painting…  Now that’s done.  So time to reassemble the Tracker.  I made sure to let the paint cure for a day or so before messing with it.  Now we need the door handles back.. And some of the other bits..  Oh did I forget to mention that blue is my favorite color !  This is “techno blue” from late 90’s VWs.  The more I look at it the more I really like it.

The Blue & Black color scheme I’ve gone with looks very good. You can start to see that once I put stuff back on.. Like the tail light and spare holder.  And don’t forget that nice handle..  So this almost completes the tailgate.

Once the inner panel was installed..  with the proper push pins that I sourced out of China.. we are done.

Check one thing now off the list.  The weather stripping and door gaskets are done.  The sill covers are on.  And the door switches are in and tested.. Working!  and I bet that’s the first time they worked for a long time.

Jan 12 2016

A bit of a snag.. the carpet … of which I spent a few hours vacuuming.  Still has crap coming out and stinks.  I’m at the point where I need to install the carpet or do exterior stuff.  At one point I thought of buying new carpet.  But it is over $300.  And it’s still has to be cut and fitted.   I’m trying to keep costs down.  So I’m going to pressure wash the carpet and strip all the stinky old padding off the back.  That means I would have to go get some underlay for carpet to replace the padding.. but at least it all would be clean.  Soooo while the carpet dries I’ll turn my attention to the bumpers, grill and the  bush guard.  I can flip back and forth.. and Git R Done.

While I was washing the carpet , I gave the seats a shampoo. Here they are back in the basement drying out.  Notice the seat bolsters are black and the uppers are grey.  We could not match that grey.  So had to use black.  I could not afford to change the backs too, so that’s a compromise.

I removed the front  plastic from the bumper.  And found that the metal was in great shape.

It makes it easier to design and modify the bush guard I have from a big truck to fit the tiny Tracker.   I also want strong steel ears coming off the frame for attaching a tow bar..  or maybe even a plow.  Got to think it over..  In the meantime I painted the rear bumper cover and mounted it back in place.

The back of the Tracker is now finished.  That roll you see is the under felt for the interior. Yet to do is cutting and fitting it into place.

Done !  Got the carpet back in today.  And the dash, center consoles and seats.


Left the horn cover off.. cause I may have to adjust the wheel.

The Bush Guard:

If you look back you will see that whom ever installed the winch just cut away enough of the bumper cover to bolt the winch to the steel part.  That worked ok..   just ok.  I had this bush guard from a full size truck.   Fairly fancy one too.

Way too heavy for the little Tracker though.  So I’ve removed the headlight guards,  trimmed 6 inches out of the middle and shortened the height by 8 inches.  That removed the bottom tube and about half the weight.  Now I have a great flat surface for the new winch. (mounting plate in photo).  Brackets to hold the guard and winch are welded to the bumper.

The bumper is quite strong, so this will work good.  I’ve painted the guard and set it aside.  Also today I set to work welding and fabricating the ears for attachments.

These are 3/4 solid steel , welded to the frame and braced.  I moved the tow hook to the center to free up the end of the left side frame.  And of coarse everything got a satin black paint job.   Time now to cut and fit the bumper cover..

There !  The covers come right up to the bush guard.  looks great.  And as my very special added bonus..  LED running lights. !

Fitted right into the bumper !  These even light up orange with the turn lights.   Cool !  Now for the paint and install.

Jan 24 2016:

Yesterday I painted all the front grill / bumper parts…  Today I got everything installed and the wiring done.

I love it when a plan comes together…  Everything fit and worked out great.  The winch loves it’s new home.. the wires are neatly run .. I couldn’t be more pleased.

The control box is under this plate.. hiding.  There is two wireless remotes for the winch.. all working great.

Time for another page..  most likely the last..  Cause there’s not much left to do.

Page 8

1991 GMC Tracker Page 3

November 24 2015

Page 3  Driving & Tweaking:

Drive … fix … drive …fix…. fix … drive

Well the purpose of driving the Tracker is to find other things “mechanical”  that need fixing.  There’s a few!  It’s interesting to drive something that hasn’t seen the road for an unknown time.  And you don’t get much for what I paid… So it’s expected.   The first thing was the auto trans.. not shifting into the higher gears.  Then that settled down and started to do things properly.  The weather out was cold,  -2 c  and the streets had icy bumps and lumps.  I forgot just how rough the suspension on a Tracker was..  Or maybe some new shocks are needed.  And then the brakes made a lot of noise.. and it felt like something came apart on the left front ?  And the brake light came on, and that shows low fluid..  which I just filled ?  Not wanting to drive much further I was close to Peter’s shop so I parked the Tracker there.. thinking that in a few days I would use the hoist to fix up stuff.  The temperature outside fell to minus 15 c  overnight.  and the Tracker had mostly water with a little antifreeze in the rad.  So I’m freaked out thinking I may have done damage.  not wanting to start it last night we pushed it into the shop to Hopefully thaw out.   Yup it was frozen..

Nov 28 2015:   Driving temporary  halted…

After a night in Peter’s shop I drove the Tracker back to my shop..  Need to fix a few things before more test driving.  Not sure if there is any leaks or damage done to the cooling system.. will find out when I go for another drive.. But first I need to drain the water out of the cooling system.  And pull the left front wheel off to see what’s making all the noise.  Just as I suspected one of the brake pads has broken and is resting at the bottom between the brake rotor and the dust cover.  That means when you use the brakes the brake piston comes way out and hits the rotor.   Not Good!  If I’m taking things apart I might as well install new rotors and pads, grease the bearings and replace the CV boots on the right side axle.  These are all things I have never done.  So learning curve here is a day or so.

Everything is apart and cleaned up.   Not easy when stuff is rusted in place.  Tracker should be happier with all this love..

I took the greasy messed up axle over to Peter’s and brought back a clean re- greased, re- booted axle.  Plus all the new brake parts came..  So it’s time to put things back together.

And we are done..   So it’s nice to have brakes again 🙂 .  Took the Tracker for another drive over to Peter’s and topped up the transmission fluid.  Now it shifts even better.  Also put some premium gas in the tank to add some octane to the stale gas that was in there..  No leaks from the cooling system !  That’s a big relief.  And it runs good..  Still some things to do though..  Now we need to pull the rear wheels and have a look at those brakes.

Thoughts:

It seems I’m building a new Tracker !  And this is just the mechanical stuff.  But this is for me to drive..  So I want it to be reliable and safe.   After that I want it to look good with the body work and new paint.  There are Trackers and Sidekicks out there for sale that perhaps don’t need this much work.  Most of those are standard shifts, and most would still need the body work done.   I believe I have a rare one.  With the auto trans , power steering ( which works great) and the removable hard top.  When I’m done I’ll have a great run-around buggy that can also go explore the back roads..  all using less gas.  Very appealing INDEED.

Fix , Fix , Fix..

Today I took the Tracker over to Peters shop and changed the oil.   And fixed the rattle in the muffler, installed the new tail pipe.  We also inspected the rear brakes and bled them as well.  The rear brakes still have lots left on the shoes.  But that darn brake light is still on.  So there must be something wrong with the switch.  Tracker is totally safe to drive now..   Turns out the wire is broken off the anti lock  speed sensor on the rear axle.  And that’s why the light is on.

Here it is in the shop.. I keep it there cause I want to tinker.. Fixing things like rattles..  loose stuff,  The horn not working… and on.  but now I’m starting to think about making the Tracker look good… I did not drive it as long as I planed to..  but enough to know it’s good to go.

On to Page 4 The Body Work..

1991 GMC Tracker Page 6

Dec 27 2015

Page 6 The Exterior Body Work:

Things are going to get dusty.  As I start to work my way around.  Lots of sanding and filling and grinding.  I started with the rear quarter panels and working my way forward..  Can’t avoid those rocker panels any more..

So I made up my mind to use 3 inch pipe. It works !  Very well .  Once I cut out all the rusty stuff there’s not much left..  Pipe was the answer.  It’s very strong too..  And it will take a lot of abuse.  Any one who goes off road will tell you that stuff you drive over flips up and smacks this part of and 4×4..  Quad or buggy.

I’ve been busy for a few days , and I’m happy that the pipe thing worked so well..  Filling and sanding till it looks good.

Nice transition.. I won’t have to hide this..  And look the holes for the interior light button are there..  Plus I managed to rebuild both buttons so I have it all original.  Need to paint the inner door frames and clean up ALOT.

Alright..  Dave & I got the hood and doors installed. Even adjusted them to close nice.  I also got the seats back from the upholsterer.  They look great.   I spent the day cutting the cardboard to fit over the rear and the sun roof..  getting ready for painting.. Still got a few touch ups so I’ll be a few days.

Or maybe just one.  Jan 7 2016..  And I’m ready for paint

The whole body has been sanded and all the boo boo’s fixed.

Everything is masked off.  Hey that’s a cool way to do a top..  I’ve seen a newer Tracker around with a top like that.   Don’t need a back seat !  Also good is the weather.  It’s warmed up to above freezing.. That means I can vent without sucking in -10 air.

Painting Day:

I thought I’d take a photo between the color and the clear coat.   Other than the color swatch and taking the lid off the can.. This is my first time seeing the color I chose.  Works for me.   As close to my quad as I could get.  It has silver metallic in it .. If it had green metallic it would be a perfect match.

I waited an hour then stripped the masking off.  Never leave the tape on longer than a few days.  All sorts of dents and other imperfections can be seen now that it’s shiny.  Oh well it’s not a show car.  I already spent a lot of time on the body.  So it’s time to put things back together..  I like this part  🙂

Here’s a list of the things I’ve yet to do:

Or need to do..  Let’s see if I get R done..

  • Install the power lock control
  • wire in the two new power plugs
  • Install all the weather stripping
  • Clean the seats
  • Put the carpet and interior back
  • Paint the grill and bumpers
  • Modify the bush guard

There is lots of little details as well..  but that’s the big stuff.

Time to start a new page with all this putting back together..

PAGE 7 HERE

1991 GMC Tracker Page 5

Dec 6 2015

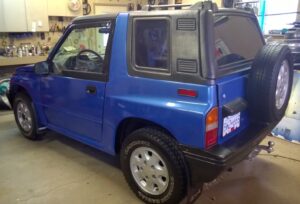
Page 5 : The Body Work  ..  Interior

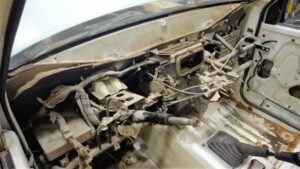
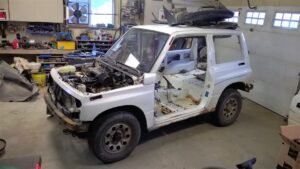
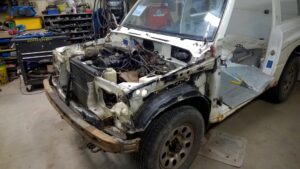
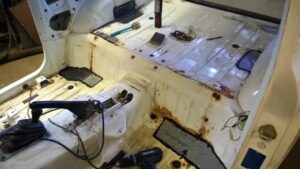
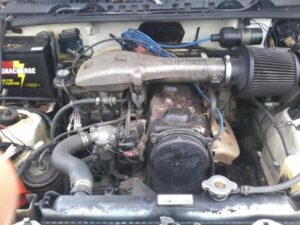
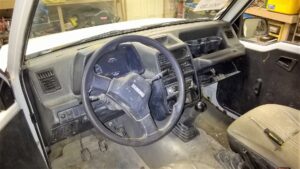
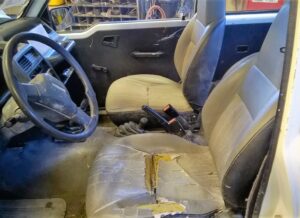
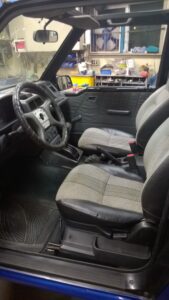
Well as planned I need to remove the dash AGAIN, the seats and carpet.  One of the reasons for not driving the Tracker more was the heater.  The fan was not blowing much air, therefore my defrost was lame at best. It’s winter I need the heater.  It is suspected that the heater core is plugged, and that would not be a surprise given the amount of dust I’ve found.  So out comes the heater..  I’m still deciding how to fix the seats up.  But they will be out and easy to do something with once I’ve made a decision.  I’m really hoping the eight seat bolts come out easily.  Doing the interior will be easier without the doors in the way.. and no top to make it dark.

Dec 9 2015

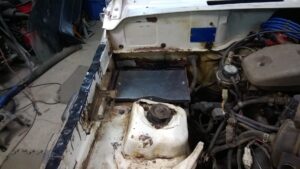
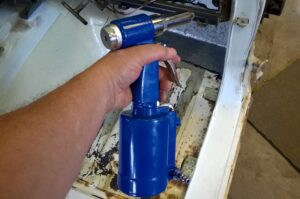
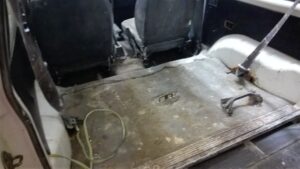
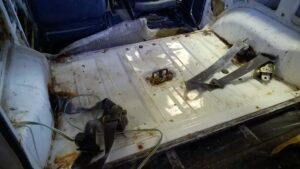
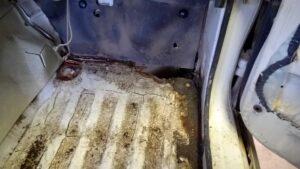
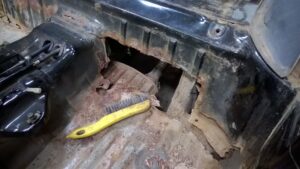
I took just the blower half of the heater out.  That allowed good access to the heater core.  There was crap in there for sure.. So I took the shop vac and the air gun to it and cleaned the crap out.  In fact all the air passages are clean now.  The heater fan blows lots of air through the core now too.  Just like new !   Now for those holes in the floor.  Once the seats and carpet were out we can assess the extent of the patching.

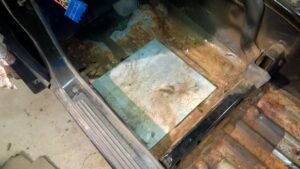
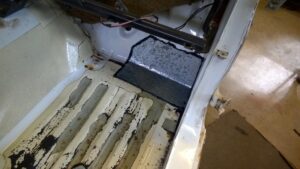
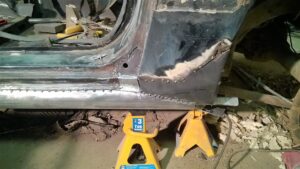
The worst hole is the drivers side . The piece of heavy gauge metal I cut and laid in there earlier is not quite big enough.  I have lots of good new metal to make up the rest.

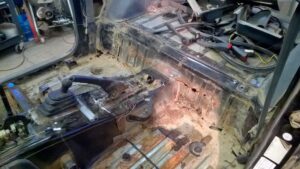
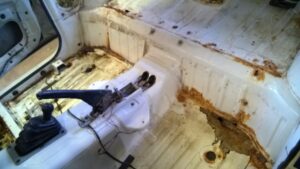
I will have to rebuild these rear foot wells.   This is a bit of structure here..  so welding is a must.  Don’t have to be pretty cause the carpet covers all this.

Dec 10 2015

Here’s the front floor all fixed.  Heavy gauge metal  glued and riveted in.  Very strong fix.   No more wearing out shoes on the road !

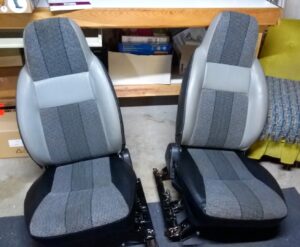
Today I took the two front seats to the upholstery shop.  I decided to have both the seats redone… seats only , not the backs.  I brought the  drivers bottom frame back to my shop.

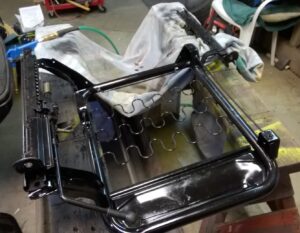
It needed a little fixing.  So I lubed the sliders and gave it a quick paint job.  I’ll take it back tomorrow.

Dec 12 2015

Got a lot done today ..  Despite wanting to just be lazy.

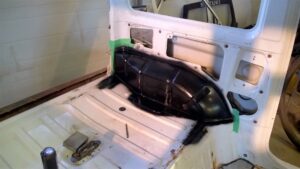
I cut out all the bad rust and made a plan.  One of the eight body mounts is right there not holding much.  So I first made and installed a new floor piece that would cover and weld to the mount.  I glued and screwed the new floor to the existing floor.

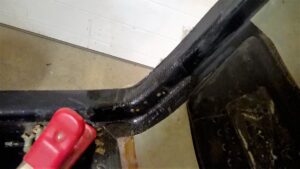
Then I made a new wall that welds to the floor making it all strong again.  Now the body mount is doing something once again.  Holding up the corner of the rear foot well.

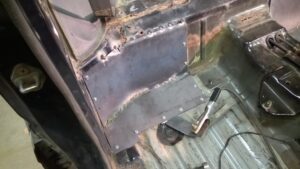
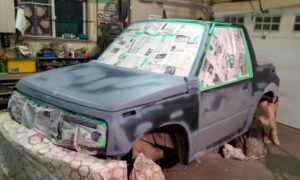
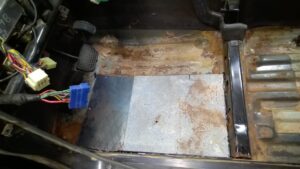
Then I did the same thing on the passenger side.  Just not as extensive.   Now to clean and spray with primer.  That’s all the interior repairs done.  The rest is just cleaning , painting and replacing.  I’m not putting the interior back together till all the body work is done because of the dust..  Some of the exterior body work requires access from the inside as well.  I’ve cleaned out the body cavities of all the mud and dust.  Now I’m turning my attention to the rear of the Tracker.

The Exterior:

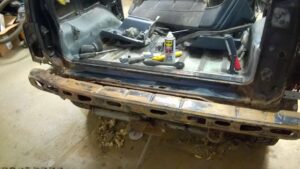
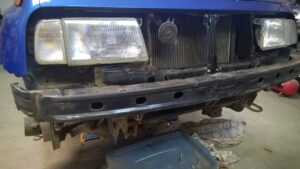
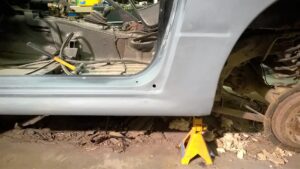
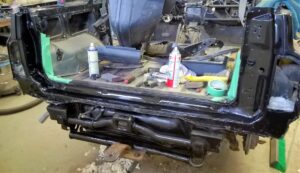
One thing leads to another..  I don’t want to do all this rust repair and leave a rusty bumper hiding under the plastic cover. So I removed the cover and the metal bumper under for a cleaning and paint job.  Also some of the metal is GONE under the tail lights and the lower rear of the fenders.  And there’s holes in the sill under the tailgate.  It’s all hidden under the plastic bumper cover, but I need to treat and paint this so it does not get worse.

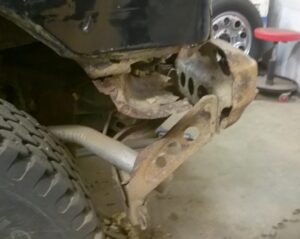
This whole panel is missing on both sides.  I need to replace it cause the bumper is held in place here.  How fortunate that the lower bumper frames on both sides are still intact.  Usually they are the first to rust away.  And other then one side a little bent up, the metal bumper is in good shape.

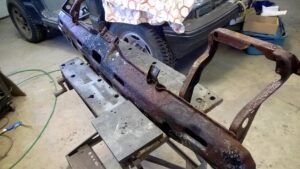
Here it is after an acid wash.  I then took the big wire wheel to it and sprayed it with rust converter.  All painted up and ready to install… But need a good place to install it..  And without the bumper in the way it’s easier for me to fix the missing metal under the tail lights.  I’ve not the tools or the skill to shape metal like the factory.. or even a good body shop.   But I will do my best.  The metal I have is twice the thickness of the body panels, which makes it a bit harder too.

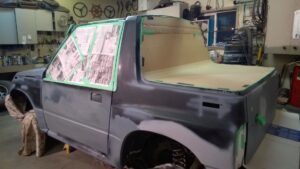
So here’s my new piece.  Welded in place with extra braces.  Then I use expanding foam to fill all behind and give it the proper shape.  And it all gets fiberglassed over with resin and cloth.  It’s not perfect but it’s strong, seals the holes and mostly replaces what was gone.

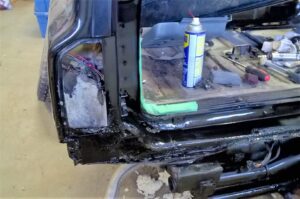
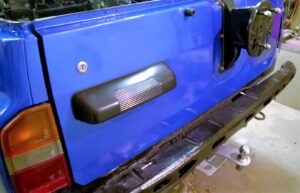
Before the whole bottom of the tail light socket was gone with no place for the screws that hold the light in.  Now I have good mounting and a re-shape of what’s visible above the bumper cover.

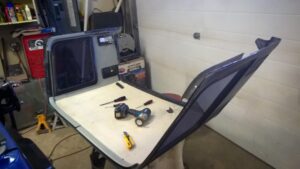
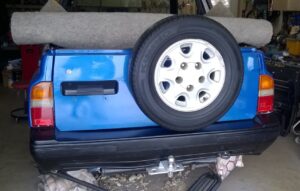
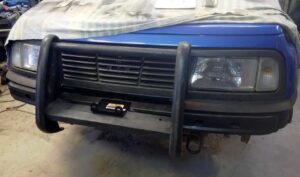
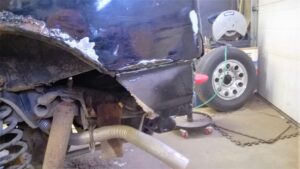
Looks good to me..  I’ll install the metal bumper and the tail gate, but not the cover till after painting.

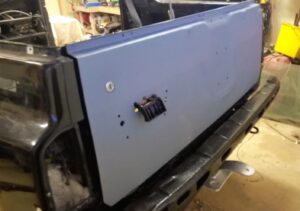
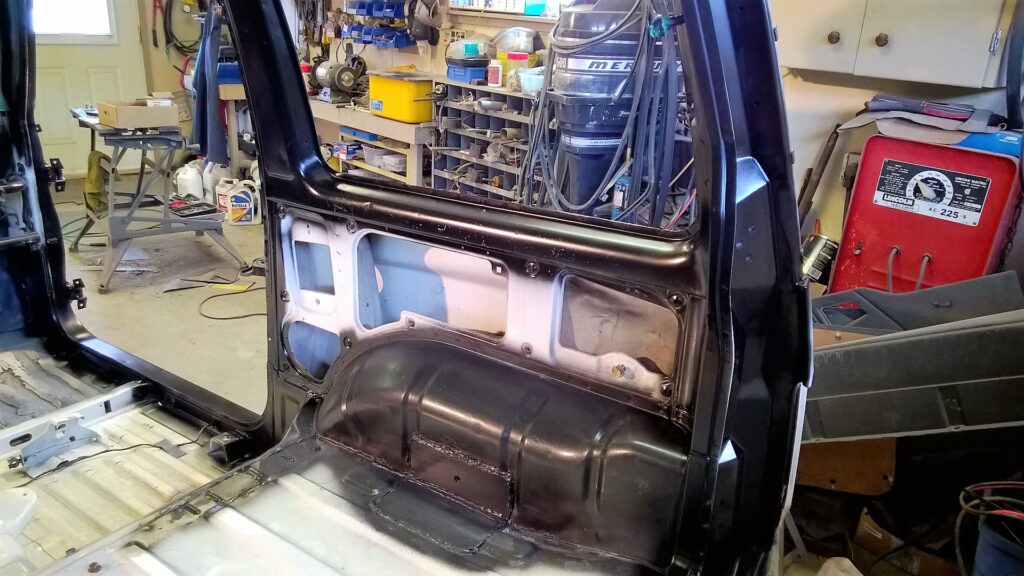
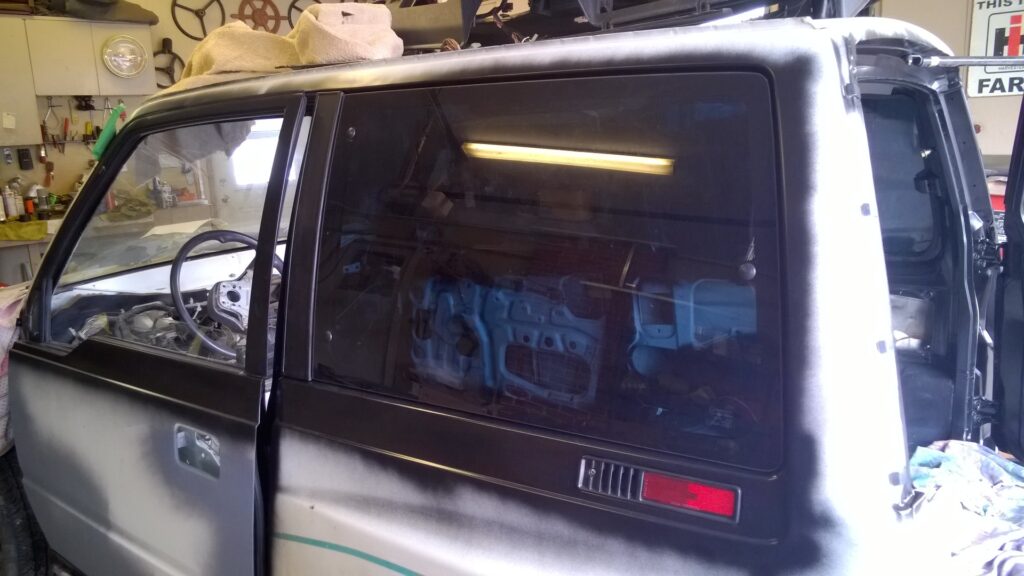
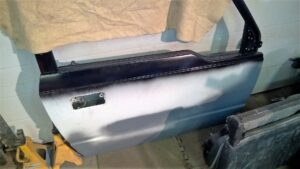
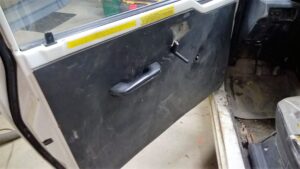
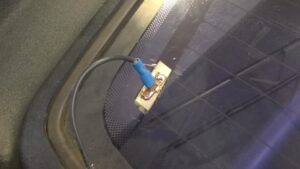
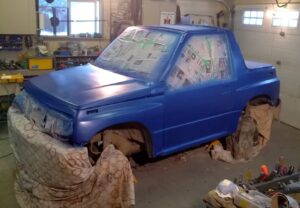
Putting some things back together,  The bumper and the tail gate.  I’m happy with the fit. You don’t have to slam it.  The power lock is installed, and that’s why the key hole and handle is too.   Normally I would leave those two things off till after the painting.  But the hook up required them installed.

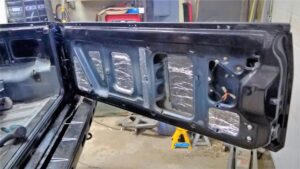
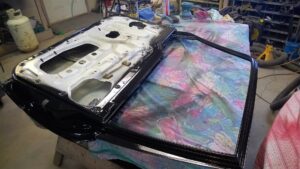
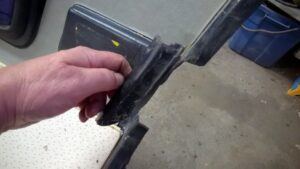
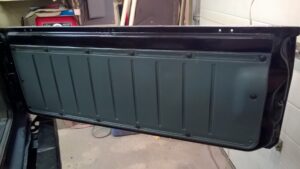
Here’s the inner side with the sound proofing .   I now need to turn my attention to the rocker panels…  moochoo work to do there… So let’s start a new page.

Page 6 Exterior Body Work:

1991 GMC Tracker Page 4

November 30 2015

Page 4  The Body Work:

Well not quite sure when to start this part of the Tracker.  There’s a part of me that is really wanting to get at this..  and there is the little voice that says drive it around a bit more.  But lets talk about the plans anyway.

The Interior…  The top half is perfect..  floor not so good..  so most of the interior says untouched.  On the 89 Tracker (years back) I had to strip the whole interior in order to paint it black.  That was the color scheme ( green & black) and all the metal was white.  Lucky me ! This one is black already.  However the doors I’ll be using are not..  But they will be pre-painted on the bench.  I will have to remove the rear side panels to get at the wiring and install new speakers.  I have repaired the rear floor already, so that’s done.   I will have to remove the dash again to wire in the power locks & remote transmitter.  The seats need to come out, and the carpet too.  There’s a bit of patching to do.  All the center console bits need to come out.  They need to be painted to match the dash..  and the light fixed in the PRNDL.  Also I’m very fortunate to have good carpet with no holes..  So clean it while it’s out and back in it goes.   Thus is the interior plan.

The Exterior is another matter.  The rocker panels on both sides need fixing.. and there is big holes on the drivers side.  This will require some tricky reconstruction.   But I like that challenge.  I’m thinking of pipe for new rockers..  stronger.   As far as removing stuff.. that’s a big list.  I would rather remove than mask around stuff.   The paint scheme is simple , SEMI GLOSS BLACK for the bumpers, grill, door handles, mirrors and around the windows of the doors.

It’s called BLUE FIRE METALLIC.. and I think it’s nice and bright.  And contrasts good with the black.  And clear coat will make it pop.

Can’t wait…   I’m going to get the hood and doors and bring them into the shop.. December looks like a good month for doing body work.

This is the hood from the 89 parts Sidekick..  It’s in very good condition.  Only three dings needed filler..  all the rest ( mostly rock chips) sanded out.  I’m only going to medium sand the hood, and spot prime.  the finishing will be done when it’s on the Tracker.  My real goal right now is to clean and paint the underside BLACK.  But get it ready to install.  Same with the doors.

The inner and outer parts of the hood are glued together !  And the middle had come apart.  So I’m using the urethane body glue to fix that..  Here I have some weight on to hold it.   Once the glue was dry (overnight) I painted the ribs gloss black.  Why so much attention to the hood ?  It’s the largest horizontal surface that’s seen.  And the prep work and paint job here reflects on the whole vehicle.

Those labels will not be covered.  There is good info on them.  I need to find something to glue into the inner panels for sound deadening.  It’s my goal to make the tracker quieter and not so “tin can” like.

I set aside the hood and started on the doors.

This is what I’m faced with.  Glued on trim & chrome door bottoms.  The last of the stink bugs where hiding under the chrome.  And I had a lot of glue to remove..  yuk.

Here’s the two doors.  It’s great that I can work on these parts while still driving the Tracker with its original bits still intact.  It’s also amazing that these parts ( off the 89 Sidekick)  are in such good shape. The rest of the body sure wasn’t.  The filler is just a skim to level out the rusty places.  And some scratches need a bit of help too.  I had to spot weld the bottom of the passenger door where the skin was loose from the inner door.  Both doors got new body caulking along the bottom as well as rust converter spray inside and out.  If you are going to fix it …fix it good.   I’m moving right along..  Got the doors all prepped and painted with the gloss black.

And I want to let them cure for a day or so.  Then it’s time to re- assemble them with the power locks and sound deadening.

Not bad for an amateur body guy..   The doors turned out good..

Dec 5 2015:

This morning I really cleaned up the shop..  The plan was to make more room for the Tracker.  So I can work all around it.   The weather warmed up a bit and It was the perfect time to bring the little guy in.  Got right to work removing the doors, hood and top.  Going to take days just to strip the Tracker down for the work.   First I should transfer the door stuff over to the newly prepared doors.  Then the old doors & hood can go for scrap.

Here I’m building a new door.  you can see the sound deadening.  Makes a huge difference to the feel of the door.  And should help with road noise as well.  It’s self adhesive foil backed foam.  Also the power lock actuator is installed.  The windows are tested as well as the power lock.  Doors are ready to install.

Mix & Match

The parts Sidekick had a dark charcoal color to the interior.  Whereas the Tracker is grey.  So I’m mixing things up a bit ..  little of this ..little of that.  The door pockets are Sidekick.  The panels are the Trackers.

Oh I almost forgot .. the new headlight came, and it’s installed.  Looks better than the right side one !  I also decided not to change the park lights for the Suzuki orange yet.  Those screws holding them in place are hard to get out..

One more thing to do before moving to the inside..  Tailgate Time !

The plan was to keep the Tracker’s black tailgate..  Because this one has a rust hole..  But after having a good look at the black one it’s just a bit worse.  So another part of the Sidekick goes on the Tracker.

Now that’s better .. only the holes that are needed ..  the rest are gone.

And the black paint for the inside and we are done for now.

Time to get going on the interior…

Page 5

1991 GMC Tracker Page 2

November 2015

Page 2  Almost Free Parts:

The project continues…

The 91 is waiting for space at Linde Auto to continue.  While waiting I’m stripping down this 1989 parts Sidekick in my shop. As well as  studying those wiring diagrams so I know what to look at when I resume. My Sister’s friend Rich found this 89 Sidekick in a field in Proctor, BC.  He just wanted the extra wheels for his Tracker. The rest he said I could have.

1989 Parts Sidekick :

Very sad looking indeed.. but the motor was reported to run and was intact.  And even though it looks bad there is lots of good parts.  So It was worth the 2 hour trip to go and bring this one back.  If you consider the other 89 Tracker I rebuilt back in 2008. I traveled further and paid good money for those body parts .  The doors off this 89 are in fairly good shape.  Especially the drivers door.  The passenger door needs a bit of welding on the very bottom edge.  But that’s better than patching a big rust hole.  Both these doors are better than the ones on the 91.  So I put them aside for later.  The same goes for the dash, hood and a few other bits.. way better shape.

At one time this was a fancy little guy.  Wired for towing ..so it was a “Dingy”   Now it’s trashed in too many ways to be put back on the road..  And a thousand stink bugs and a few dozen wasps came along with this little guy .. Everything I took apart I found more.. So I had the shop vac at the ready to suck them up.   All worth it because  it’s donating good parts for Rich & I.   This is a Sidekick so it has the orange turn signals which I like..

These are in perfect condition..  Once I polish them up they will look like new.

Check out the difference between polished and not.

Even bigger difference in the park / turn lights from the front.  They get sand blasted in the winter..

The other important part..  for me.. is the dash..  again the 89 had a much better one,  seen here.  And if you look on the left side I tried some restore treatment  wow just like new.


So another day or so and I’ll be cutting the body off the frame.  I want to keep the rolling frame and see if I can sell that.   So here’s what’s left..

Not much..  The window goes for recycle..  and so does the body metal.  It’s a lot of work when all you got is a cutoff disc and a saws all.  A plasma cutting rig would have made short work of this.

And this is what is left..  and even though the body is rusted away to nothing this frame  is in amazingly good condition.  If only someone made a fiberglass body that would just bolt right on..  I’m very temped to build my own body ..  for now I’ll just hang on to the chassis.

Now that the parts Sidekick is out of the shop..  I decided not to wait for space at Peter’s shop and bring the 91 Tracker home to get it running.

Damned if it doesn’t just fit on Dave’s landscape trailer.   Quite well to..  So I need to really clean out the shop good and we will have room to work on the Tracker.

Welcome to the my shop .. little friend.   Now to look at the reason for not starting..  Both Dave & I checked all the fuses and they are good..  but no power to the relays.  So I decided that the best way would be to completely remove all the wiring for the stupid remote start. And the way to do that is to remove the dash.. I’ve done this a few times , plus I want to check a few things out anyway.   And that steering wheel has to go..    Sooo  while I was pulling those extra wires out I noticed some ground wires we forgot to attach !

Oh No ! could these be the cause of all the grief..  quite likely.  We’ll see once I get the dash back in..  speaking of..

What a dusty mess..  Air hose & shop vac needed for this.   One very promising thing was that none of the screws holding the dash were rusty or stuck..  This I is a good thing about the hard top vs the soft top..  less moisture gets in.  and the interior stays nice.   A while back when I was taking things apart on the 89 parts Sidekick,  I cleaned the dash and all its bits.  So that one is going back in.. was my plan anyway.   One other thing was to compare wiring harnesses to see if things like a tachometer and the rear window defogger switch were exchangeable.  Yes they are.  Both harnesses have the wires.  I’m thinking of using the Sidekicks instrument cluster because it has a tachometer.

The Sidekick on the left .. and the much more modest Tracker on the right .  But the Sidekick ODO has an extra 90 thousand kms !  So need to think this one through.  In the meantime I got to the cleaning of the dash area..  While doing that I noticed a black box attached to the fire wall hiding behind the ECU..  It’s plugged into the main wiring.. and it says Suzuki on it.. ??  oh well must be important..  Can’t find it on the wiring diagrams though.

Mystery Box..   Looks like it belongs.. and it’s not part of the remote start.. so it stays.   Later I found out that this is the anti lock brake control module.  Another bonus I think !

So I’m in the middle of getting the new dash ready to install..   thinking about adding a clock , USB charge ports.. etc..  And Dave shows up and fixes the  unattached ground wires..  says to me “it will run without the dash” ? right ?  Uh ya I think so..   So I turned the key.. and we could hear the fuel pump !  Wow.  Turned the key more and boom she starts right up..

After the smoke cleared ( from oil and cleaning the motor)  I took a quick video..   Needs work on the water pump..  there is a noise coming from there..  and a coolant leak.   But !  We have a running Tracker instead of one you push !   That’s progress.  Now I need to get the dash back in.   But I must do a little pimping to the dash..

And bring the 1991 into the 2015’s   A new 12volt plug,  a digital clock, plus a digital volt meter & 2-USB charge ports on a switch.  That’s all the tech you need these days..  for under $50.

Nov 19 2015 :

The dash is all together and in.. everything works fine..

I now have a Trackerkick.. or is that a Sidetracker ?   We ran the motor a bit today as well..  Trying to find exactly where the coolant leak is..   I still think it’s the water pump gasket.  But the motor runs well..  The lights on the dash go out like they are suppose to..

And it was the water pump gasket. We installed a new off the shelf water pump ( cause it was cheap) and no more leak.   Backed it out of the shop.. and let it run to warm up good..  No problems.  Yahooo   So now to put some stuff together again..

and we start with the grill & the top frame.  Notice the blue ?  that’s a piece saved from the 89. It was in better condition.  So I cleaned and painted the backside.  Still looking for a headlight..

Here’s two of the Suzuki Alloy wheels I horse traded for..  I have five. So the spare will look good without a cover.  The plan is to remount the tires that are on the Tracker onto these rims.  Then we are styling!

The plan here is to get the Tracker road worthy enough to drive it around for a few weeks.  I really want to make sure we have fixed all the mechanical things before any body work is done.  So here’s what I need to do:   1 –  Install a tail pipe so the exhaust is going out the back , not under.   2-  I need to repair a few rust holes in some important places where road crap can get inside.   3-  The tailgate handle needs to be cleaned, painted & installed.   4 – And as soon as it’s on the road..  an oil change and the coolant replaced.

I’m trying something new to deal with the small rust holes.  These are holes that aren’t seen because they are covered or under the hood.  I clean them up and treat them with Naval Jelly.  It converts the rust and after 24 hrs hardens to a paintable surface.  Then I’m going to glue & screw a patch over the hole.  We’ll see what I think when done.

This is the tailgate handle from the 89 parts Sidekick.  Even though the metal bits are rusted, they are still strong.   So I’m using the Naval Jelly treatment on this as well.  And yes it seams to work good..  Why rebuild the black one when this will work.

Here in the back seat area I used the rust jelly..  and then I made patches from Galvanized Steel.  Everything is sealed up with urethane sealer.   Later I will paint this area with box liner epoxy or undercoat..  Later.

This is one of the motor compartment patches.  On the other side is a smaller one.  When the inner wheel well is undercoated I think this will last a long time..   With holes here the tires throw water and mud into the motor compartment.. Not good !   Just about ready for the road.  Time for a new page…

Page Three ( Driving the Tracker)